Showing posts with label How To. Show all posts

Saturday, December 27, 2014

Create a Calendar and Import Events


We are undergoing a change in our district right now. We have been a GAFE district for a number of years, but we are changing our domain. This sounds simple enough, the email address just changes at the end...right? Well...there is a lot more that goes into it. What about all those files in your Drive? You do realize that you can not just share and transfer ownership outside your GAFE domain. Sharing, yes. Transfer ownership...not so much. Also, all those calendars that you can not make others owners of. The list goes on. We have been migrating our @gl.k12.mi.us account to @gulllakecs.org for a few weeks now. Things are slowly showing up, sharing, and reorganizing. Slow and steady wins the race. I will be sharing some Tips and Tricks on this migration for the next couple weeks. This tip will be to show how to export events from your old (gl.k12.mi.us) account, create a new calendar, and import these events.


Create a Calendar and Import Events


Here are the steps to export calendar events from one Google Account and import them to another. You will need access to both accounts to do this.


How to export a calendar:

  1. Open the Calendar in the account you want to export from in your browser.
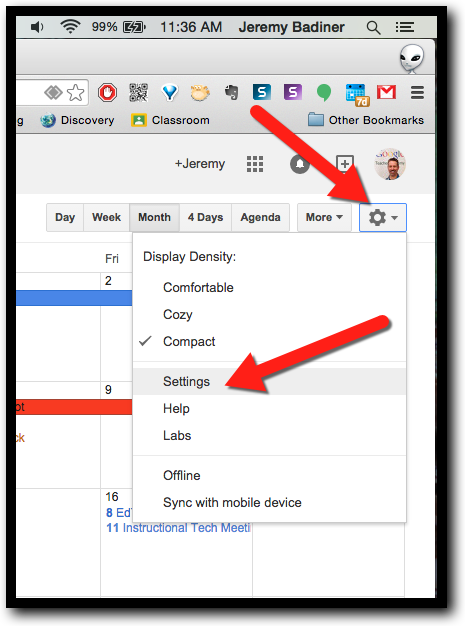
  2. Click on the gear and then “Settings”.
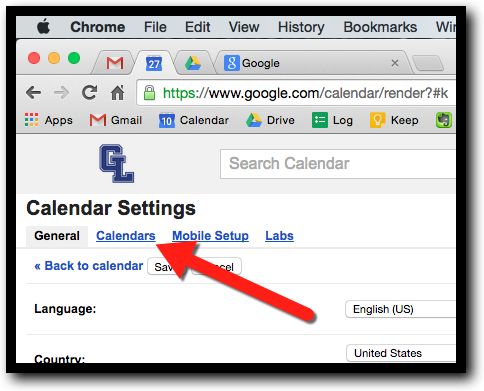
  1. Click on “Calendars”.

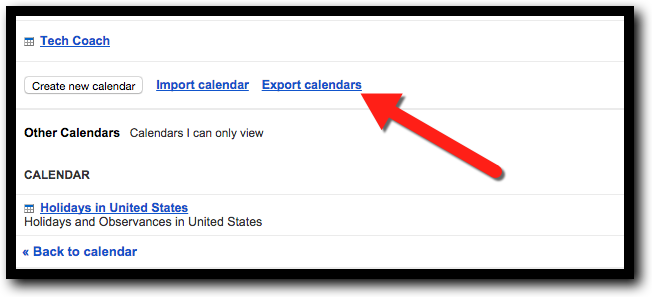
  1. Scroll down and click on “Export Calendar”.
  1. Your exported file will now be on your computer. Remember its location.


How to create a new calendar:

  1. Open the Calendar in the account you want to create a new calendar in with your browser.
  2. Click on the gear and then “Settings”.


  1. Click on “Calendars”.

  1. Scroll down and click on “Create New Calendar”.

  1. Name your calendar and click “Create Calendar”.


How to import the exported events into your new calendar:

  1. Open the Calendar in your account you want the events added in your browser.
  2. Click on the gear and then “Settings”.

  1. Click on “Calendars”.


  1. Scroll down and click on “Import Calendar”.

  1. Choose the exported file from your computer and choose the calendar to import these events into.


  1. Click “Import”.


If you want all these steps in a Document Click Here.

Friday, October 25, 2013

Text and Voice Comments in Google Drive

One of the best attributes of Google Drive is the collaboration that can take place. Sharing and editing of work makes student work even better. This allows new editors to help the author. Within documents in Google Drive there is a great tool for commenting. When allowed, readers (or teachers) can send the author comments about the piece of writing. This can be a note of encouragement, suggestions for improvement, or general comments. From a teacher stand point  this is where we would grab the red pen and scribe to the student on their printed paper. Now, the student sees the comments and can edit/change the actual publication to improve it. This is easy to do with the built in comments feature, but there is also an add-on that kicks it up a notch. Now voice comments can be added. What does this mean? Instead of just typing text in for comments, teachers (or collaborators) can leave voice messages attached to sections of the document! This is incredibly easy and very productive. Check out my video and Google Presentation below and give it a shot!


Saturday, October 5, 2013

Students' Sharing Google Files: The EASY Way!

Google Drive is an absolute must in any classroom. It allows student file storage, is easy to use, and  allows student/teacher collaboration. The only issue I have had in the past is when students don't share a document with me correctly and I do not have access to edit or to view a file. Remembering to type in a long email address or granting proper rights  can be problematic for younger students. There is an easy way to avoid all this. Instead of sharing each file individually, students can create a folder in their Google Drive and share that folder with teachers. Then, any file they drag/create within that folder is automatically shared with those who have access to it, and all rights granted follow all files. Easy! Below is a short video on how to do this. Check it out!


How to create and share folders to share files in Google Drive.

Thursday, September 26, 2013

Adding Audio and QR Codes to Projects using Google Drive

They are everywhere. They're on purchased products, magazine ads, posters, store signs, and even your morning cereal box. Those pesky black speckled squares! Those mysterious QR codes! But what are they really used for? What do you do with them and why are they so important? They are an easy and quick way to access a web link, file, document, or a million other things online. Wouldn't it be great if you could have your smartphone or tablet scan a QR Code and play your students' voice describing a project? You can! Here is an easy way to have students create an audio file and attach it to a project. This can be a writing sample they made, an art project they created, or a poster they designed. Putting a student's voice on their work helps explain details and gives even more ownership to their work...and it is really easy! Here are 7 easy steps to do this. All you need is an audio recording, Google account, and internet access!


7 steps to Adding Audio to Student Projects

  • Step 1: You will need to get an audio recording of the student describing, reading, or retelling their story/project. This can be done with apps for tablets or a computer program like Audacity or Garage Band. Best output is WAV file (plays better with Google Drive).
  • Step 2: Once you have the recording on a computer, the student will need to upload this audio file to their Google Drive. I suggest creating a folder for Audio Files. 
  • Step 3: Share the audio file. I recommend making the file viewable to anyone with the link.
  • Step 4: Copy the link and paste it into a QR code making site. I use http://qrcode.kaywa.com because it is easy and free. This will generate the QR code image. Save this to your desktop.
  • Step 5: Attach this image to your project. You may have to print this out or insert it as an image in your document.
  • Step 7: Sit back and look like a Tech Ninja!


Here is a screencast showing how to do all 7 steps. Watch it and get QR'ing!


Saturday, September 21, 2013

Fall Conference Schedule

Here is a PDF and video to help Gull Lake staff edit last year's Conference Schedule to work for this year. All that needs to be done is to change the dates to match this year's calendar. Below is a link to the PDF for full instructions if you need them.


How to Change the Dates:


Step-By-Step "How-To" Set it All Up

Saturday, September 7, 2013

Parent Email Lists

This Tech Tip will look into creating parent email lists. At Gull Lake we use GroupWise for our main email. Let’s face it, making, editing, and maintaining email group lists is nothing short of difficult, confusing, and often will not work from the web based version of GroupWise. There is an easy, yet short way to do a work-around. Create these parent email lists outside the GroupWise address book.


Parent Email Lists:

If you are like me, you want to send parents updates, newsletters, and other information easily. Parent email groups are great for this, but setting them up can be very time consuming (especially using GroupWise). In order to create email groups in GroupWise you must: 
  1. Open GroupWise and Address Book 
  2. Create a new group 
  3. Manually enter in all your parent contacts 
  4. Attach new contacts to the list 
  5. …and not be using the “online” version that does not seem to like finding your set up groups (this seems to be hit or miss) 
  6. Then delete these at the end of the year and start all over again 


There is, in my opinion, an easier way to do this. All you need is Microsoft Word or Google Drive and a list of all your contacts. The advantage to using Google Drive is that this list will be available wherever you are by logging into your Apps account. For those using Dropbox, Microsoft Word will work the same way.


Here is what to do:
  1. Ask parents to give you their email address. I use Google Forms for this. 
  2. Open up a word processor program (Word, Google Drive, Pages, etc…). 
  3. Make a listing of all those parent contacts in the document (make sure to put a “,” after each contact). I make the first list all parents, then copy that list and make more for parties, newsletters, etc. I just delete from any parents that don’t need to be on that particular list. 
  4. Create a new email message. 
  5. When you are ready to send it to the list of parents, copy the correct list from your document. 
  6. This is important: paste the copied list into the BC (Blind Copy) box. This is important as it hides parent email information for being viewed by others (privacy Issues).

    Monday, August 19, 2013

    Planbook.com: How to add "I Can Statements" to Lessons

    We are using Planbook.com as our lesson plan book in our K-5 classrooms. Overall, the teaching staff seems very pleased with this decision (especially with changes that are required with transparency of CCSS within all lesson plans in Michigan. Planbook.com has many advantages over a paper plan book. 

    • It is accessible anywhere there is internet connection
    • Administrators have direct access to plans (no emailing to find good observation times)
    • No need to print sub plans as there is a link for subs to view
    • Common Core State Standards are easily attached to every lesson
    • and...adding "I Can Statements" is pretty easy

    Below is a quick video of how to create (yep, you do need to type them all in once) a list of your I Can Statements aligned with the CCSS.


    Thursday, July 25, 2013

    Printing on Post-Its

    Here is the answer to every teachers' prayers. We all use Post-its. They are everywhere in or lives: on our desk, computer monitor, books, lesson plans, stacks of papers to grade, dash of our car...everywhere! I know if you are like me you get tired of writing the same thing on Post-its you use all the time. Wouldn't be nice if they come pre-printed with what you wanted on them? Sure, you can go to Vistaprint or other companies and get a set made, but that is time and money. Here is the easy solution. Print them yourself! Download the templates below, rip into a stack of Post-its, stick them on the paper in the square, open the doc on your computer, and type away! Really...why didn't I think of this years ago. It took stumbling on it on the internet to see how easy it can be!

    Ideas for printing:
    1. Common notes to kids that require just a small edit
    2. Notes for student work (scores, writing prompts, edit ideas...)
    3. Lesson plan changes/ideas
    4. Student names to put on project, supplies, etc
    5. Group names for class groups
    6. Normal format note you write often to yourself or others
    7. Anything you write often. Just leave parts blank to fill in if needed.


    Download these templates and get creating!

    3 X 3 Post It Template

    2 X 1.5 Post It Template

    Saturday, July 20, 2013

    I Can Statements in Planbook.com

    Our district is using Planbook.com for lesson plans district wide K-5. This is a great program. I have created a quick "How To" on adding "I Can Statements" into your lessons. You will need to do this for each subject. You will see in the video that I had a document with the Math Standards already typed up. You will have to either find them (district created) or Google them.