Friday, May 27, 2022

Using Chrome Tab Search

Are you one of those out there that has a million tabs open in your Chrome browser right now? (You don’t need to raise your hand, you know who you are.) Maybe you have so many that all you can see is the favicon (image in tab) on your tab. Then you spend too much time clicking all those similar YouTube tabs trying to find “just the right one”. Well, there is an easier (and more time-saving) way to find the correct tab. Use the Tab Search built right into Chrome.


Search Open Tabs:

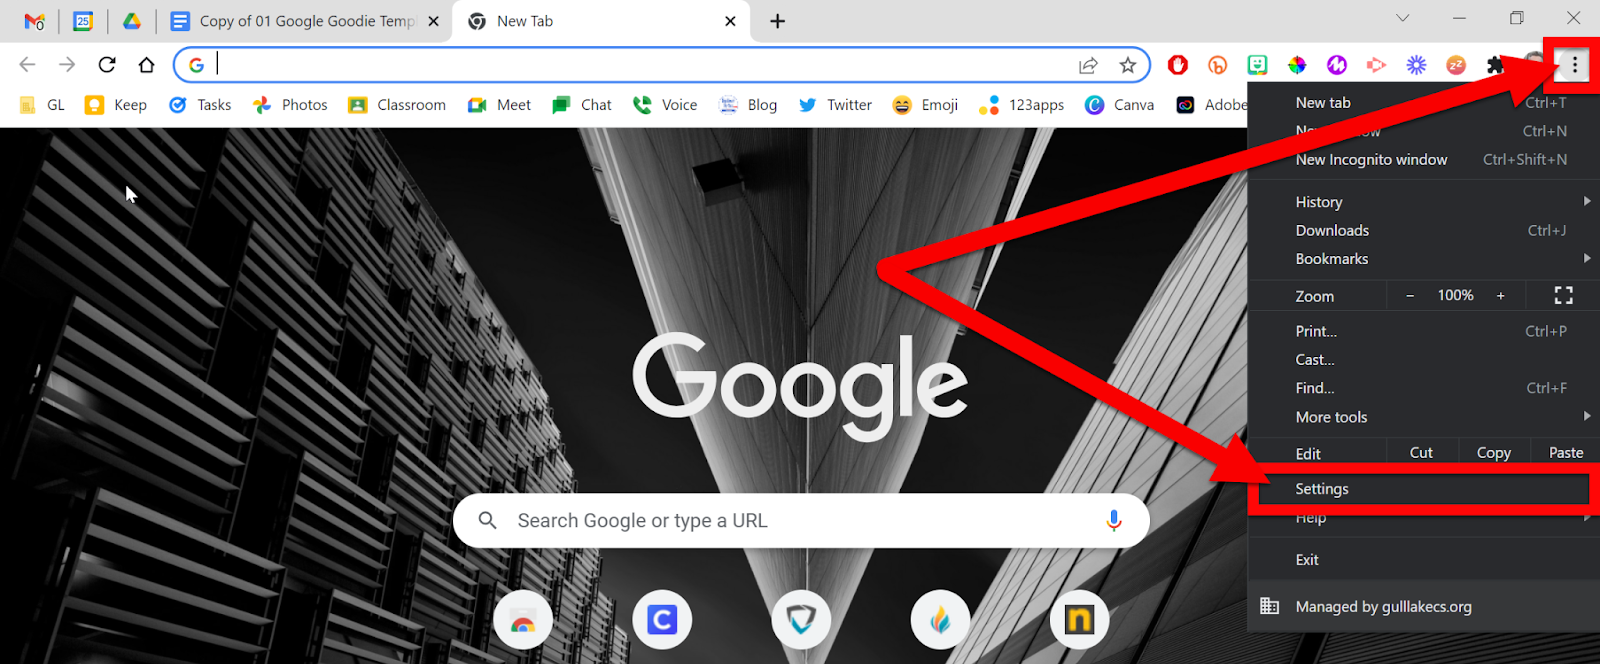
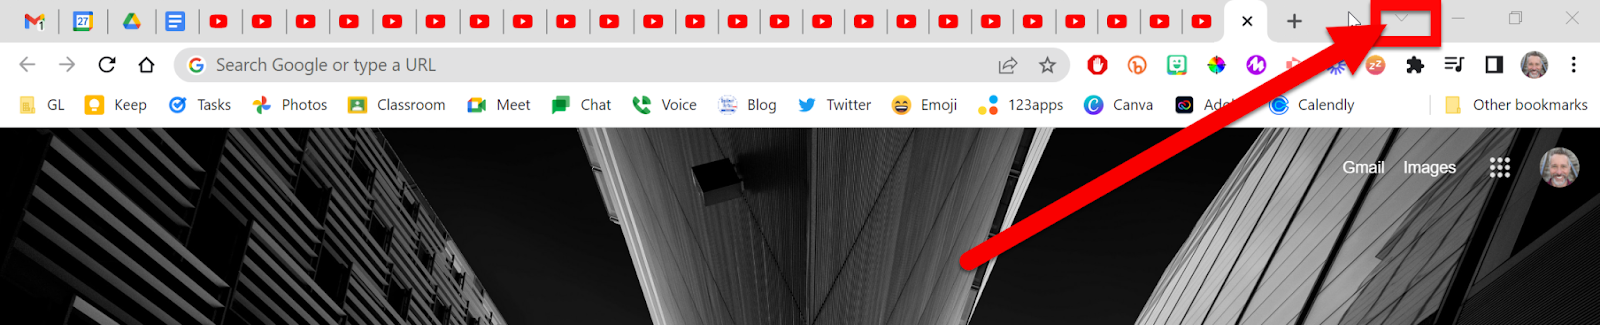
  1. Look to the far right at the top of Chrome. You will see a dropdown arrow that looks like this: “V”. Click that.


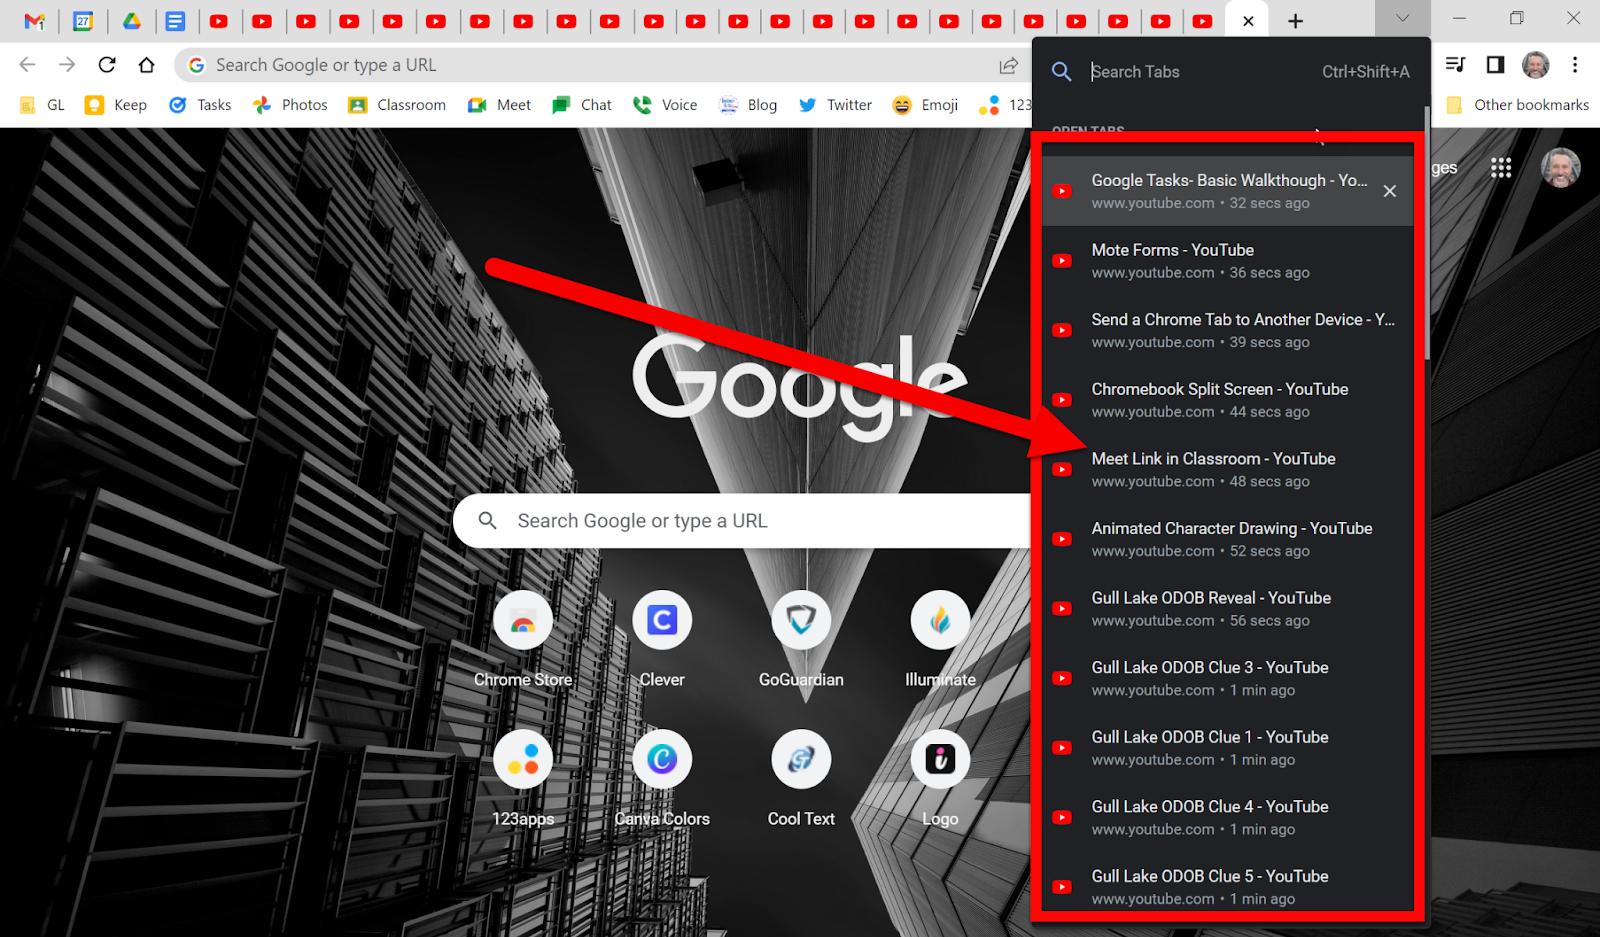
  1. The top section shows a listing of tabs that are currently open. Scroll until you see the one you need to open and click on it.


Open a Recently Closed Tab:

  1. The best way to do this is to use the keyboard shortcut “Control+Shift+T”.

  2. If there have been a LOT of closed tabs click the down arrow that looks like this: “V”. 


  1. The top section shows a listing of tabs that are currently open. Scroll until you see the “Recently Closed” section.


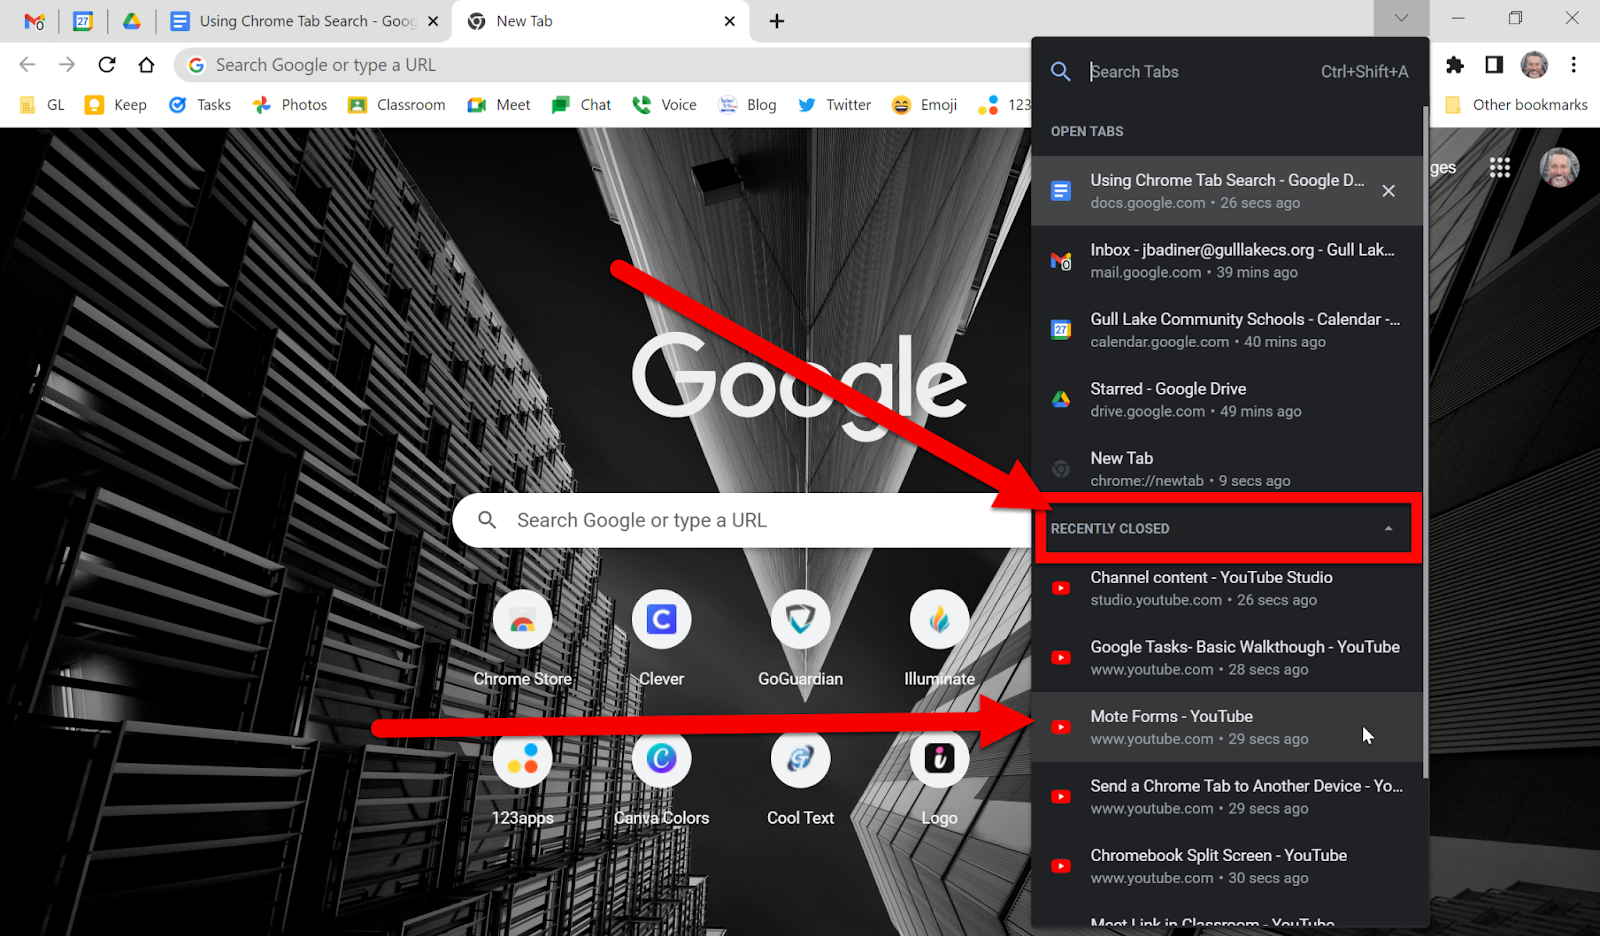
  1. Scroll until you find the tab you wish to bring back. You might not find your tab as our district blocks the storing of “Browsing History” but this will work for the current browsing session and not many days back. 


Now you can easily find the tab you are looking for. 


*Note: Every tab you have open does take system resources. The few tabs, the quicker your device will run.


If you want these directions in a Document click HERE!


Wednesday, May 25, 2022

Set Chrome to Continue Where You Left Off

Have you ever had many tabs open in Chrome and accidentally closed Chrome or shut down your device to discover you lost all those tabs you worked so hard to open? There is an easy setting that will make Chrome open all the tabs you had the next time it starts up. Follow these steps to never lose those tabs again! Also, give "Pinning Tabs" a shot as well!

*Note: If you do these settings on your PC/Mac, they will transfer to your Chromebook.


Set Chrome to Bring Back Tabs (PC/Mac):

  1. Head over to your Chrome settings. On a PC or Mac (this setting is not available to adjust on a Chromebook) click the 3 vertical dots in the top right and click “Settings”.


  1. On the left side click on “On Startup”.


  1. Select “Continue where you left off”.


All the PC/Mac Steps Here:


Set Chrome to Bring Back Tabs (Chromebook):

  1. Click on the clock and then the Settings gear.


  1. Click “Security and Privacy”.


  1. Click “Manage your apps”.

  1. Choose “Chrome”.


  1. Click “More Settings and Permission”.


  1. This will bring up a new tab in Chrome. You can also type chrome://settings/onStartup and get here to avoid all the steps before. 


  1. Click “On Startup” and choose the setting you want.


All the Chromebook Steps Here:


Chromebook Video Walkthrough Here:

https://youtu.be/Cw5aOaj33wk


Now when you shut down your device and restart Chrome, all the tabs you were working on will reopen!


If you want these directions in a Document click HERE!


Tuesday, May 24, 2022

Using the Google Pronunciation Tool

Have you ever wondered if you're saying those words right? The good news is that Google has you covered. There's a Google pronunciation tool that you can easily use to make sure that you are saying words correctly. Check out the directions below to see how to do this.


Using the Google Pronunciation Tool:

  1. Open a new tab in Chrome.

  2. Type into the search bar or address bar the word you want to know how to say followed by the word “Pronunciation”. (Ex: Worcestershire pronunciation)


  1. You will see the interactive tools to use:

  1. Phonetic Spelling

  2. Play so you can hear the audio

  3. Slow down playback

  4. Mouth visualization while the word is spoken

  5. Practice by using your Mic to see if you are pronouncing the word correctly


Check out this video to see how this all works: youtu.be/yJ8qtph5Ehw 


If you want these directions in a Document click HERE!


Thursday, May 19, 2022

Use Google Meet within a Doc, Slide, or Sheet

If the past few years have taught us anything it is that we can do almost anything with Google Meet (or Zoom). Connecting and collaborating remotely has become the new norm. Google has launched an even easier way to collaborate within a Document, Slide, or Sheet. You can now create or join a Google Meet without leaving your Document! Check it out.


Access Meet within a Doc, Slide, or Sheet:

  1. Open a Document, Slide, or Sheet.

  2. Look at the top right corner for the Google Meet icon. Click on that icon.


  1. If you want to create a meeting click on “Start new meeting”. 


  • You will get a link to share. Share this out with anyone you want in the meeting.


  • If you want them in the same Document, Slide, or Sheet you can copy the code (the last characters after the …com/ in the address) so they can enter them as their join code. This will allow them to see the Document, Slide, or Sheet without having to “Present” the tab. You can still present, but there might not be a need. You can then all edit at the same time as well.


  1. If you want to join an existing meeting click “Use a meeting code”.


  • Enter in the code you were given by the person who started the meeting. This will allow you to have the Document, Slide, or Sheet open and see other participants on the screen without having to share the screen.


  1. You will see other participants on the far right. There are options, like a regular Meet, that you can adjust as well.


  1. End (or leave) the meeting when you want as you would a regular Meet.


The benefits of running a Meet from a Document, Slide, or Sheet is that you can all edit the document and collaborate while seeing and hearing each other without the indeed to “present” and take over the screen. Having the small video feed on the right and the live Document front and center is perfect for live creation, editing, and collaboration!


If you want these directions in a Document click HERE!


Google Documents Dropdown Menu

Google updated their Smart Chips (my how-to here) to include a great new feature, Dropdown Menus. These are pretty awesome, especially because you can customize them to work best for you! Check out the steps below to see how to start creating your own Dropdown Menus.


Access Smart Dropdown Menu in Smart Chips:

  1. Open a Google Document.

  2. Place your cursor where you want the Dropdown Menu located (I use tables for this the most, but it can be done in line with text or anywhere you want).

  3. Type the “@” symbol and start typing “Dropdown”. Select “Dropdown” in the popup.


  1. Select “New Dropdown” or choose one of the Presets (or one that you made if you already created one in this Document).


  1. You can select to create a new Dropdown Menu or use a Preset.


Access Smart Dropdown Menu from “Insert”:

This option is also available in the “Insert” section of Docs, Slides, and Sheets. 

  1. Click on “Insert” and choose “Dropdown”.


Customize Dropdown Menu:

  1. After selecting “New Dropdown” name your list.


  1. Add the description for each option/category.


  1. Add colors if desired. This gives you the ability to quickly see progress or choices selected.


  1. Delete categories by clicking the Delete icon, or add more by clicking “New Option”.


  1. Click Save when done. 

Just a note: this Dropdown Menu will be available on this Document as a created Dropdown, but it will not be available on other Documents.


Using Dropdown Menu:

  1. Use these as clickable status icons in your document to choose the options you set.


Uses for Dropdown Menu:

  • Project Status/Review Status

  • Fill in the blank assignments

  • Form style fill-ins

  • Checklists

  • Evaluation documents

  • Anything where you want to select items from a list

  • …and many more uses!


If you want these directions in a Document click HERE!

Wednesday, May 18, 2022

VR Rooms with VRroom

The ability to meet virtually is an opportunity that has become a new standard. Usually, it is with tools like Zoom or Google Meet. There are other tools that serve as more of a chat room and do not require a login. VRroom is one of these tools. The cool thing is that this tool is very customizable, easy to use, and FREE. 


Set Up a Room:

  1. Head over to www.vr-room.com.

  2. Click on “Sign In” at the top right.


  1. Choose Sign In with Google.


  1. Choose a room background from the left. The creator of the room can change this at any time, even during the “meeting”. Others that join can not change their background.


  1. Click on “Load Room” to get started.


  1. Click on “Join Room”.


  1. Click on the share icon at the top to get the link to share with others. You will get a QR code and a link (auto copied).


  1. Share the copied link with those you wish to invite or display the QR Code.


*There is background noise set in some rooms that can be distracting. There seems to be no way to turn this off. Keep this in mind when choosing a room. You might want to check out which room works best for your needs.


Interacting in the Room:

  1. To move around:

    • Use the Arrow Keys (↑,→,↓,←)

    • Use W, A, S, D

    • Q and E rotate 45 degrees 

  2. Click (and hold) and drag your mouse to look around.

  3. Turn on/off your mic or take pictures (auto-downloaded to your device).


Change Avatar and Name:

  1. Each background has places to change your Avatars. All you need to do is walk through the floating image and you will become that Avatar. Some rooms have very customized Avatars to change to while some just have colors. The Avatar will remain with you even in the next room you join (when signed in with Google).


  1. To change your name click on the “People” icon.


  1. Click on your name on the list.


  1. Change your displayed name and click “Accept”. 


  • There will be a random name created when you first join. Once you change your name the new one will show up each time you join a room.

  • Caution with students. This will allow anonymous naming. You will want to make sure they use something you and other students can identify to reduce inappropriate behavior. 


Room Uses:

  1. These could be planning rooms to meet when you can not be in person with students.

  2. Voting. Have students move to spots in the room by what a choice. “Move to the triangle for a game, square for a snack, or circle to have extra recess.


  1. Just a fun activity to explore and have FUN!


Keep in mind that appropriate behavior is an expectation. I recommend everyone having to set their name to their actual name so there will be fewer issues! Anonymity can lead to more behavior issues.


If you want these directions in a Document click HERE!