Wednesday, November 18, 2020

Insert Image from Search

We all insert images from Google Searches into our emails and files (Docs, Slides, Drawings, etc). Most of us do this by downloading the image and then inserting it into the desired place. There is an easier way that does not involve downloading the image. Check out these steps to see how! 

  • Important: Make sure to only use copyright-free images and not just a basic Google search for images that you put in Docs, Slides, and Drawings. Remember, if you are in one of those tools and use the “Insert” option at the top they are already copyright-free. That is the best method.


Insert an Image:

  1. Have your email or Document open on one tab.

  2. Open another tab to do your Google image search.

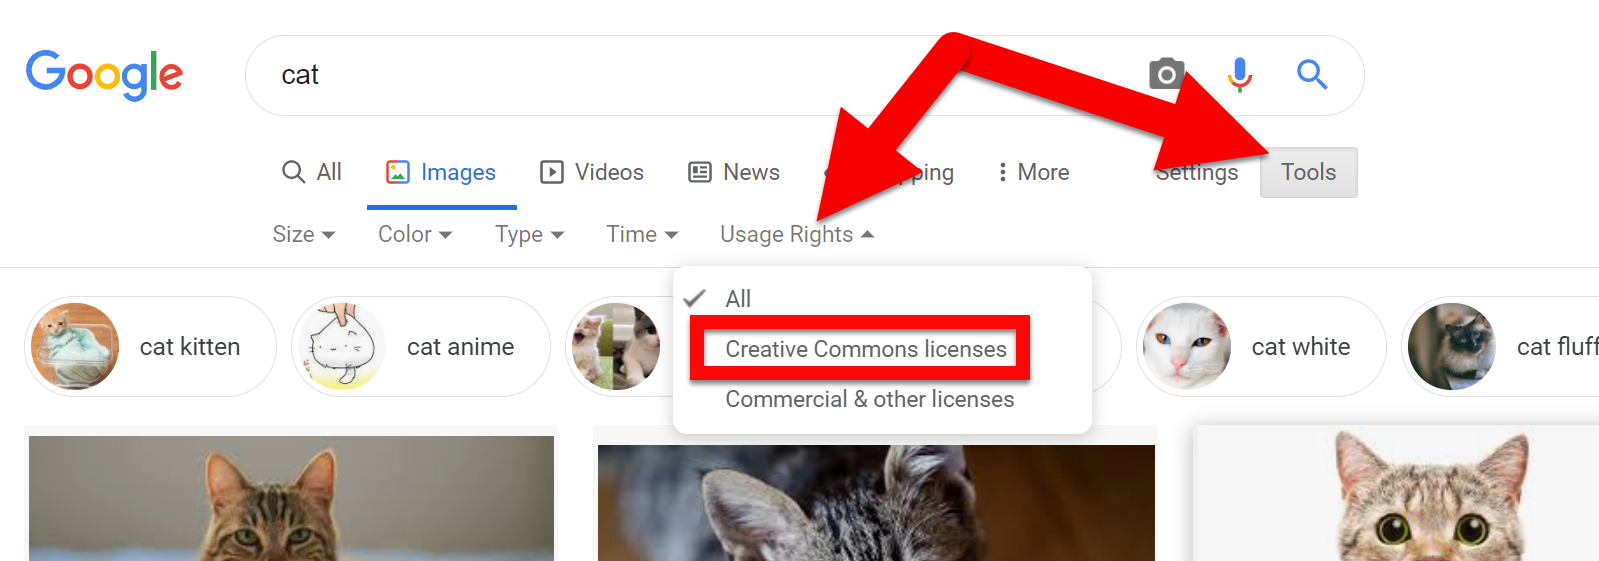
    • Always look for copyright-free images using “Tools”, “Usage Rights”, and choose “Creative Commons”.


  1. Click on the image you want to use. It will then appear in the top right.


  1. Drag that image to the tab that you want to attach it. Drop it in your email or Doc.


Below are examples of how to do it in Email and Docs.


Email:


Document:


If you want these directions in a Document click HERE!


Tuesday, November 17, 2020

Remove Unused Google Meet Extensions & Using Meet’s Built-In Grid View

Ok...the days of needing any of the Google Meet Grid View extensions are over. This is now built into Google Meet. What does that mean for many of you? You need to remove all those Grid View extensions as they are fighting each other, causing issues, using a TON of Chromebook/PC resources, and slowing down your device. The more extensions you have, the more resources are used all the time and the slower your device.


One Way to Remove Extensions:

  1. Click on the Puzzle Piece in the top right of Chrome.

  2. Click the 3 dots to the right of the extension you are no longer using.

  3. Click on "Remove from Chrome..."

8574FDE8-246C-4205-8685-F0CDE0D0DA08.GIF


You should do this for any extension you are no longer using, not just Meet Grid View. Now is a great time to remove all those extensions you forgot you installed. The ones that you cannot remove are pushed by the District.


How to use the Built-In Grid View in Meet:

  1. Click the 3 dots in the bottom right corner.

  2. Click on "Change Layout".

  3. Choose "Tiled".

  4. Slide the slider at the bottom to the right.

Meet Grid View.gif


You will have to do this each time you start a meeting. Unfortunately, there is no saving this to default.


See all Participants in Meet While Presenting:

The only issue is when you are presenting you get that box that says "You are Presenting" (like we really need to be told?). This is usually the issue for those using 2 monitors (if you only use one you only see the screen you are sharing and not any participants).

  • If you take that screen with the "You are Presenting" showing and hold Control and tap the -  button then the "You are Presenting" box will shrink. All your kids will show up (the more you tap the - button the smaller that box gets and the more kiddos you can see). 

  • When you want to go back to normal you can hold Control and tap the + button. Not perfect, but gets the job done.


If you want these directions in a Document click HERE!


The Powerful Whiteboard.chat

There are many whiteboard apps and tools out there. Many need subscriptions to do much. Whiteboard.chat is different. It has many tools and add ons, and is 100% free for teachers! It has the options for multiple pages, connections for up to 100 people, collaboration, save to PDF feature, video calling, teacher view (see all student work in live time), uploading backgrounds and PDF, and so much more! Oh, did I mention that it is 100% FREE! Whiteboard.chat is a Free, full-featured, and powerful whiteboard tool. There is more to it than most will ever need, but enough to make it your “go-to” whiteboard tool. It even has an option to limit what is available to students (this helps with our young learners). Check it out and play around with it!


  • This is just a basic “Get Started” doc. There is so much to this tool that it would take many docs and videos to share them all. The Whiteboard.chat team does a great job on their YouTub channel with all their YouTube Videos.


Create a Whiteboard:

  1. Head to Whiteboard.chat.

  2. Click “Start Drawing”.


  1. Choose what you wish to do (Teach, Collaborate, or manage boards).


  1. Click the 3 lines in the top left corner to see tool labels.


  1. The “Tools” option has many helpful tools.


  1. You can upload an image or PDF as the background for students to draw or write on. This is a great way to create “fillable” activities.


Share a Whiteboard:

  1. Click on the “Invite” button in the top right. Then share either the QR Code, Classroom Code, or the URL with your students.


  1. When they join twitch the QR Code or the URL they will be directly in your Whiteboard (nothing more to do to join). If they use the Classroom Code they will need to enter that code in the code box. All will be asked to enter in their name. 


  1. If you want them to be signed in (I recommend) have them click the Gear in the top right and then your sign-in method (sign in with Google).


  1. Each student will be assigned a different color. They can change this if they wish (bottom right).

  2. Anything you draw or add to your Whiteboard will be added to their Whiteboard in real-time. 


See Student Work:

  1. Here is where Whiteboard.chat gets COOL! You can see their work in real-time. 

  2. Click on “Grid View” at the bottom. YOu will see all your students’ screens. You can click on any of them and join their screen and add to their Whiteboard. 


  1. You can just see or collaborate with each of your students. There are MANY more options to look at in their feature as well!


This is just a very basic “Get Started” walk-through. There is so much more you can do with Whiteboard.chat. You can collaborate, invite teachers, share a student board with the class, video call, and so much more. Check out all you can do by learning more directly from Whiteboard.chat with their YouTube Videos or join any of their many webinars!


If you want these directions in a document click HERE!

Monday, November 9, 2020

Create a Video or GIF from Google Slides

Google Slides is my “go-to” tool. I use it for presentations, newsletters, creating images, hyper-docs, and many more uses. (You can find some of my other uses
here.) You can also use it to create videos and GIFs! With the Slide’s Add-On called Creator Studio, you can make your Slides come to life! Follow the steps below to give it a try!


Create a Video or GIF:

  1. Create a Slide deck that you want to turn into a video (mp4 of the slides advancing) or a GIF (image of all the slides progressing). 

  2. Make sure to add the Creator Studio Slide’s Add-On.

  3. Click on “Add-Ons and choose Creator Studio. You can just click “Open” or choose “Create GIF” or “Create Video”.


  1. Let it run (this can take a minute depending on how many slides you have).

  2. Set the output size (in pixels).


  1. Set the Interval (in seconds). The lower the number, the faster the slides advance. When I make a GIF or Video with a lot of slides I make this less than 1 (ex: .2 is about ¼ or a second). 


  1. Choose your Choose Export Format (GIF or Video) and click “Go”.


  1. It will create this for you (might take a minute).

  2. Then click the Download icon or the Preview icon. 

  3. Once downloaded, add or share this as you need!


Here is an example of 86 Slides created as a GIF:


This brings your Slide decks to life as a playable Video or GIF!


If you want these steps as a Document click HERE!


Tuesday, November 3, 2020

Background Updates to Meet


Google Meet has been receiving some updates over the last few months. Here is the latest update to change your video background! 


Open Background Settings:

Before Joining Meet:

  • Click the shaded person icon in the lower right corner of your selfie video.


  • This will pop-up to select your background image.


After Joining Meet:

  • Click the 3 dots in the lower right corner and then click “Change background”.


  • You will see the options available. The top row is the blur background options and the bottom lists images you can choose. The ability to upload your own will come later when Admin gets the ability to disable this for specific school groups.


Blur Background:

  • Click the first “Blur” option. This is for a slight blurring of the background.


  • Click the second “Blur” option. This is for a heavy blurring of the background.


Set Background Image:

  • Click on any image listed. It will set that as your background.


Reset Background to No Blur or Image:

  • Click the 🚫icon to remove any background you previously added.


Any blur or image you set will be saved in your next Meet session.


If you want these steps in a Document click HERE!