Showing posts with label Images. Show all posts

Wednesday, May 6, 2026

Satellite Text Images


NASA has a cool site that lets you create words from letters derived from satellite images. Each letter is a satellite image that has an object shaped like the letter. This is worth taking a look at and creating a text masterpiece!


Create Text:

  1. Head over to science.nasa.gov/specials/your-name-in-landsat.

  2. Enter the text you want created in the box at the bottom of the page.


  1. Click “Enter” to see your creation. If you want it changed, click “Enter” again to recreate.


  1. If you want to keep it, click the Download icon and keep your creation as an image. You can also click the QR code icon to share this image with a QR code.


Start creating some awesome satellite-generated text images!


If you want these directions in a document, click HERE!


Thursday, August 28, 2025

Create Animated GIFs from Drawings

Animated GIFs are cool. They are easy to use because they are images, but carry more power because they look like videos. This tool is a cool way to take your students’ drawings and make them come to life! Check it out!


Steps:

  1. Head over to www.eatmy.art.

  2. Choose the template to use and click “Print” to download the PDF. The more squares available, the smoother the image movement is and the more action you can have, but the more drawing to create.


  1. Have students draw in each square. Think of this like a “flipbook” of the old days. Each square shows where the object moves as it progresses. Here is an example of zooming into a book that has a picture of the book in it.


  1. Once they have created all the required drawings, take a photo of this PDF. Get this to your computer.


  1. Upload this image to the site with this link.


  1. Let it process. When it is done, click “Download”.


  1. Use this GIF in documents, Slides, or other places you could insert an image!


Here is my example:


If you want these directions in a Document, click HERE

Thursday, October 26, 2023

Ideogram AI Image Creator

It seems that every day there is a new AI image tool being created. Some of these are great and even free. One that is worth looking into is Ideogram. This tool will create an image from a text description. It is easy to use and FREE.

  • One thing to keep in mind, this is a public tool. Everything created is shared with everyone. That means that there could be some questionable images displayed. I would recommend that only teachers or older students use this tool, and not K-5 kiddos.


Create a Custom AI Image:

  1. Head over to https://ideogram.ai/.

  2. Create an account (it is free and stores your creations for easy finding later).

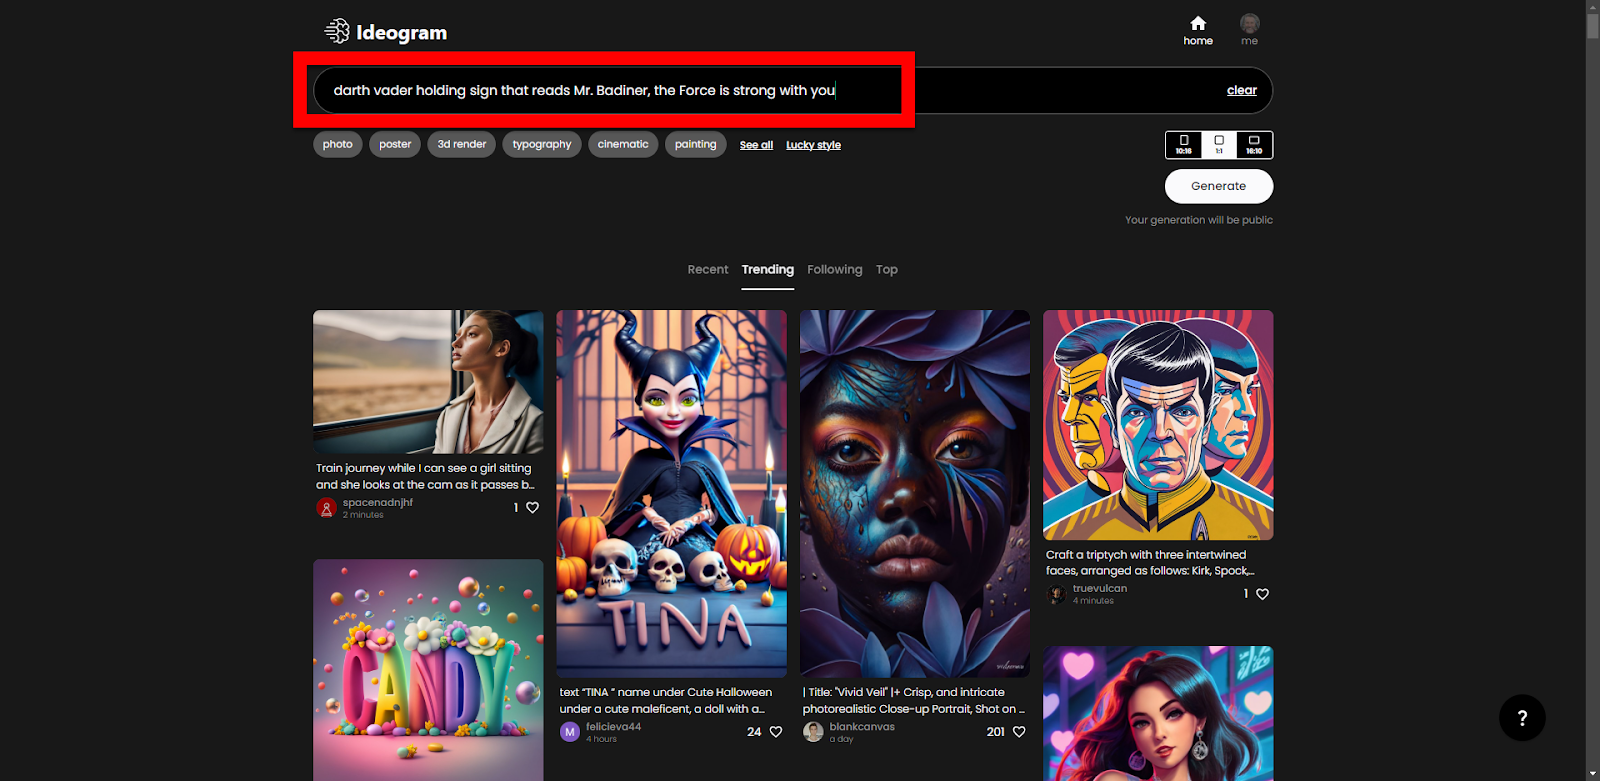
  3. In the box at the top type in a description of what you want your image to be.


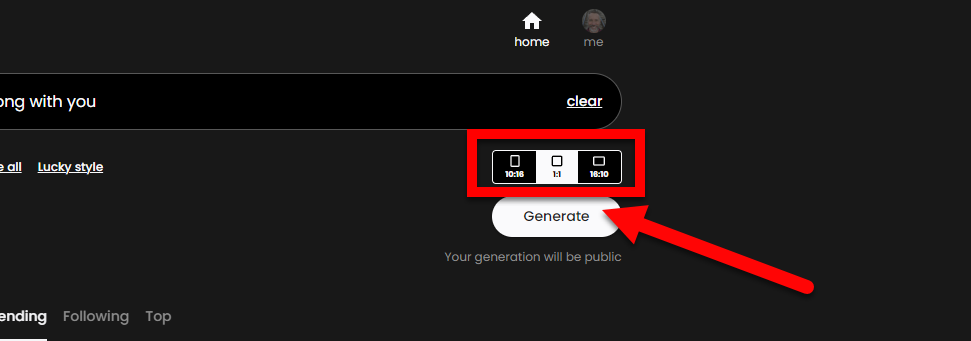
  1. Choose your image size and click “Generate”.


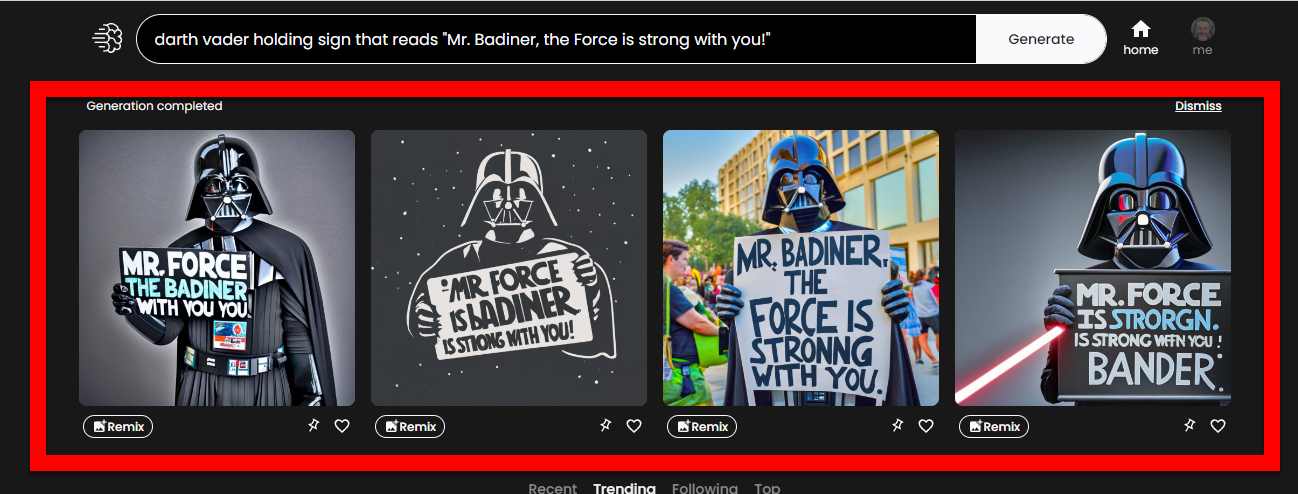
  1. It will take a few moments and your images will appear. 


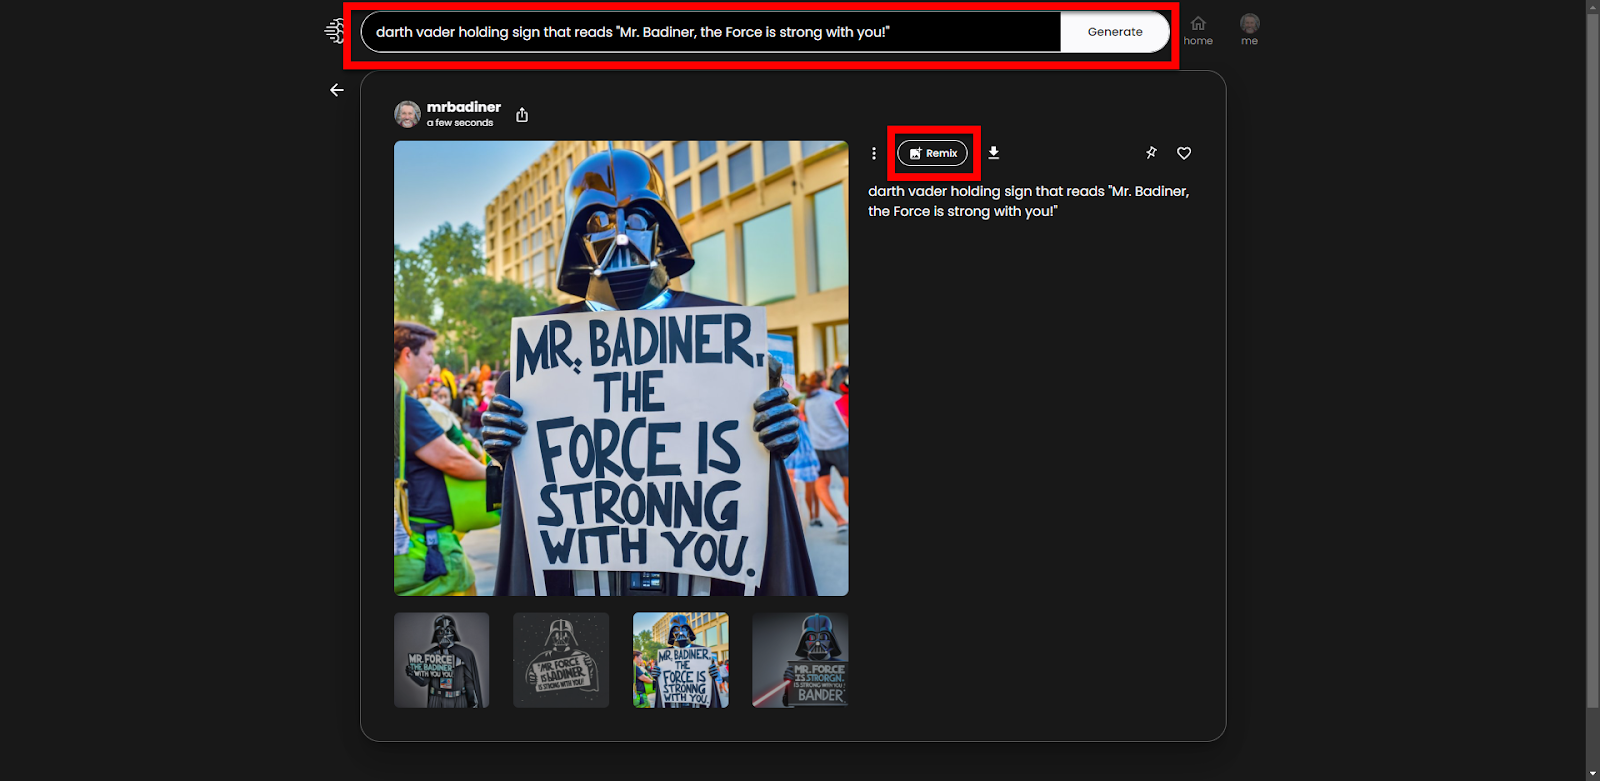
  1. If you like one click on it and choose the version you want. Then click the download icon. If you want you can edit your description and try again or click “Remix”.


Nothing is perfect, and you will have some things that do not work out all the time (like some of the text in my images above) but you can just remix or try again until you get what you need. Give it a try!


If you want these directions in a Document click HERE!

Thursday, March 25, 2021

Chromebook Screen Capture

It is finally here! You can now use the built-in screen capture tool on any Chromebook (you must be updated to version 89+)! It is easy to do. Just follow the steps below.


Take an Image Capture:

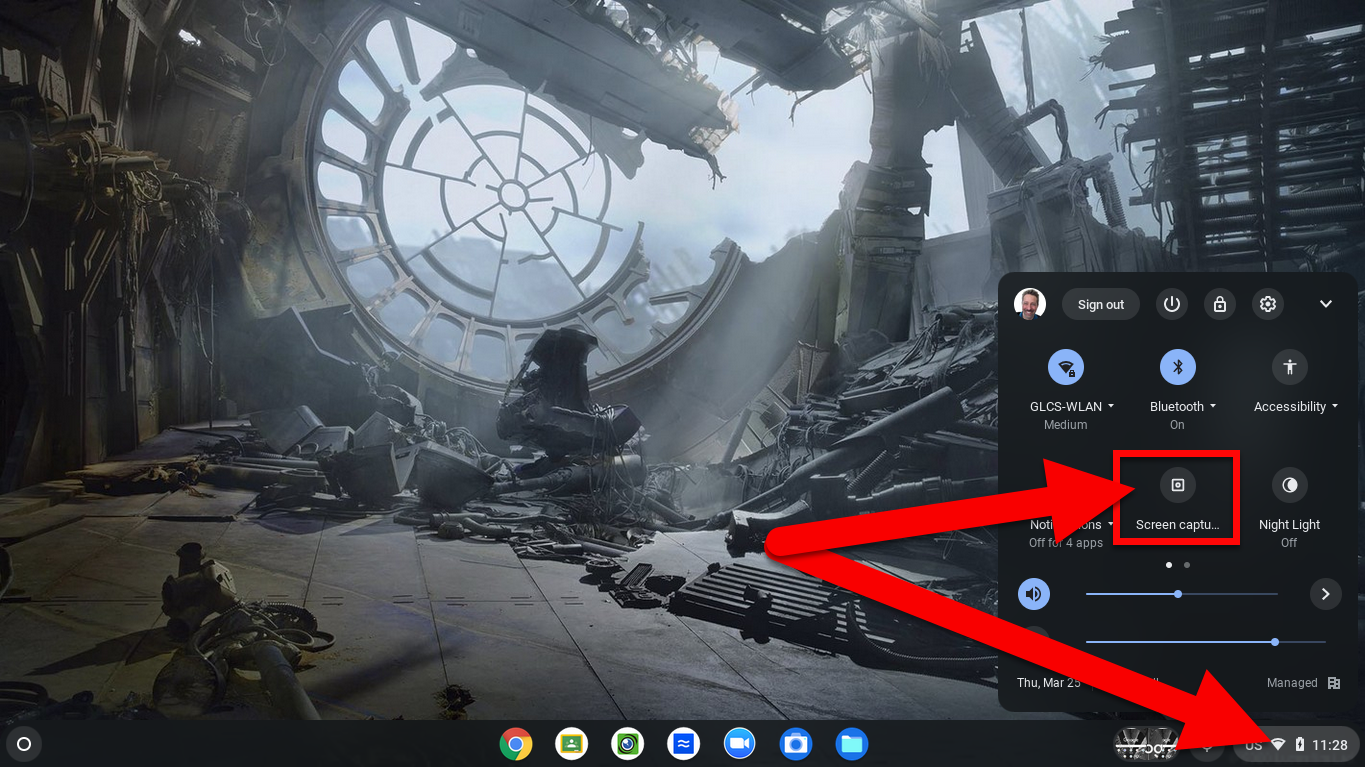
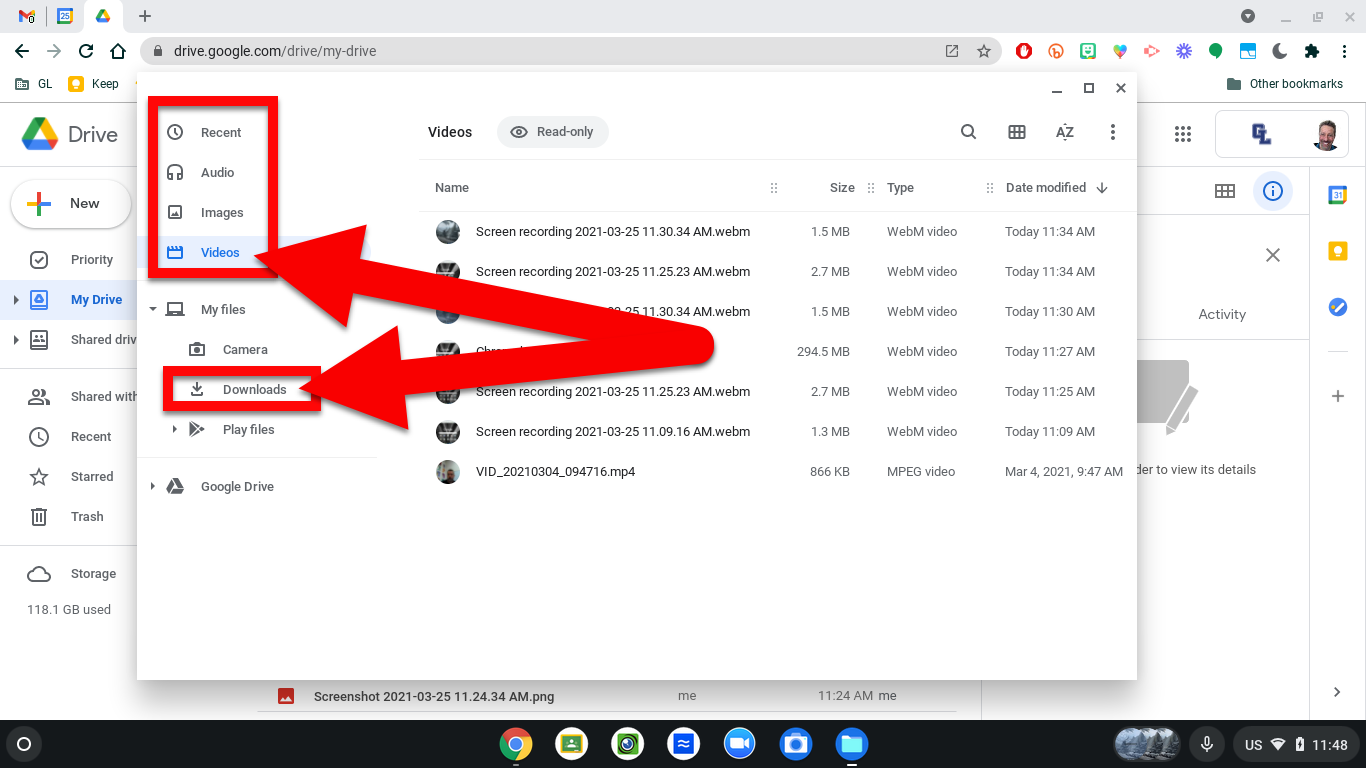
  1. Click on the clock in the bottom right corner and click on “Screen Capture”.


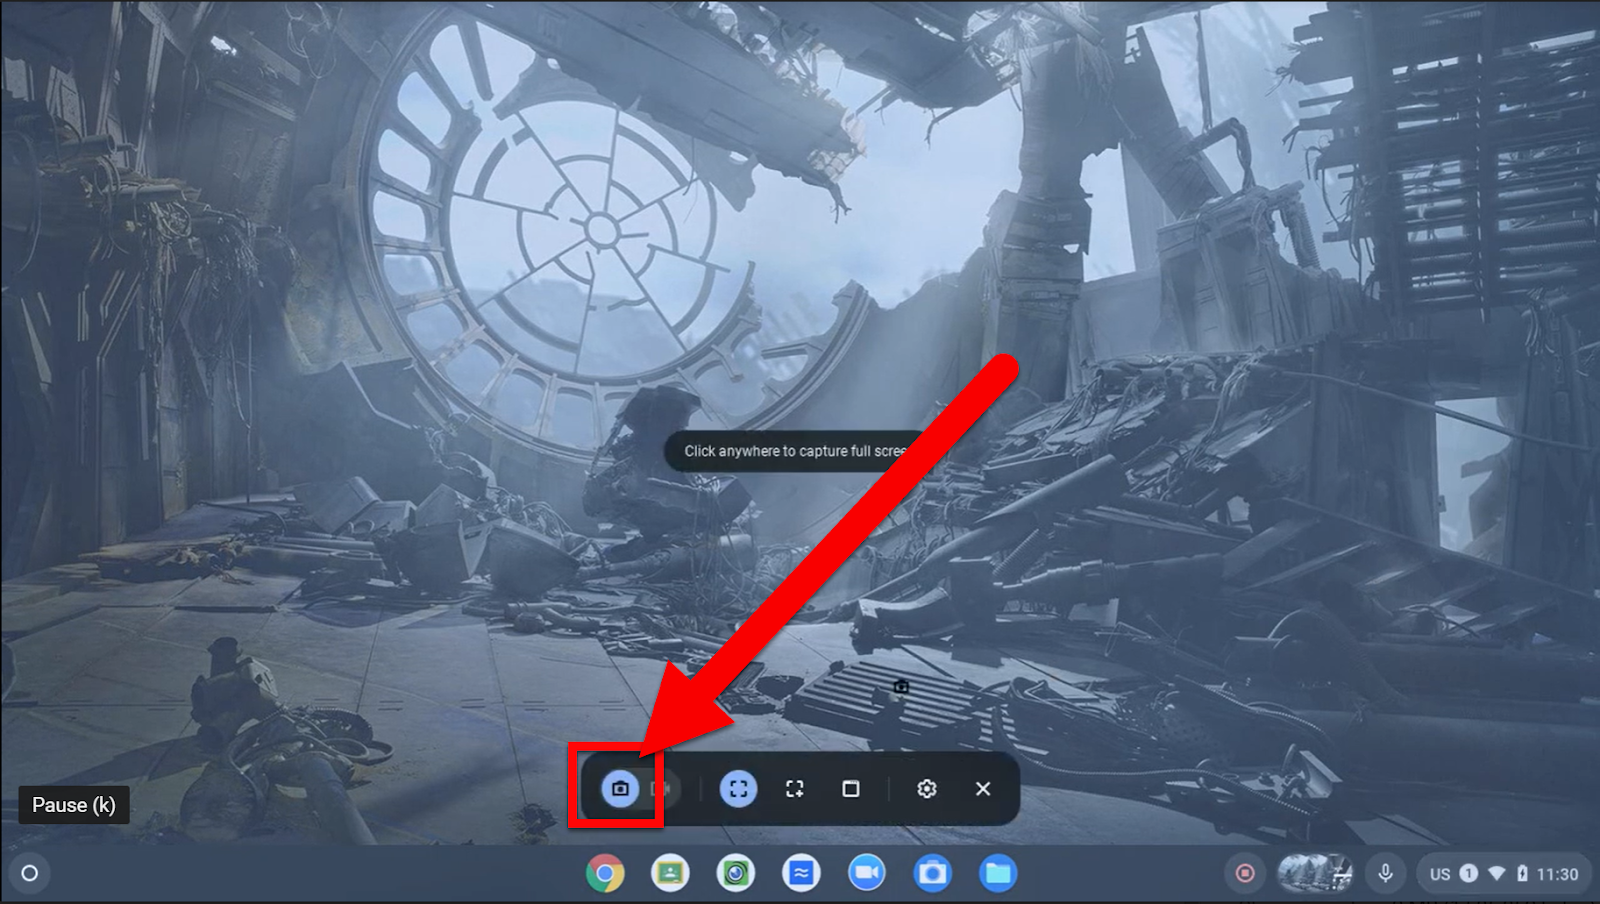
  1. Select the “Camera” icon.


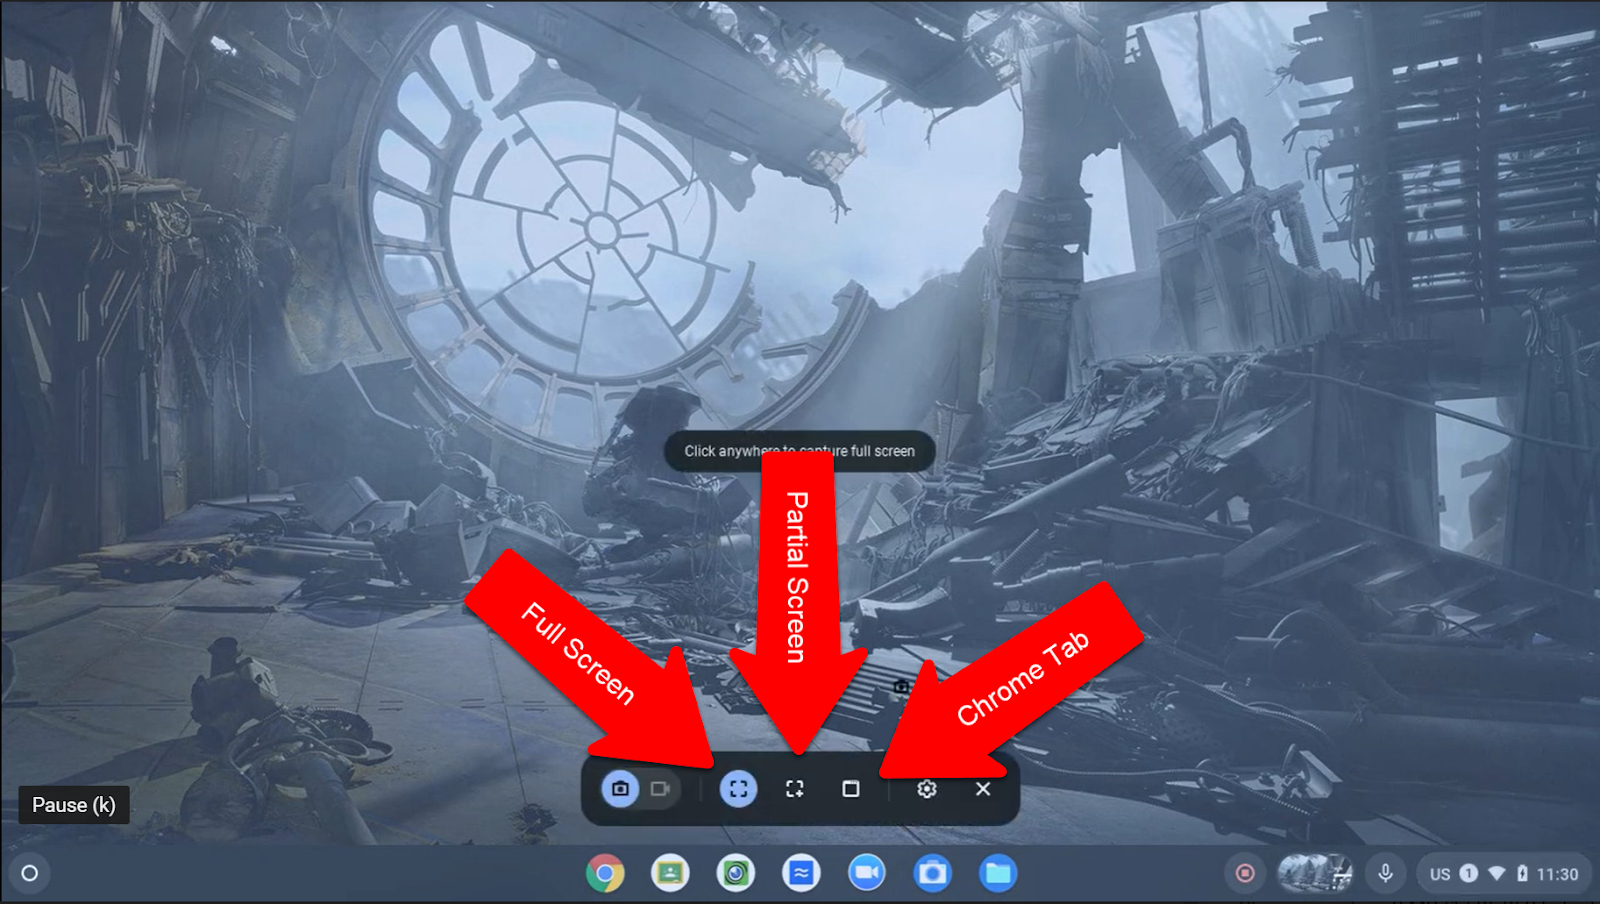
  1. Choose what you want to capture:

    • Full Screen

    • Partial Screen

    • Chrome Tab


  1. Click “Capture” or “Click anywhere to capture full screen” on the screen.

  2. These images will be saved to your “Downloads” file, as well as your “Images” section.


Take a Video Capture:

  1. Click on the clock in the bottom right corner and click on “Screen Capture”.


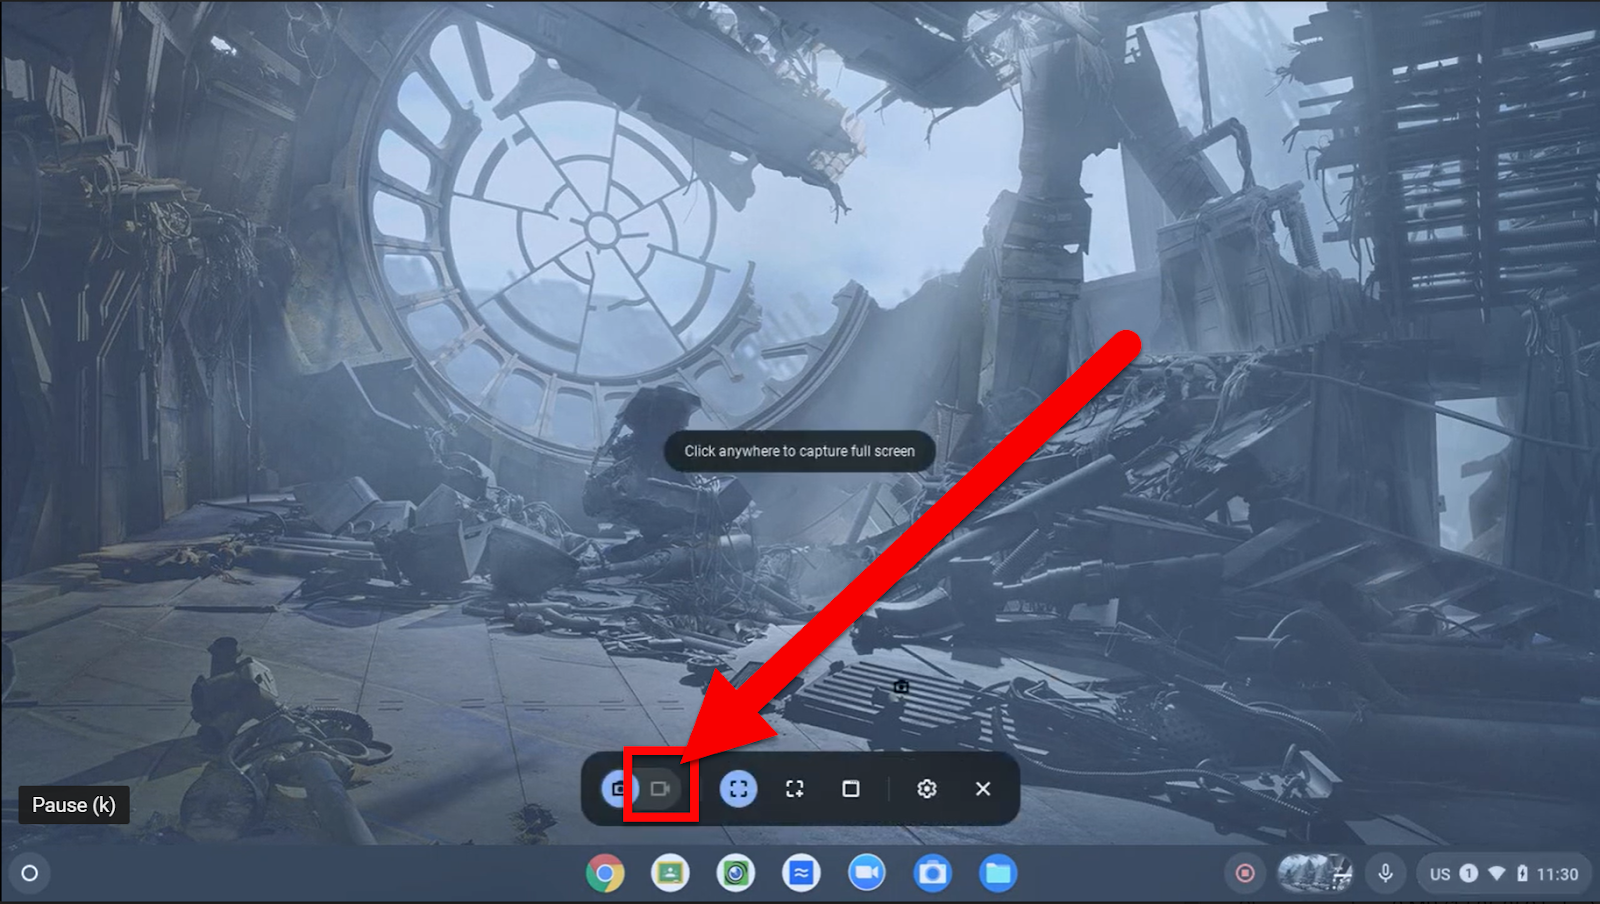
  1. Select the “Video” icon.


  1. Choose what you want to capture:

    1. Full Screen

    2. Partial Screen

    3. Chrome Tab


  1. You will want to double-check that your audio is (or is not) recorded depending on what you want. Click the setting gear and enable or disable audio recording.

  2. Click “Capture” or “Click anywhere to capture full screen” on the screen.

  1. These videos will be saved to your “Downloads” file, as well as your “Videos” section.


For a quick Video walk-through click here: Chromebook Screen Capture


If you want these directions in a Document click HERE!

Wednesday, November 18, 2020

Insert Image from Search

We all insert images from Google Searches into our emails and files (Docs, Slides, Drawings, etc). Most of us do this by downloading the image and then inserting it into the desired place. There is an easier way that does not involve downloading the image. Check out these steps to see how! 

  • Important: Make sure to only use copyright-free images and not just a basic Google search for images that you put in Docs, Slides, and Drawings. Remember, if you are in one of those tools and use the “Insert” option at the top they are already copyright-free. That is the best method.


Insert an Image:

  1. Have your email or Document open on one tab.

  2. Open another tab to do your Google image search.

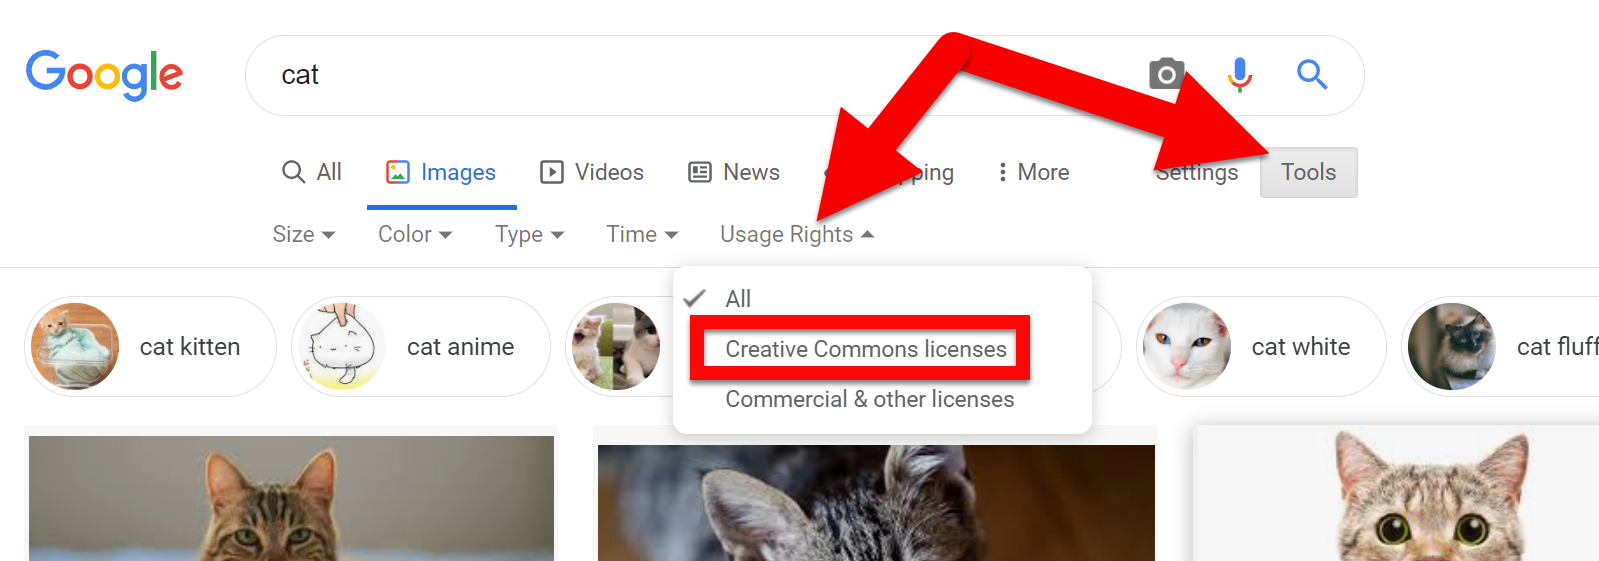
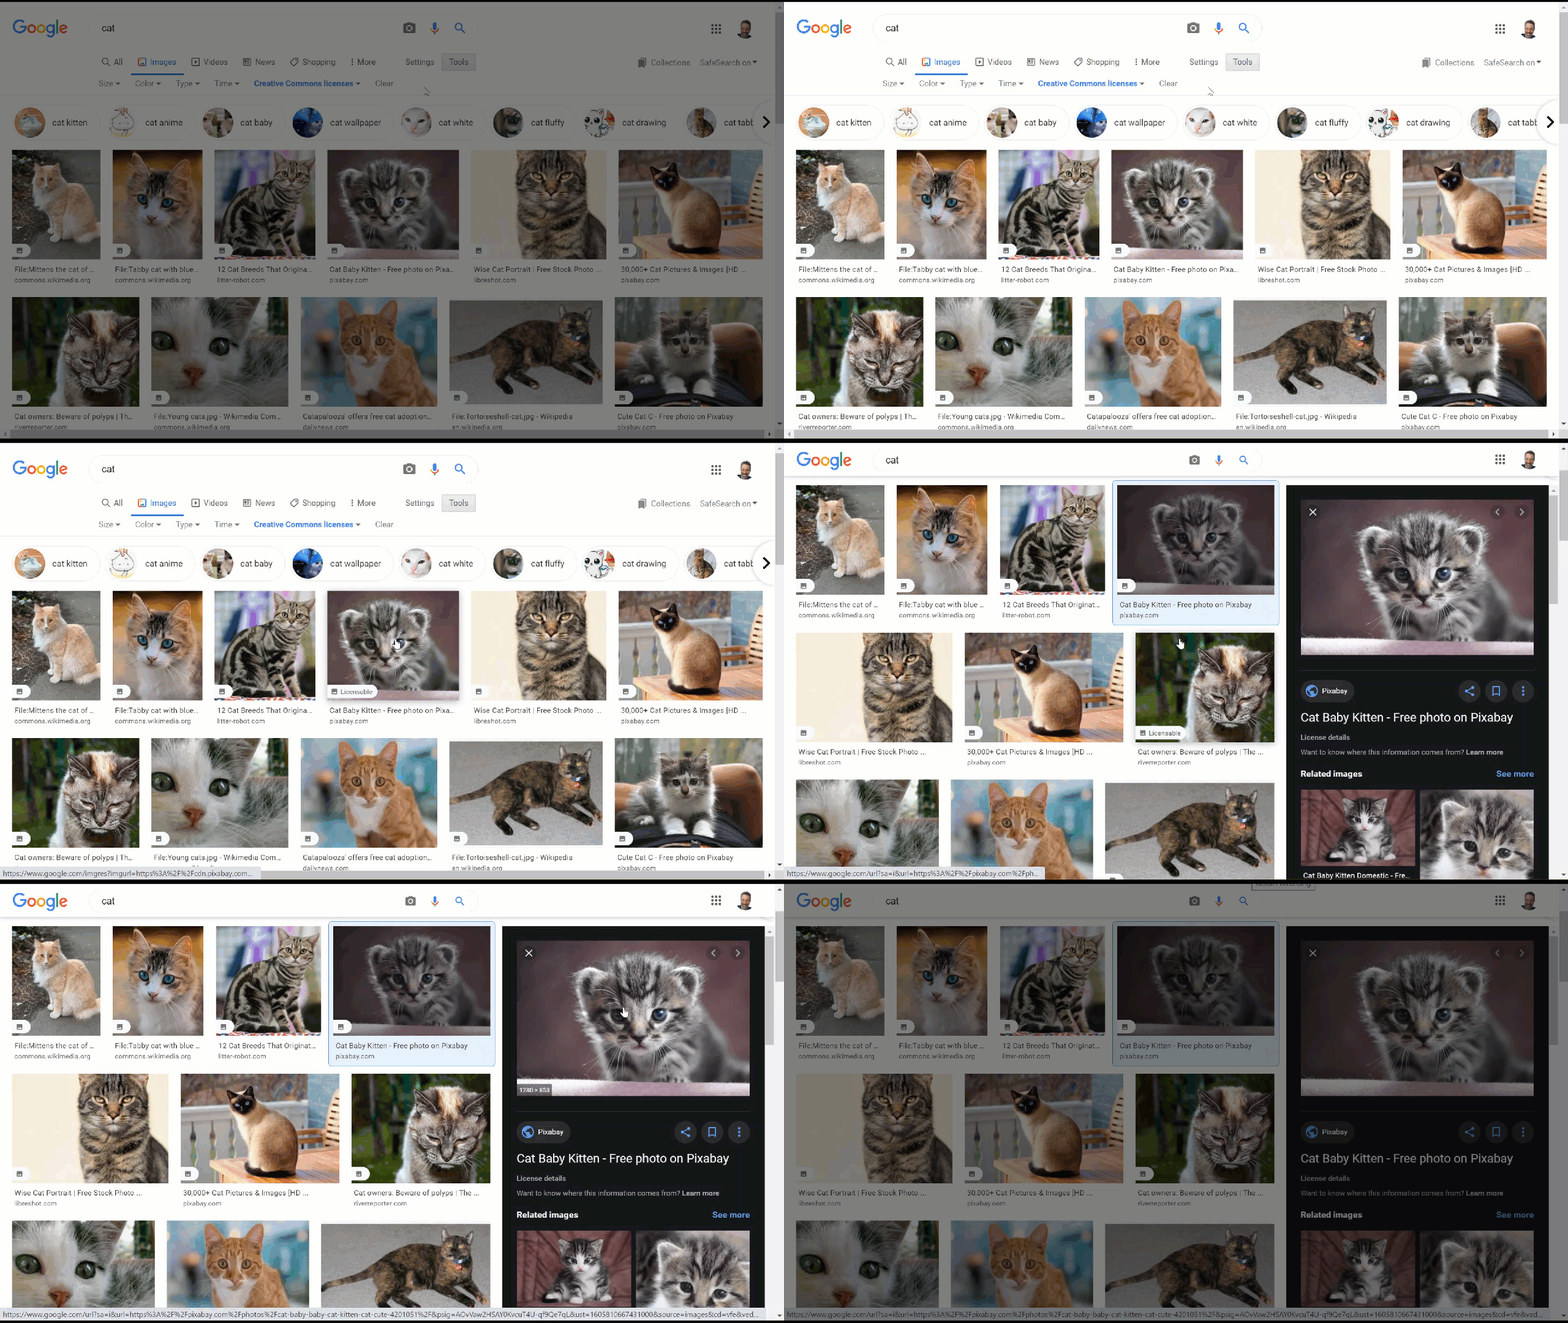
    • Always look for copyright-free images using “Tools”, “Usage Rights”, and choose “Creative Commons”.


  1. Click on the image you want to use. It will then appear in the top right.


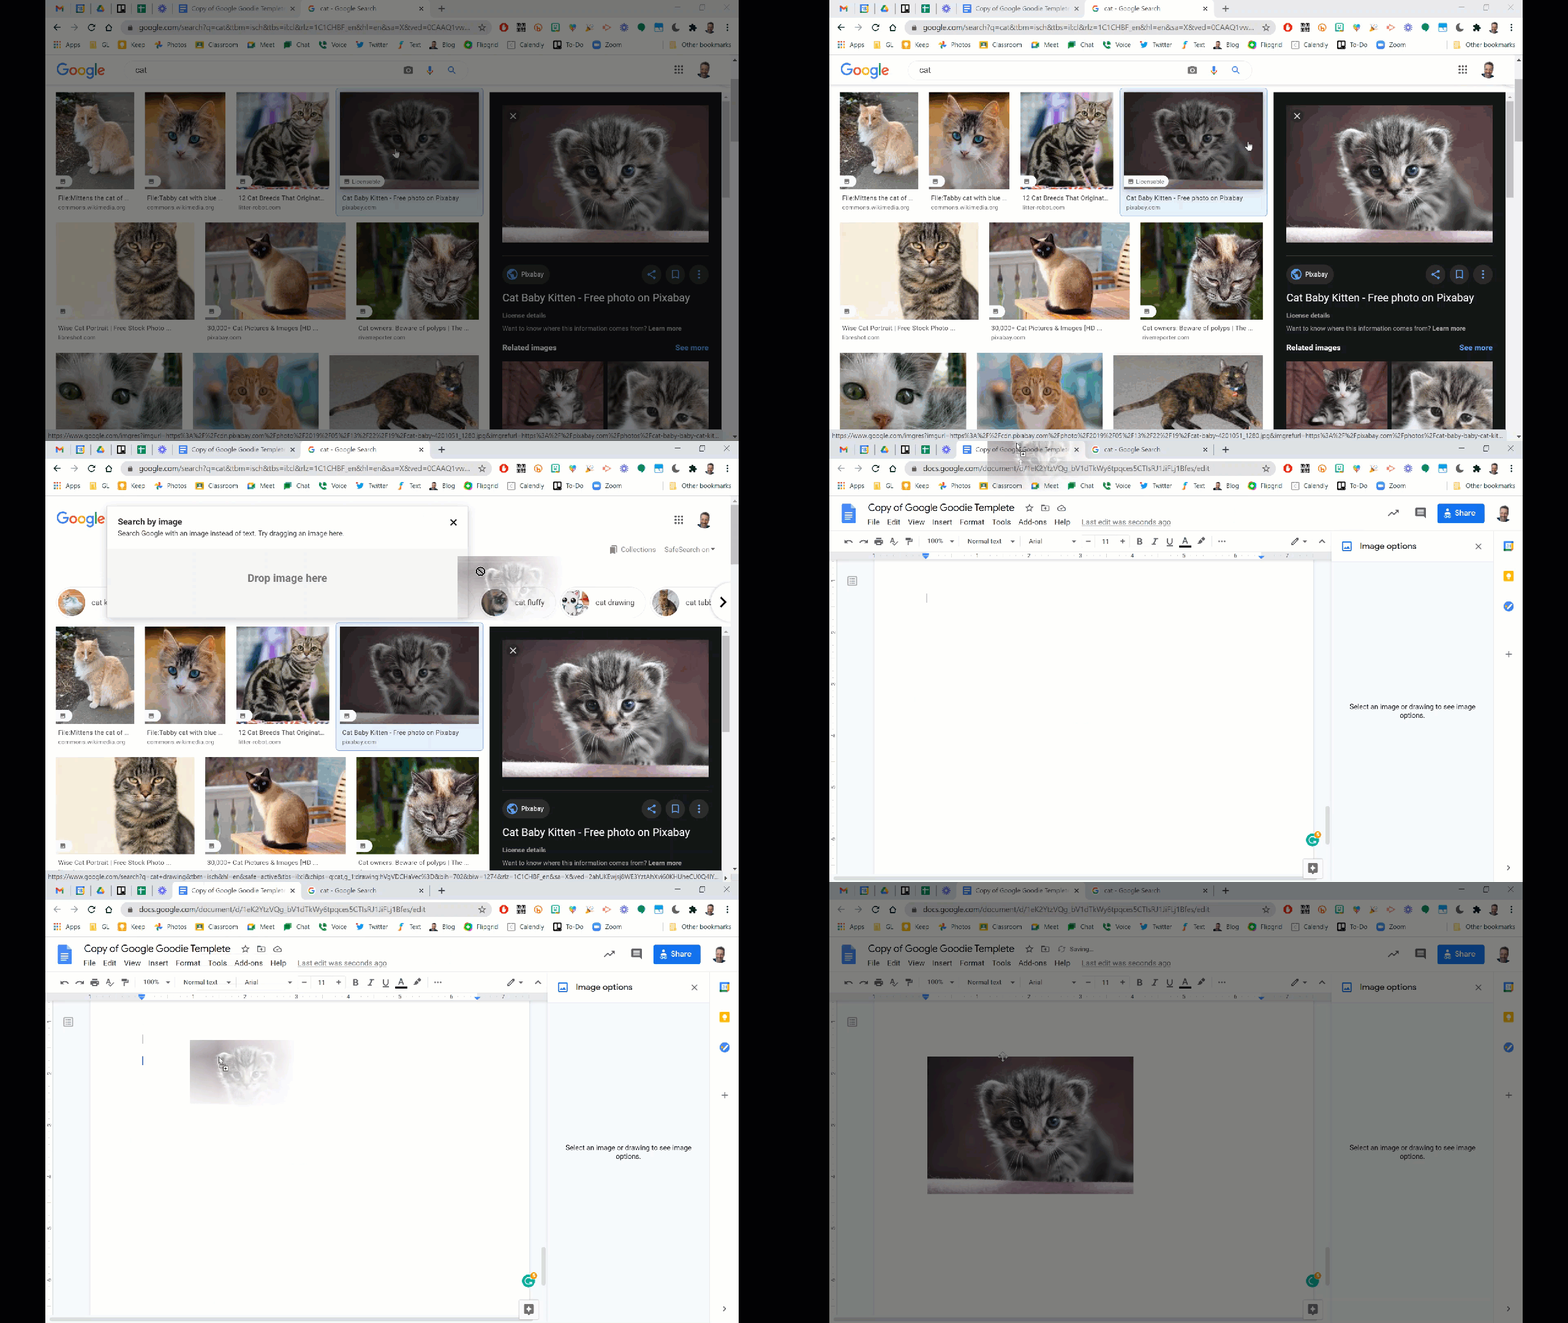
  1. Drag that image to the tab that you want to attach it. Drop it in your email or Doc.


Below are examples of how to do it in Email and Docs.


Email:


Document:


If you want these directions in a Document click HERE!


Monday, October 14, 2019

Create Picture Collages

Are you looking for an easy way to share pictures in a collage format? There are lots of tools to do this, but some require accounts. Collage Maker does not! Below are some tips on how to use this FREE tool to make great images from multiple images.


Create a Photo Collage:
  1. Get some images on your device (PC, Mac, Chromebook).
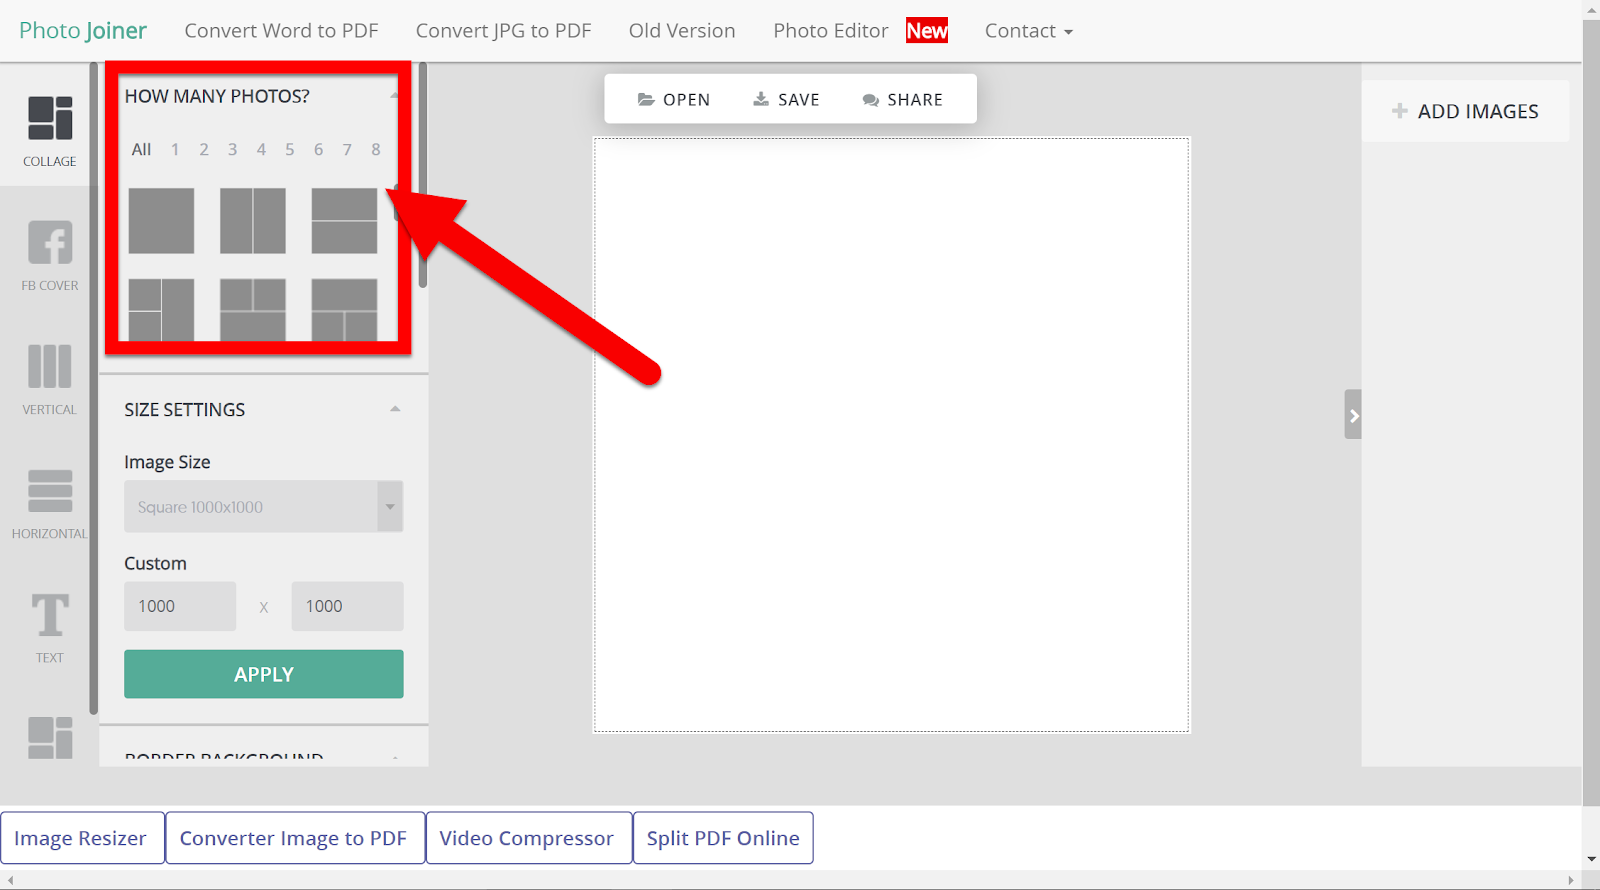
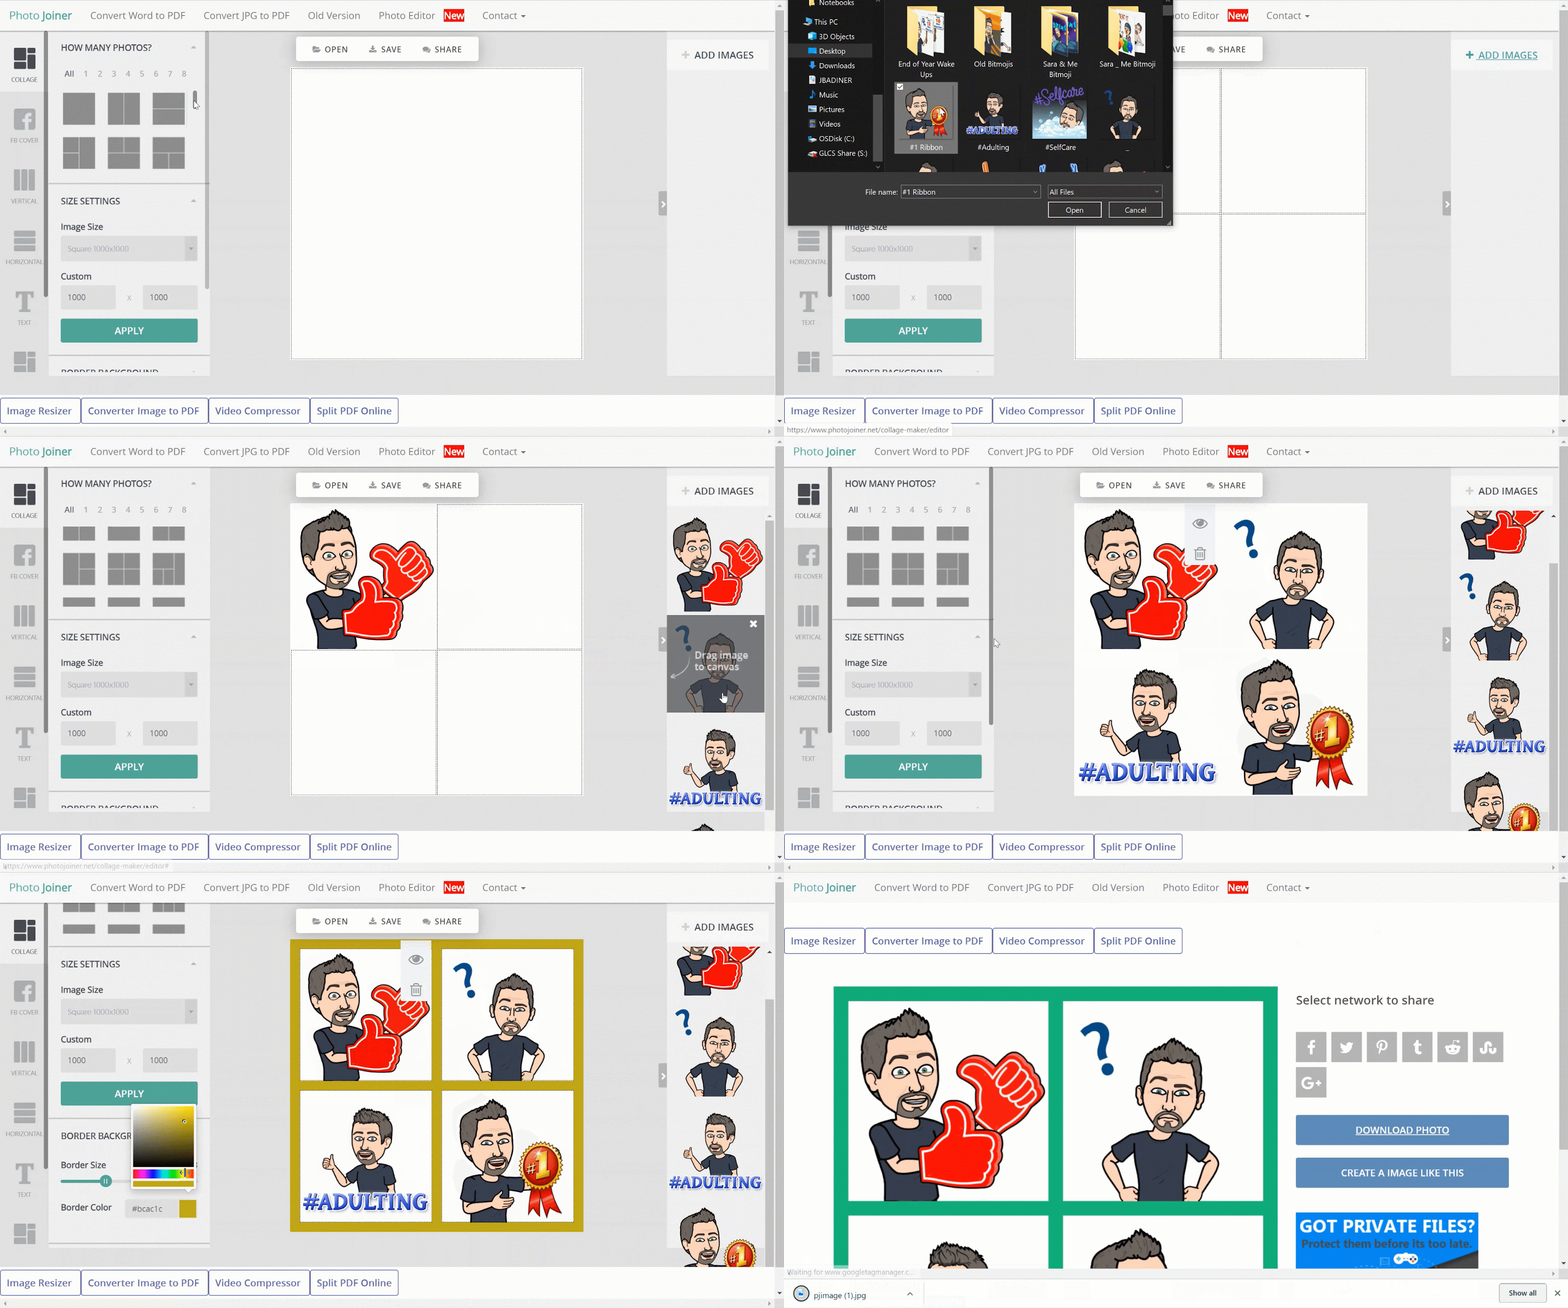
  2. Choose your layout on the left (there are many to scroll through).


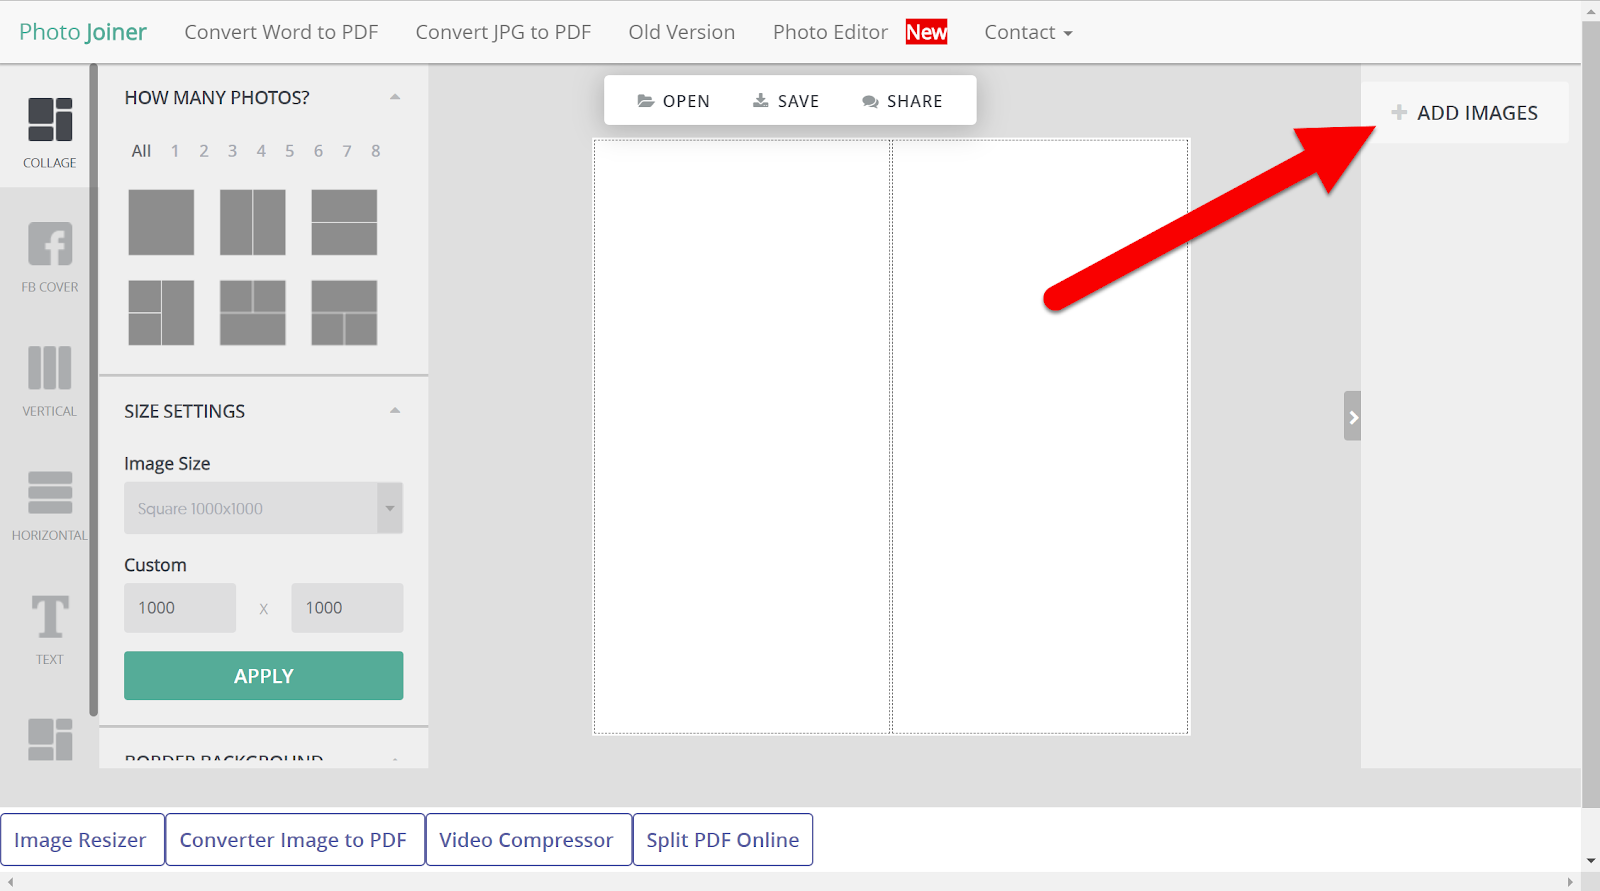
  1. Click “Add Images” in the top right to choose images from your device.


  1. Drag images to the place you want them in the collage and drag image to the location in each spot to fit the best display.


  1. Edit the border size and color. 


  1. Click the “Share” button.


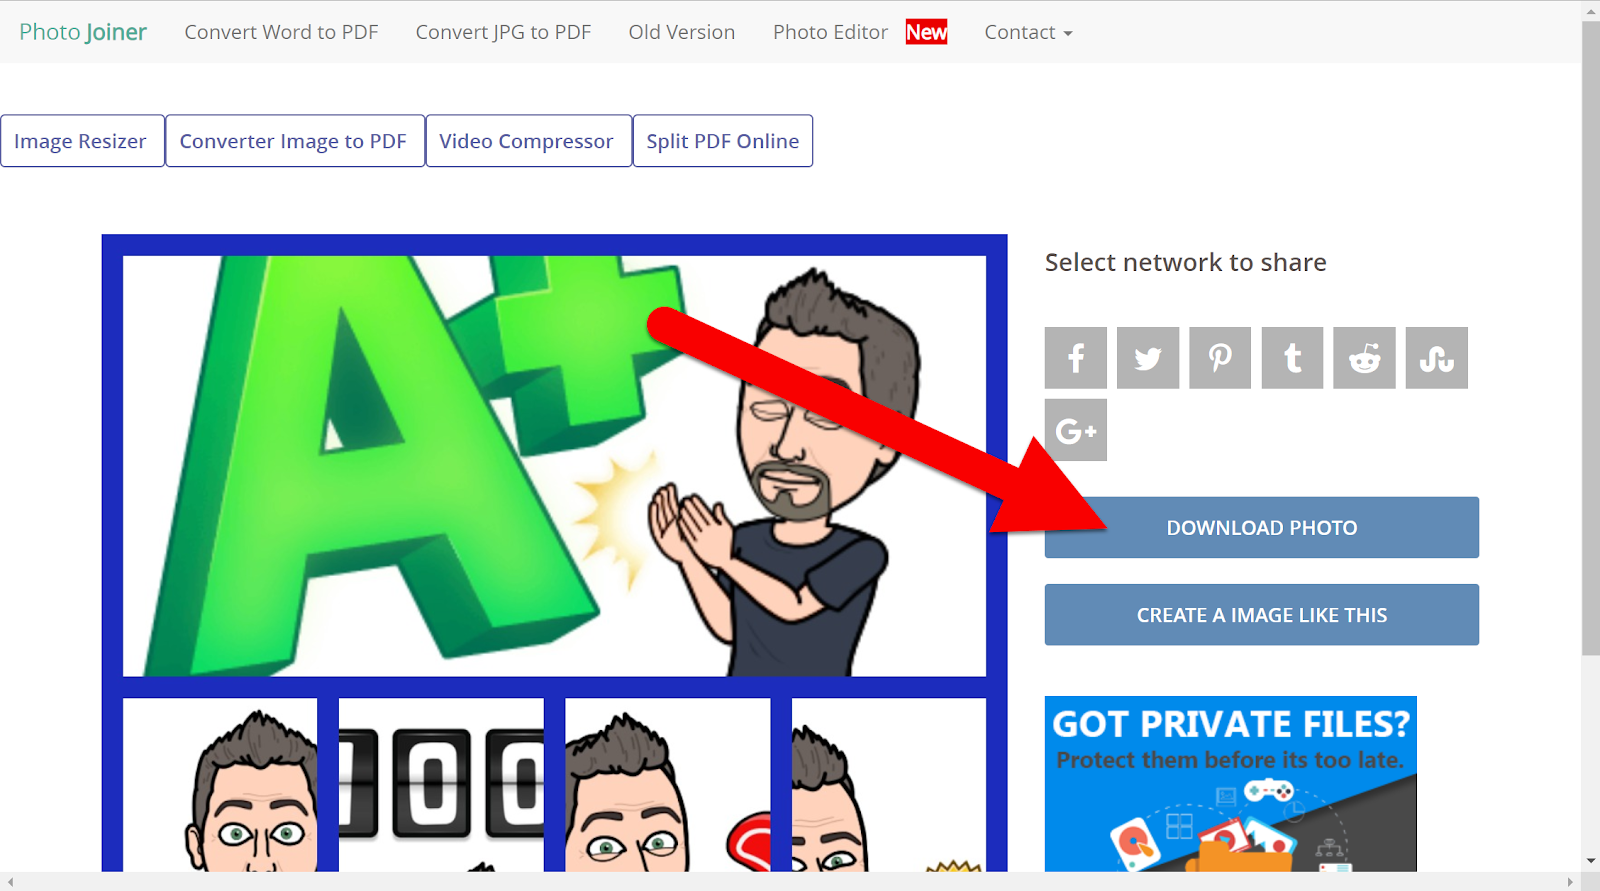
  1. Click “Download Photo”.


You now have an awesome collage creation ready to use in your project!


If you want these directions in a document click HERE!

Friday, December 21, 2018

Remove Image Background

So, you have that perfect picture but you really want to have a different background. For example, your students are studying landforms and you want to put a picture of them on the top of a mountain. If only you could take the object of the picture (your students) and put it on a different background. The good news, you CAN! There is an awesome (and free) website that can strip the background of any image away and make it transparent so you can overlay it on a new background. The curricular possibilities are endless! Give remove.bg a try!

Remove the Background of an Image:
  1. Head over to remove.bg.
  2. Upload your image of the object you want the background removed.
  3. Make sure the object looks like you want and download the new image. Unfortunately, there are no editing tools to remove more/less. Hopefully, your image works well.


  4. Download the image and save it in a place you can easily find.


Add a New Background to the Image:
  1. Open up an image editing tool. If you are a G Suite user, use Google Drawing.
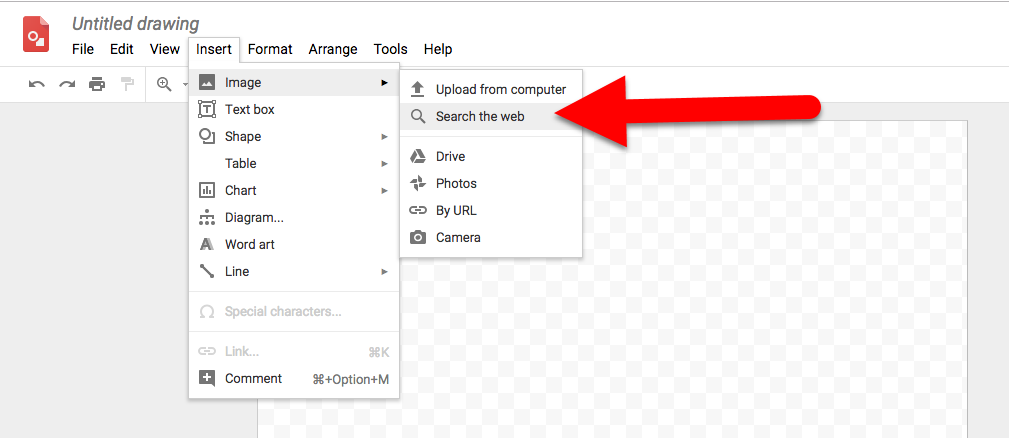
  2. Upload the background image you want into Drawing. You can search for backgrounds by clicking “Insert”, then “Image”, and choose “Search the Web”.
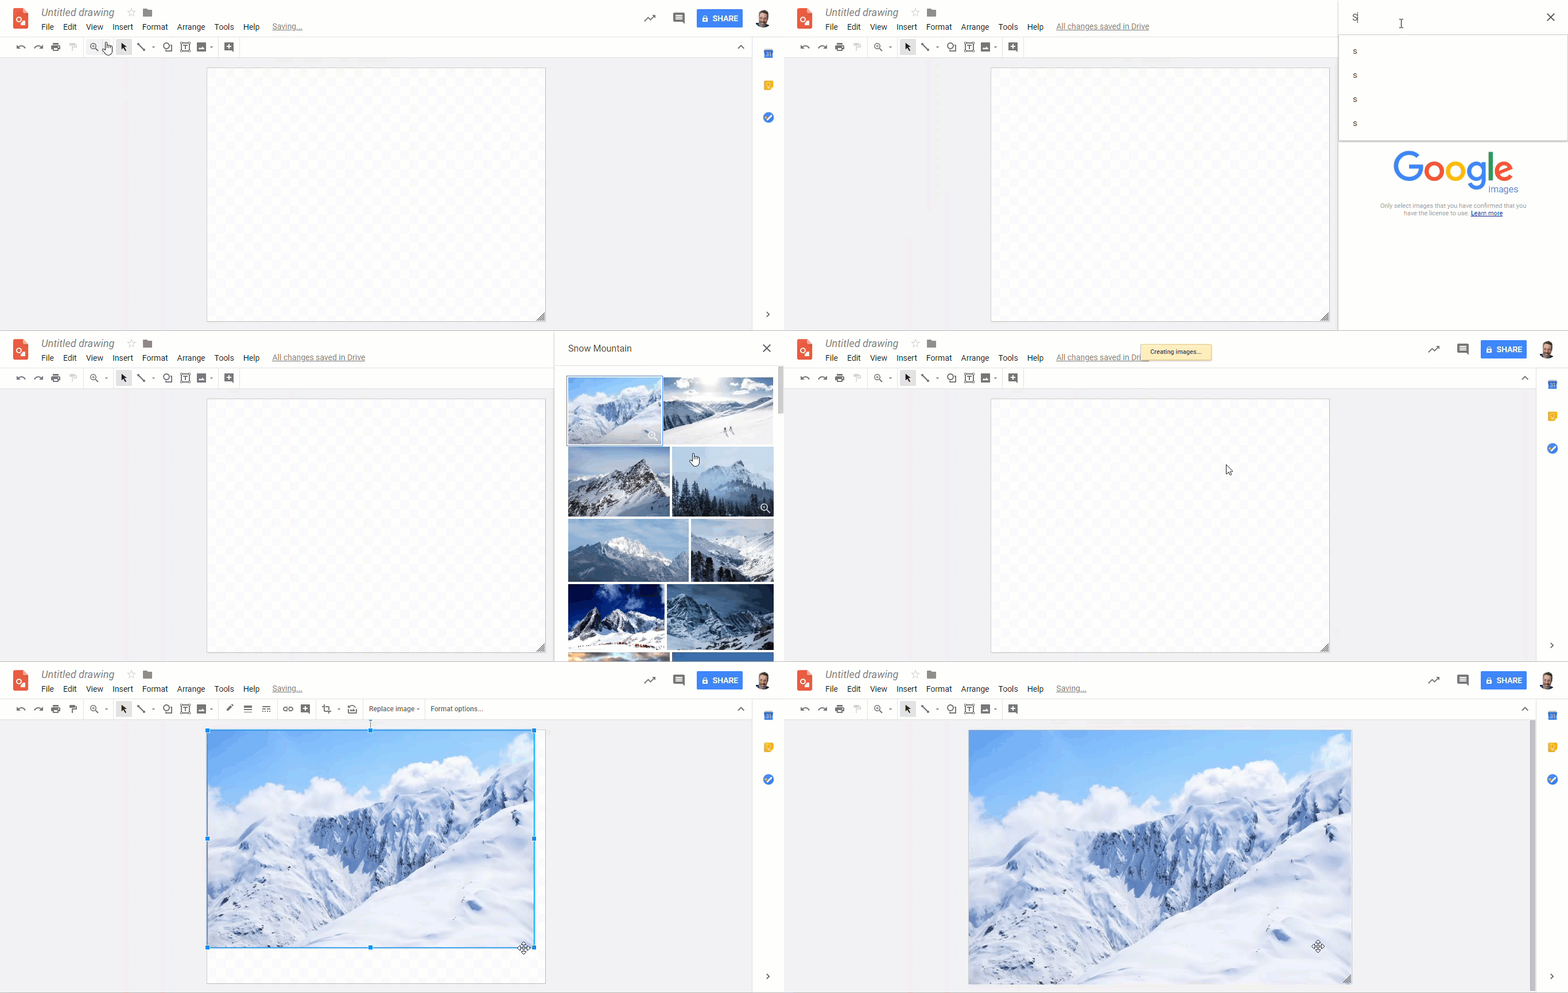
  3. Choose an image for the background and resize your canvas to fit.

  4. Upload your image you downloaded from remove.bg on top of your new Drawing. Move it to the location you want and resize if needed.
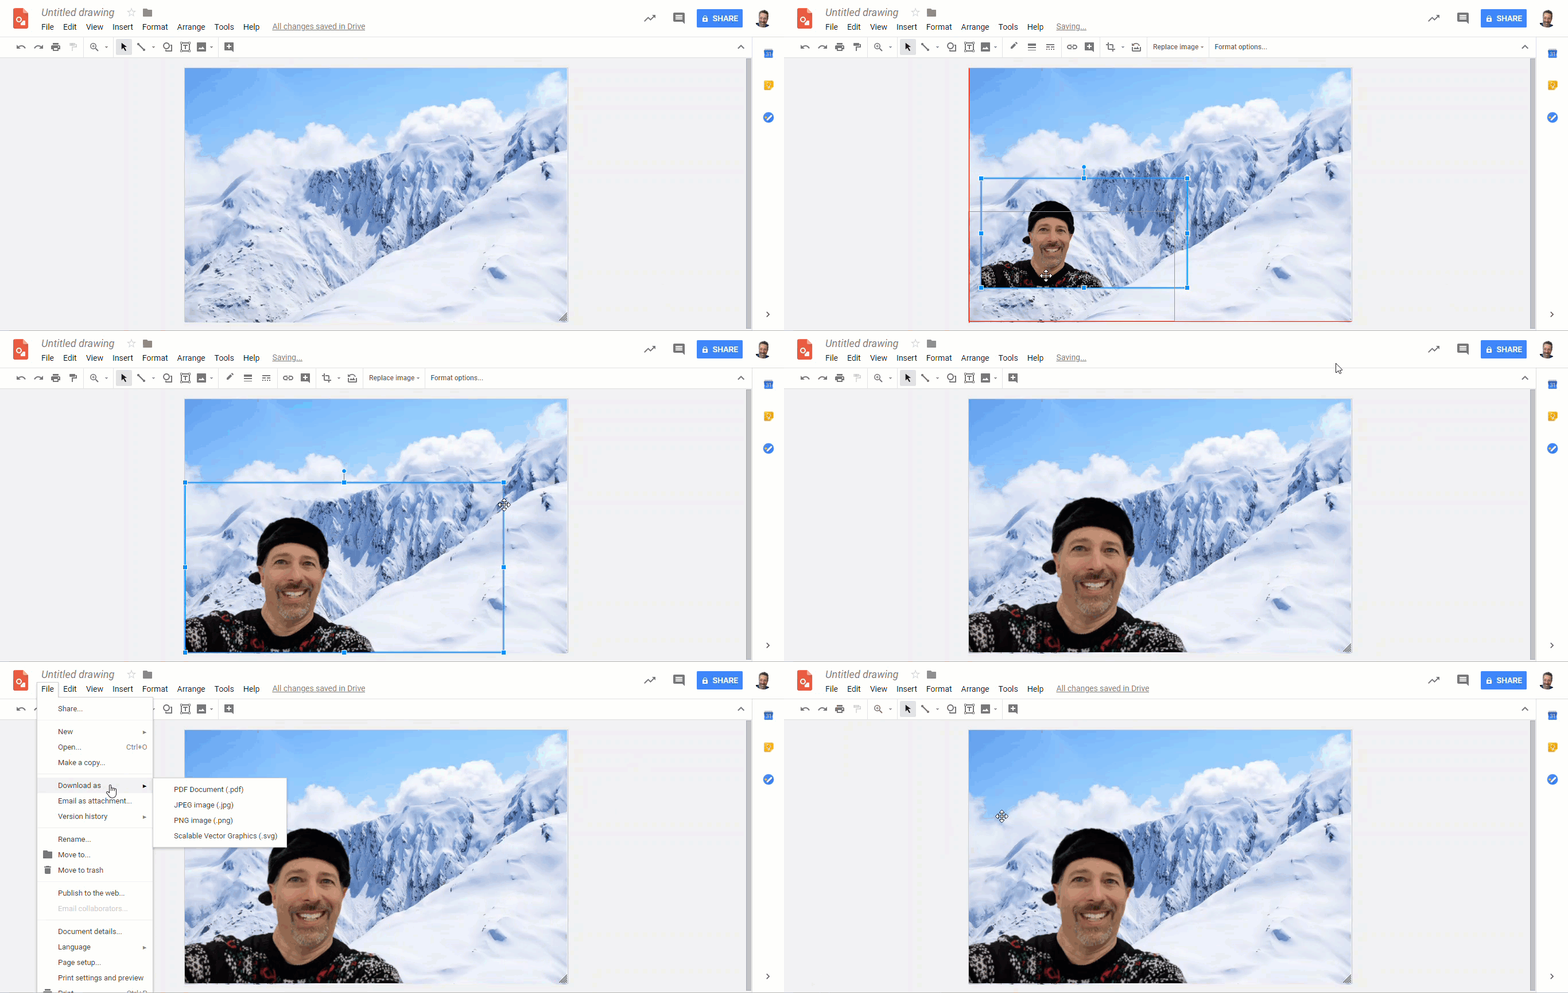
  5. Click on File, Download As, and choose the format you want (I prefer PNG).


You have just transported the object of your image to a new location! Just think of all the curricular opportunities this offers!


If you want these steps in a document, click HERE!


Tuesday, January 30, 2018

Create Animated GIFs

They are everywhere. Those little animated pictures. They are in documents, on social media, and in our text messages. They say a picture is worth a 1,000 words, I have to wonder how many is an animated GIF worth? It has to be millions! The best part about a GIF is that they are easy to make and use. Give these 3 easy to use tools a try and start saying more without speaking a word!


Make a GIF with your Web Camera:

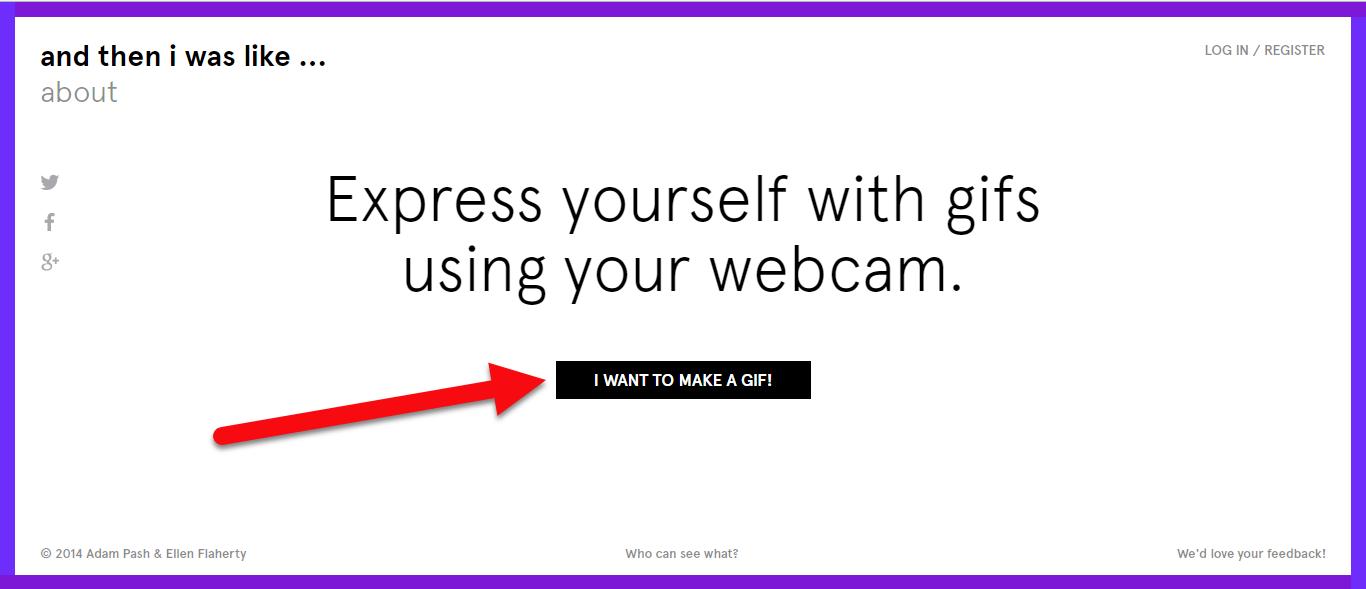
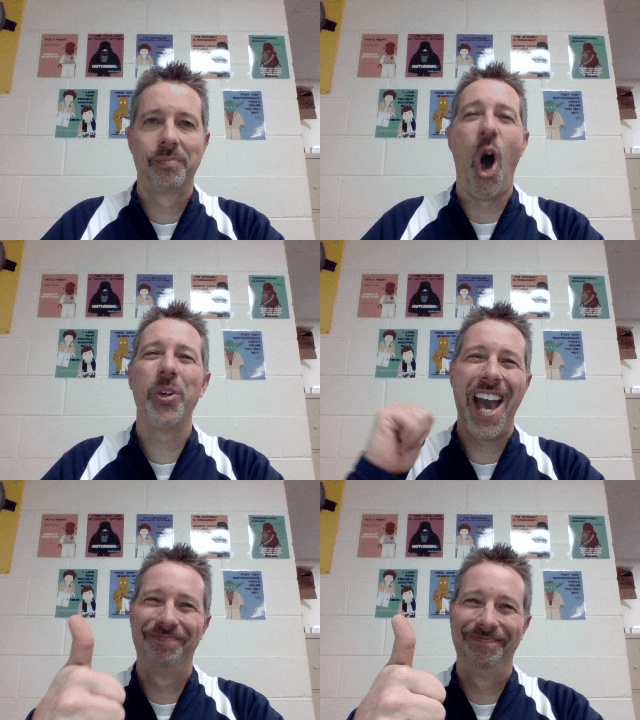
  1. Click “I want to make a GIF” and allow camera access.


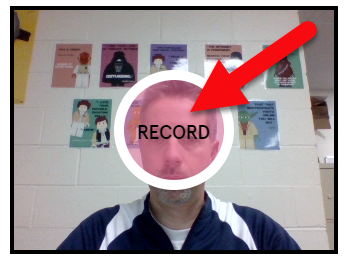
  1. In the center of the camera view click “Record”.

  1. The countdown will start and then it will record. You only have a few seconds so make your message quick.
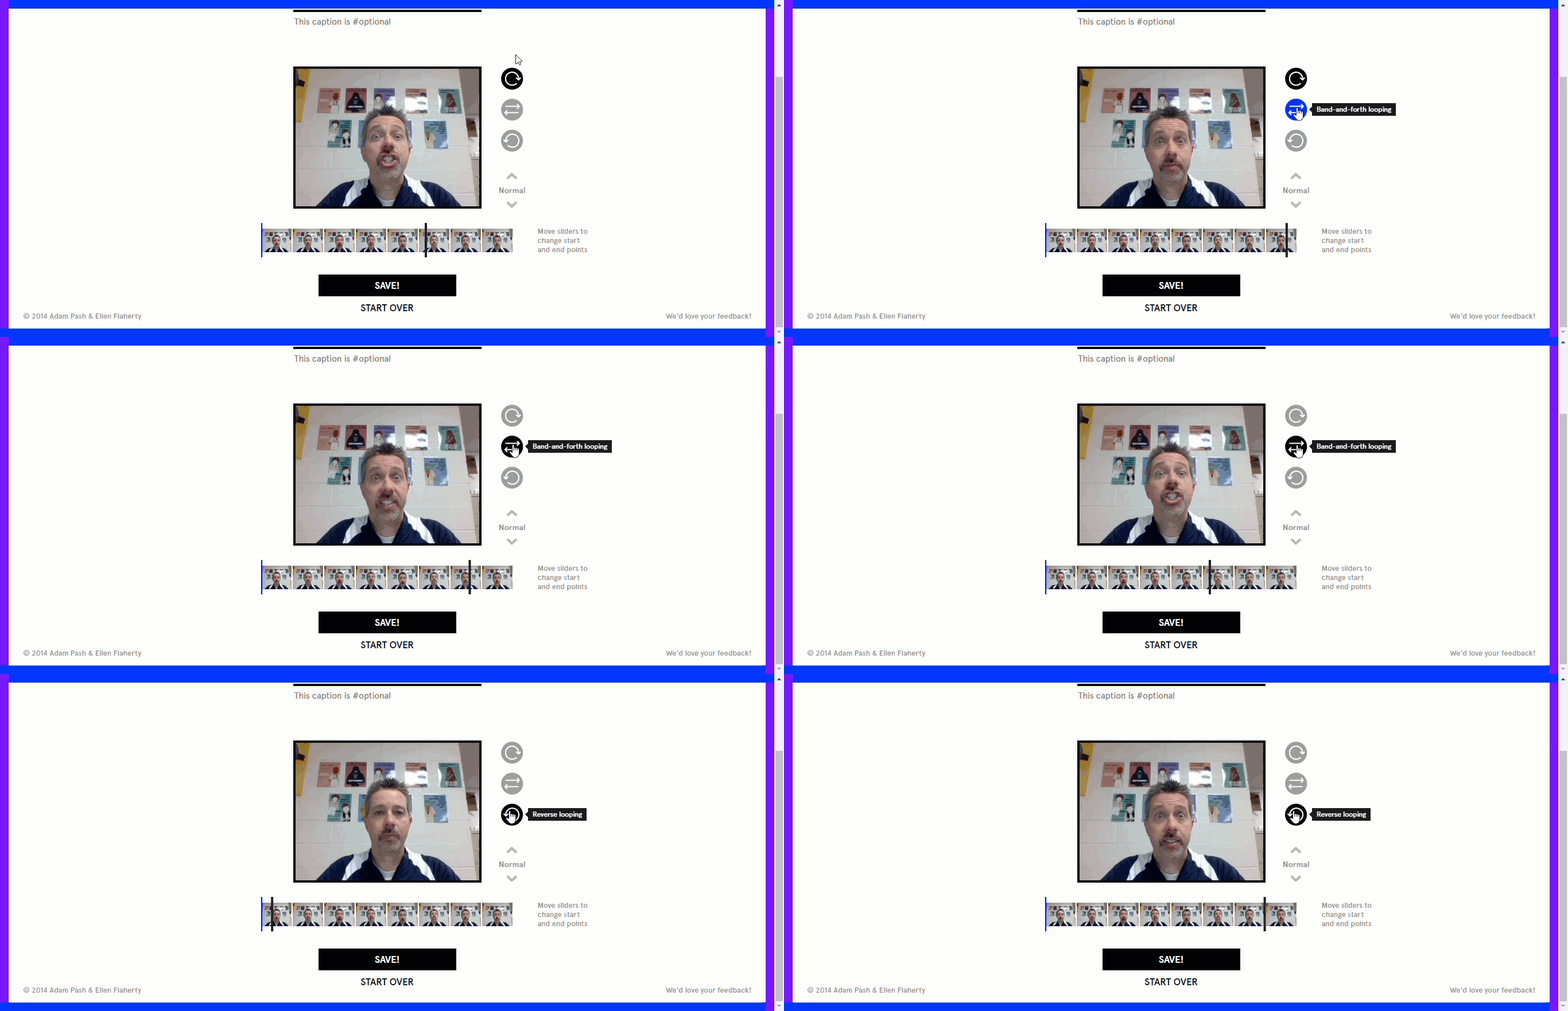
  2. You can choose the begin and end point of your GIF.
  3. You can also choose to loop the GIF (top), have it play forward, then backward (middle), or have it play in reverse (bottom).

  1. Either click “Save” or “Start Over”.
  2. On the next screen, you can share to social media tools or right click on the image and save it to your device.


Make a GIF with your Google Photos Images:
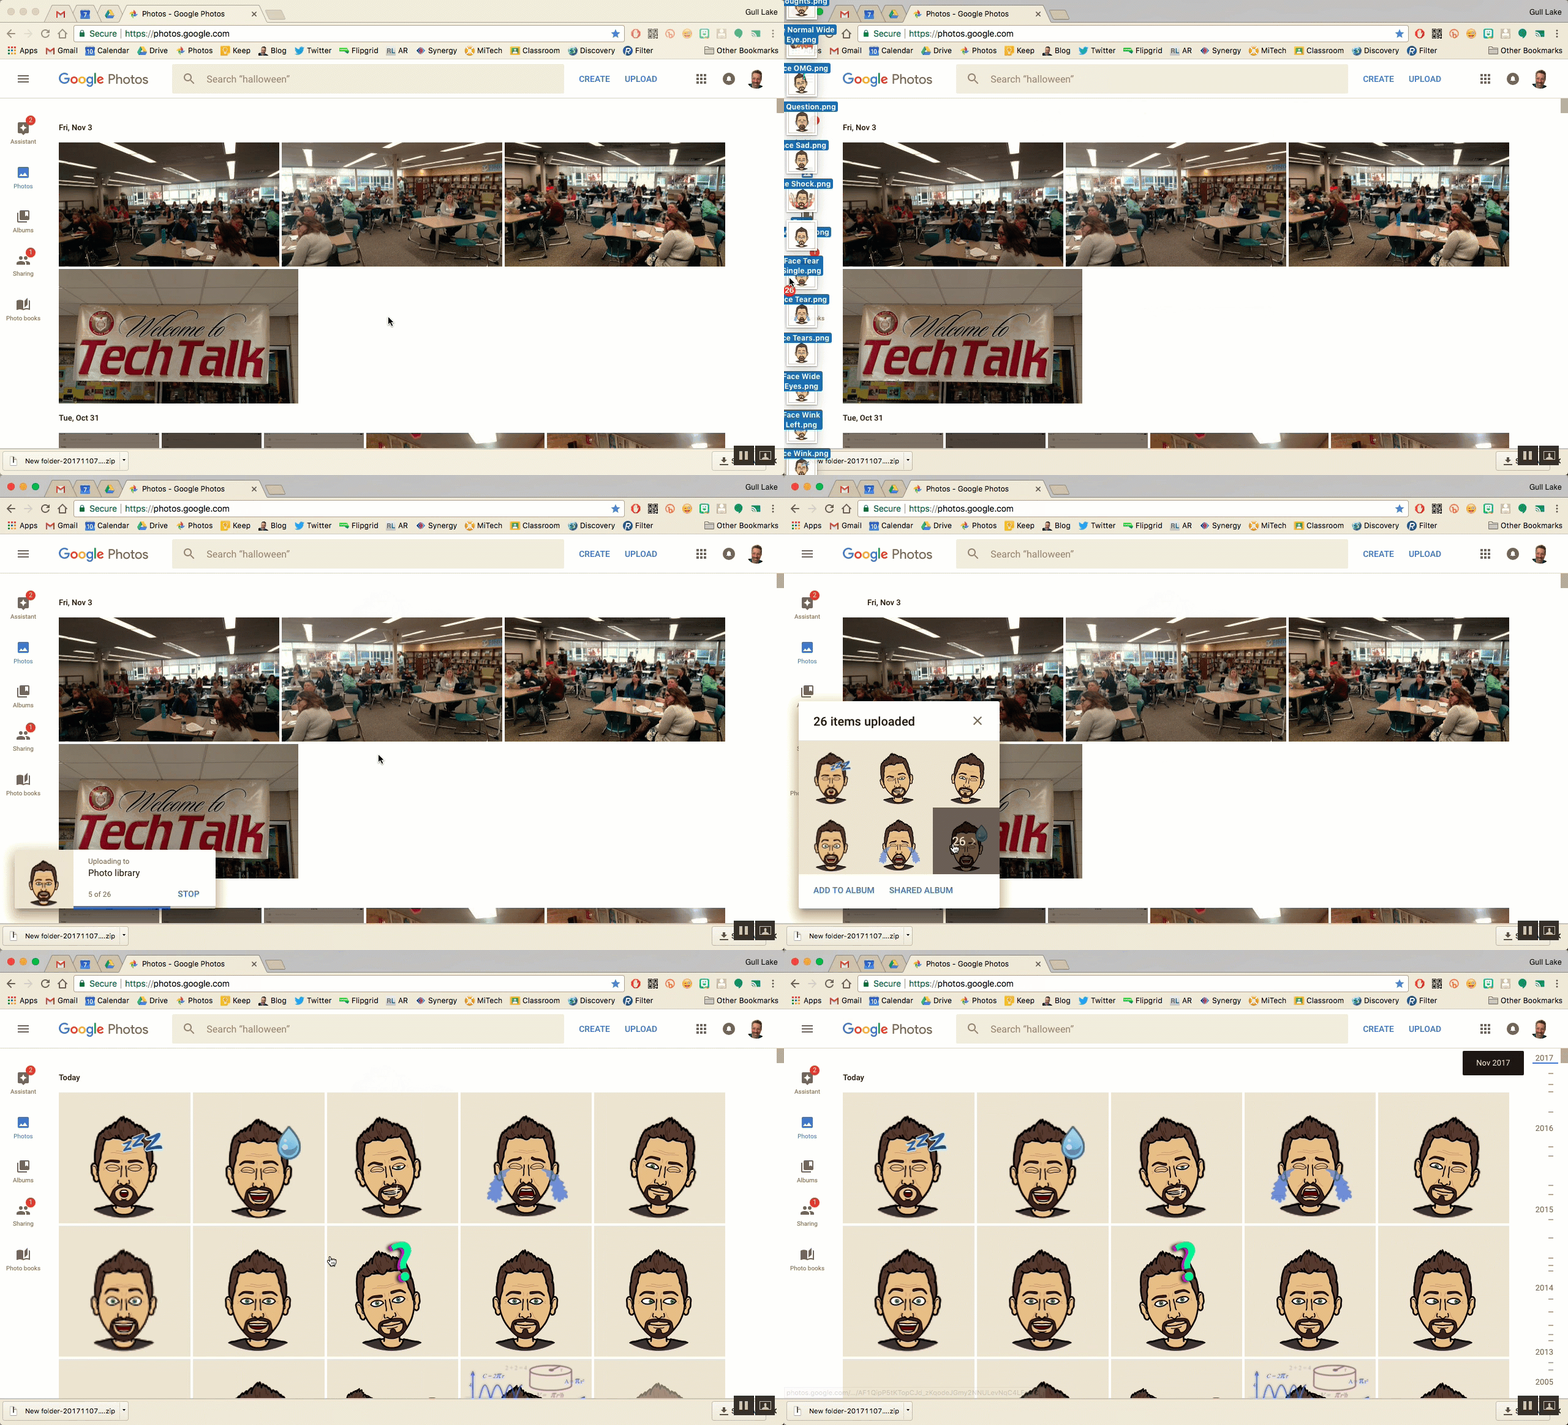
  1. Use the Google Photos app on your mobile device to auto-upload device pictures: How To Document
  2. Manually (or auto upload) upload images to Google Photos.
    1. Drag your images from your computer directly to the screen.

  1. Go to photos.google.com or use the Google Photos app and select the check mark in the top left corner of any image you want to be included in your GIF.

  1. You can choose between 2-50 images for any one GIF.
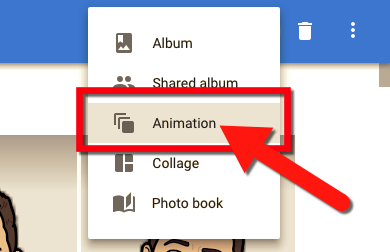
  2. Once your images are selected, click the “+” icon in the top right.

  1. Select Animation.

  1. Your animated GIF will be created. Download or insert this image into any project or social media post to share.


Make a GIF with flipanim.com:
  1. Go to flipanim.com.
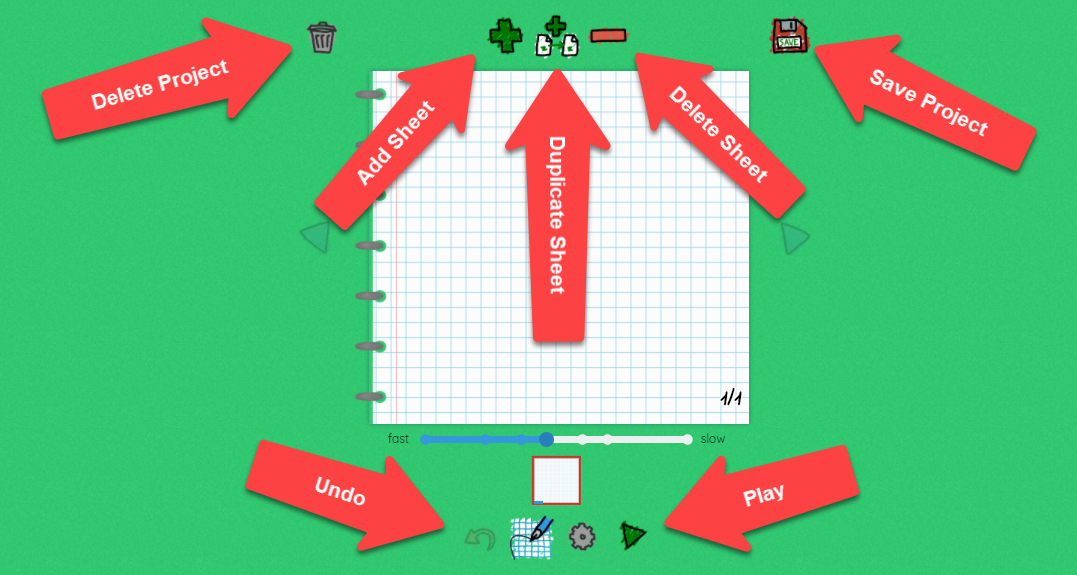
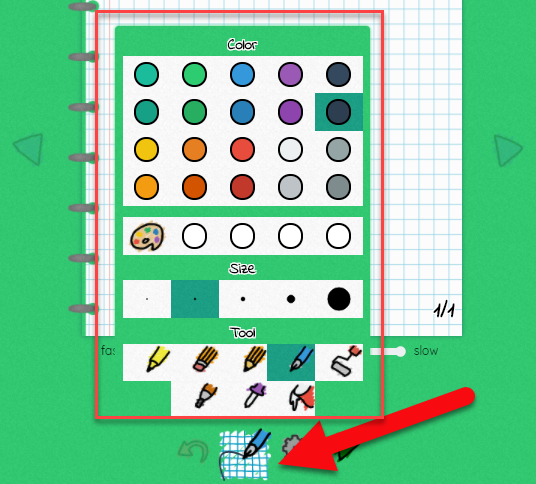
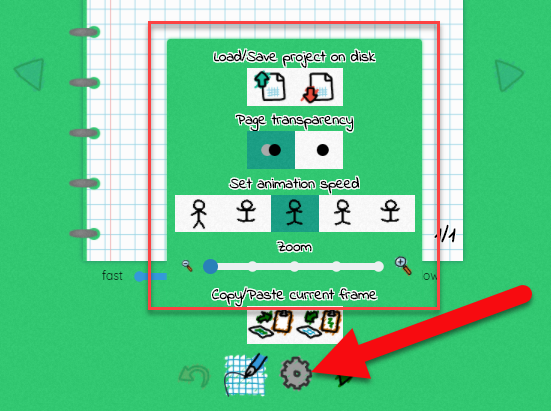
  2. Look at the tools:
 

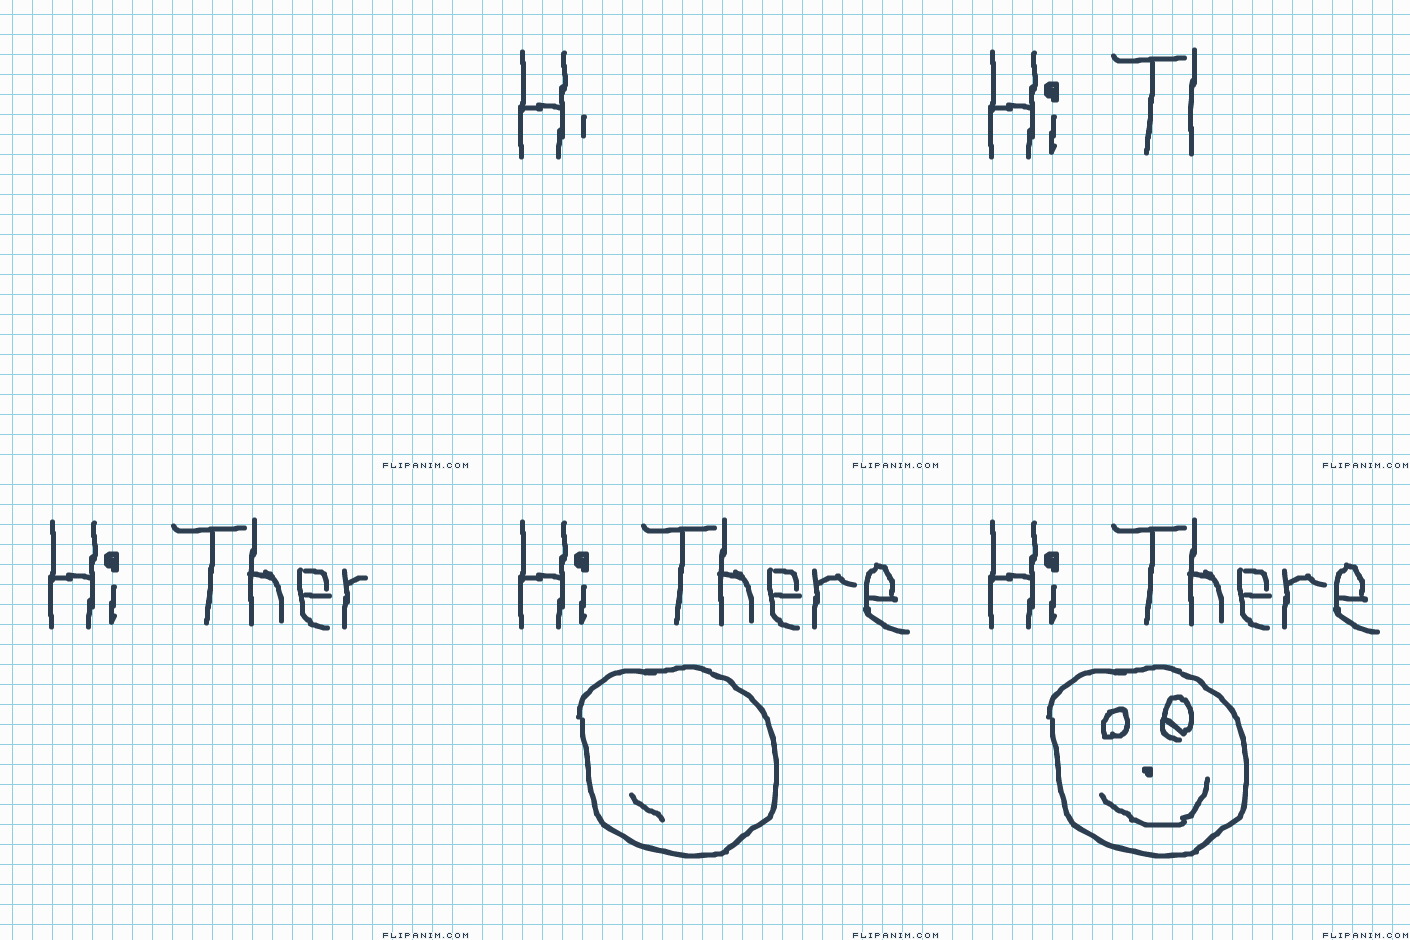
  1. The drawing process is a lot like those old school paper flip books we did as kids. You draw a little, add a page, draw a little more, add a page, etc. The advantage is that you can see the previous drawing to continue from.
    1. Start your drawing.
    2. Click the plus icon.
    3. You will see your previous drawing. Draw your moving object in the new location.
  2. Each sheet is a new “movement”. If the object is not moving (just adding things) you can use the duplicate icon to keep the previous drawing and just add to it.

  1. When you are done click “Save” and title it. The GIF will be uploaded and the next screen shows it in action. Right-click on the image and download to your device!


...and remember...it is a “J” sound in GIF (like the peanut butter)!


If you want these steps in a document click HERE!