Thursday, December 22, 2022

Name Version History

I am all about sharing my Google Creations. Collaboration is the key to awesome projects. The trouble is when someone accidentally deletes or changes things. Yikes! This is when Version History comes to the rescue. You can always go back to almost any specific “moment in time” in your document’s history. This can make correcting mistakes easy, but if you have been working on a Document for a long time it may be challenging to find just the right moment to revert your file. This is when naming your Version History comes into play. Take a moment in all your projects (especially at major checkpoints) to name that moment so it is easy to return. (Example: you have a document that is all text and you are just adding images to it. Name it “Text Only” just before adding the images. Then you can always return to the Text Only version if needed.)


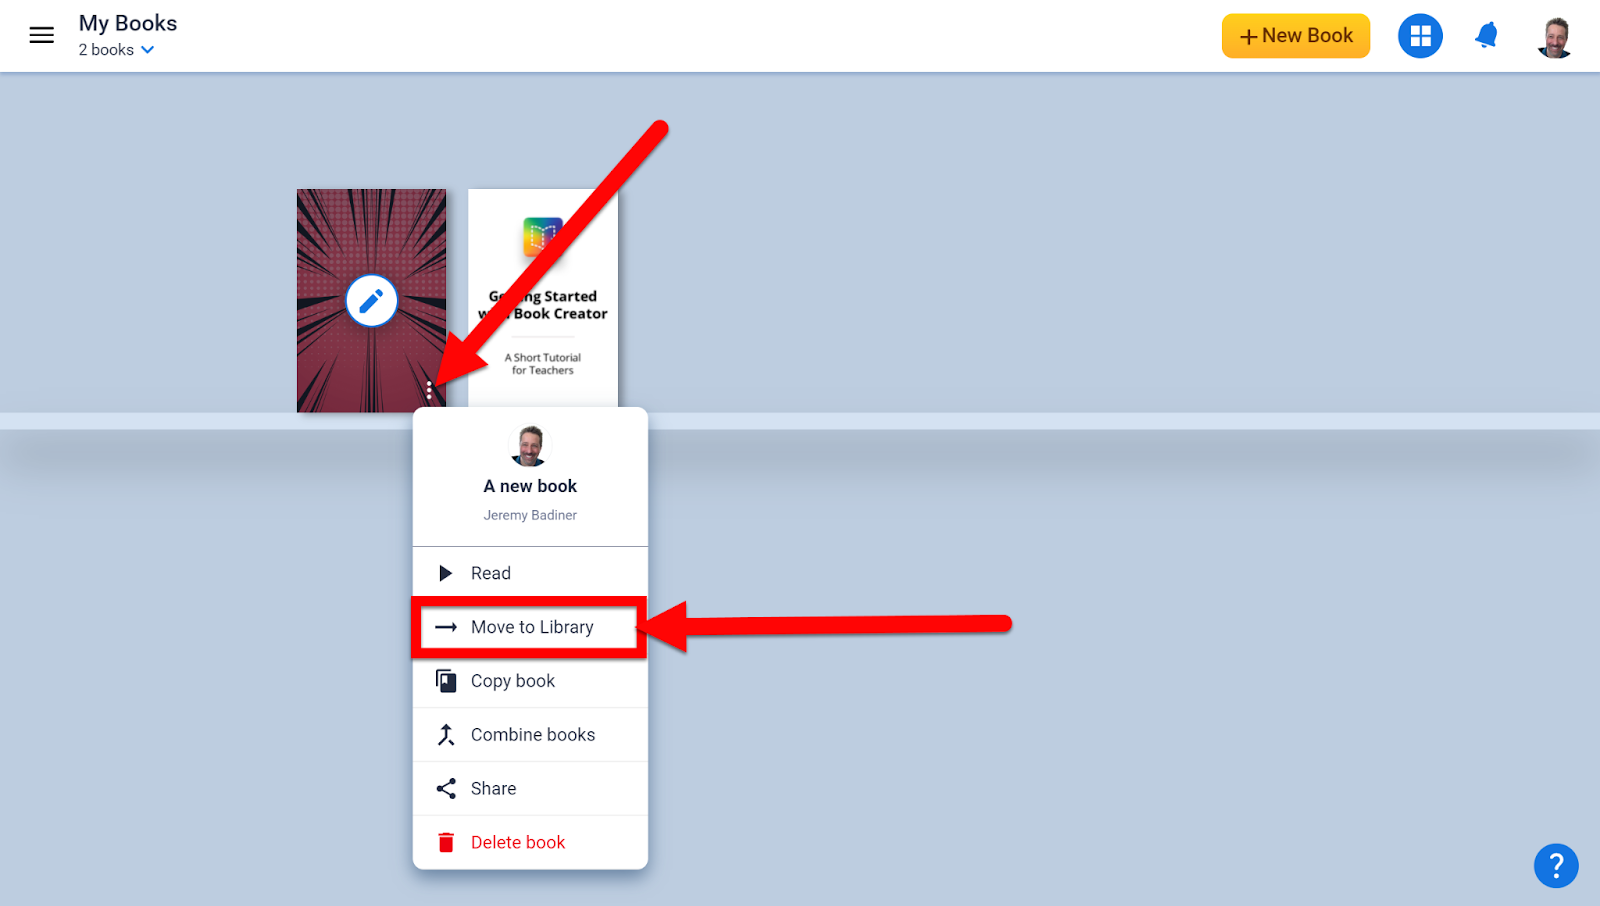
Name a Version History Moment:

  1. Open up your Document (Slide, Drawing, Sheet, or any Google file).

  2. Click on “Edit” in the top left. Choose “Version History” and choose Name Current Version”.


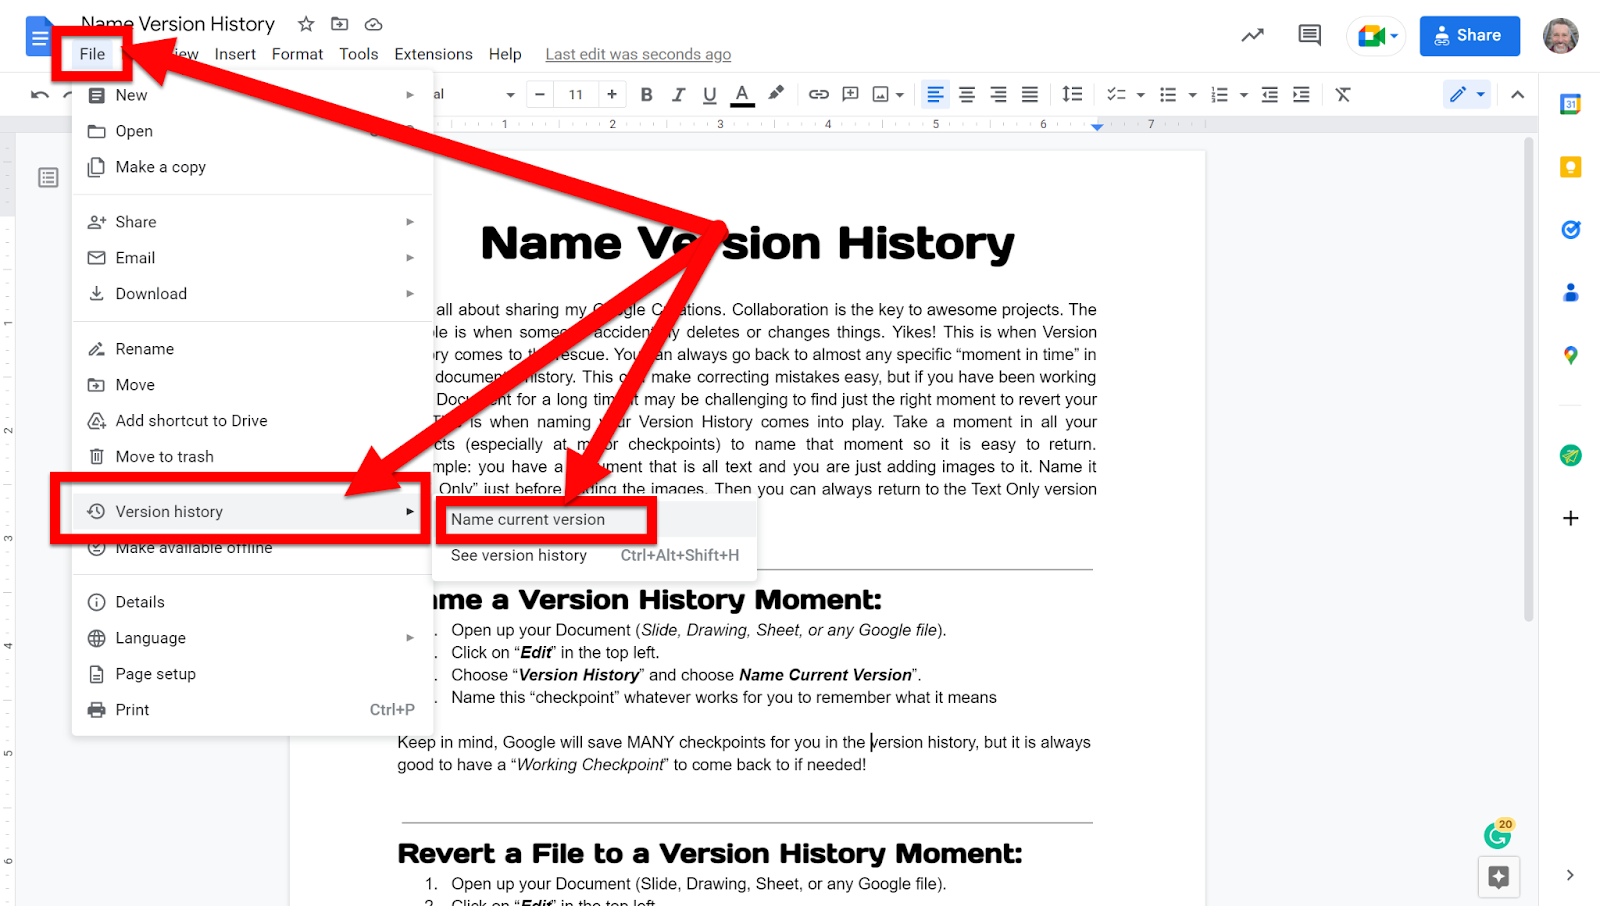
  1. Name this “checkpoint” whatever works for you to remember what it means.


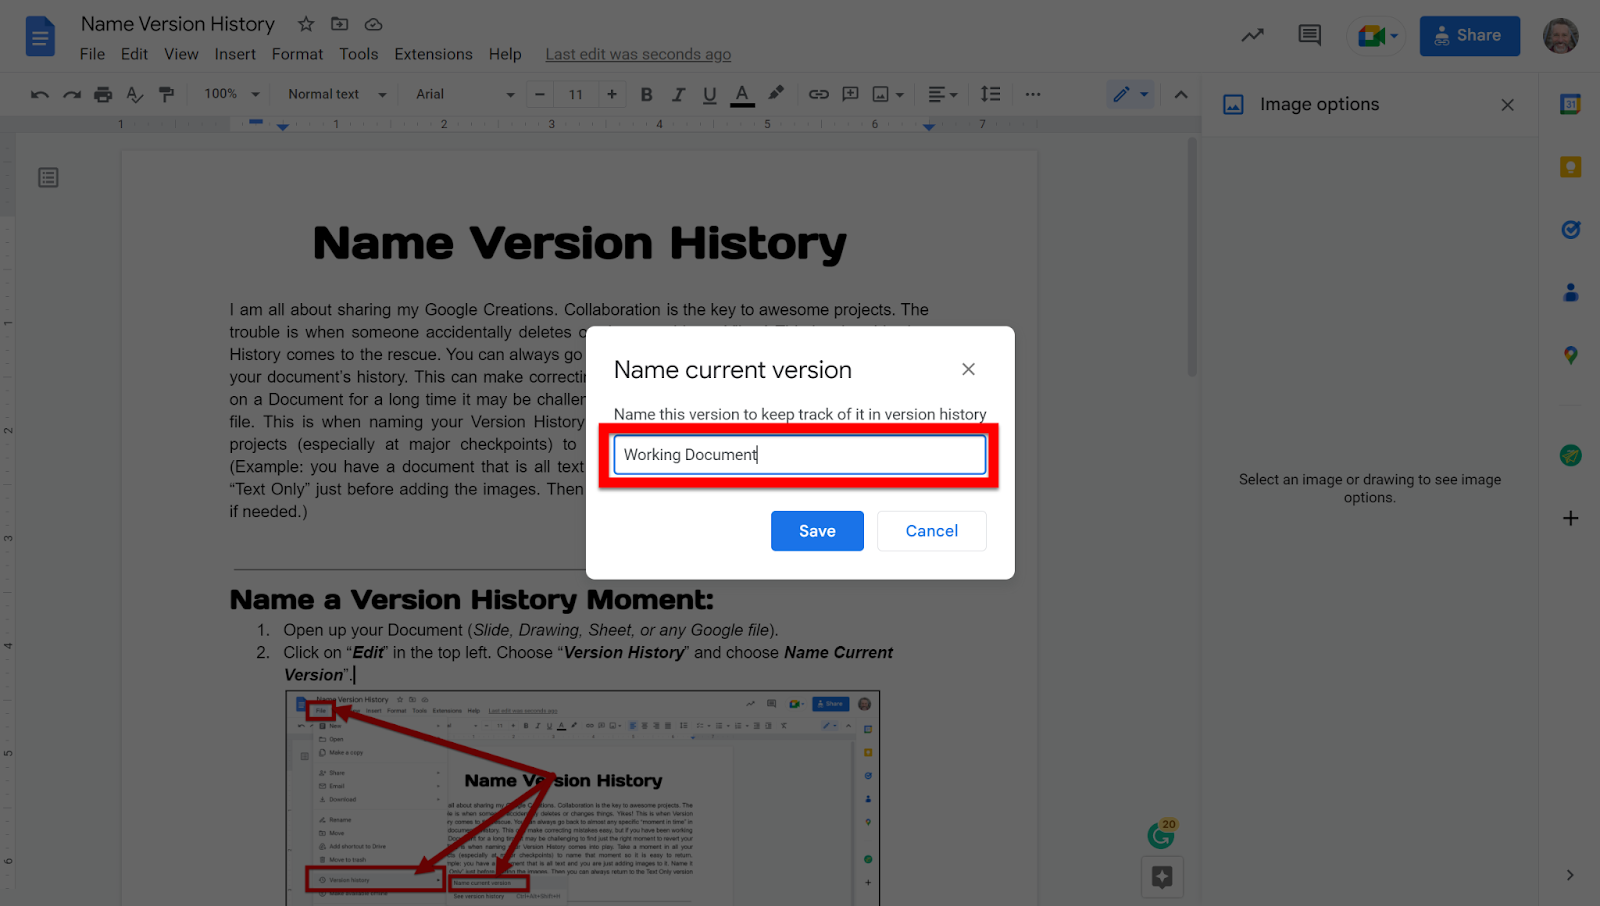
Keep in mind, Google will save MANY checkpoints for you in the version history, but it is always good to have a “Working Checkpoint” to come back to if needed!


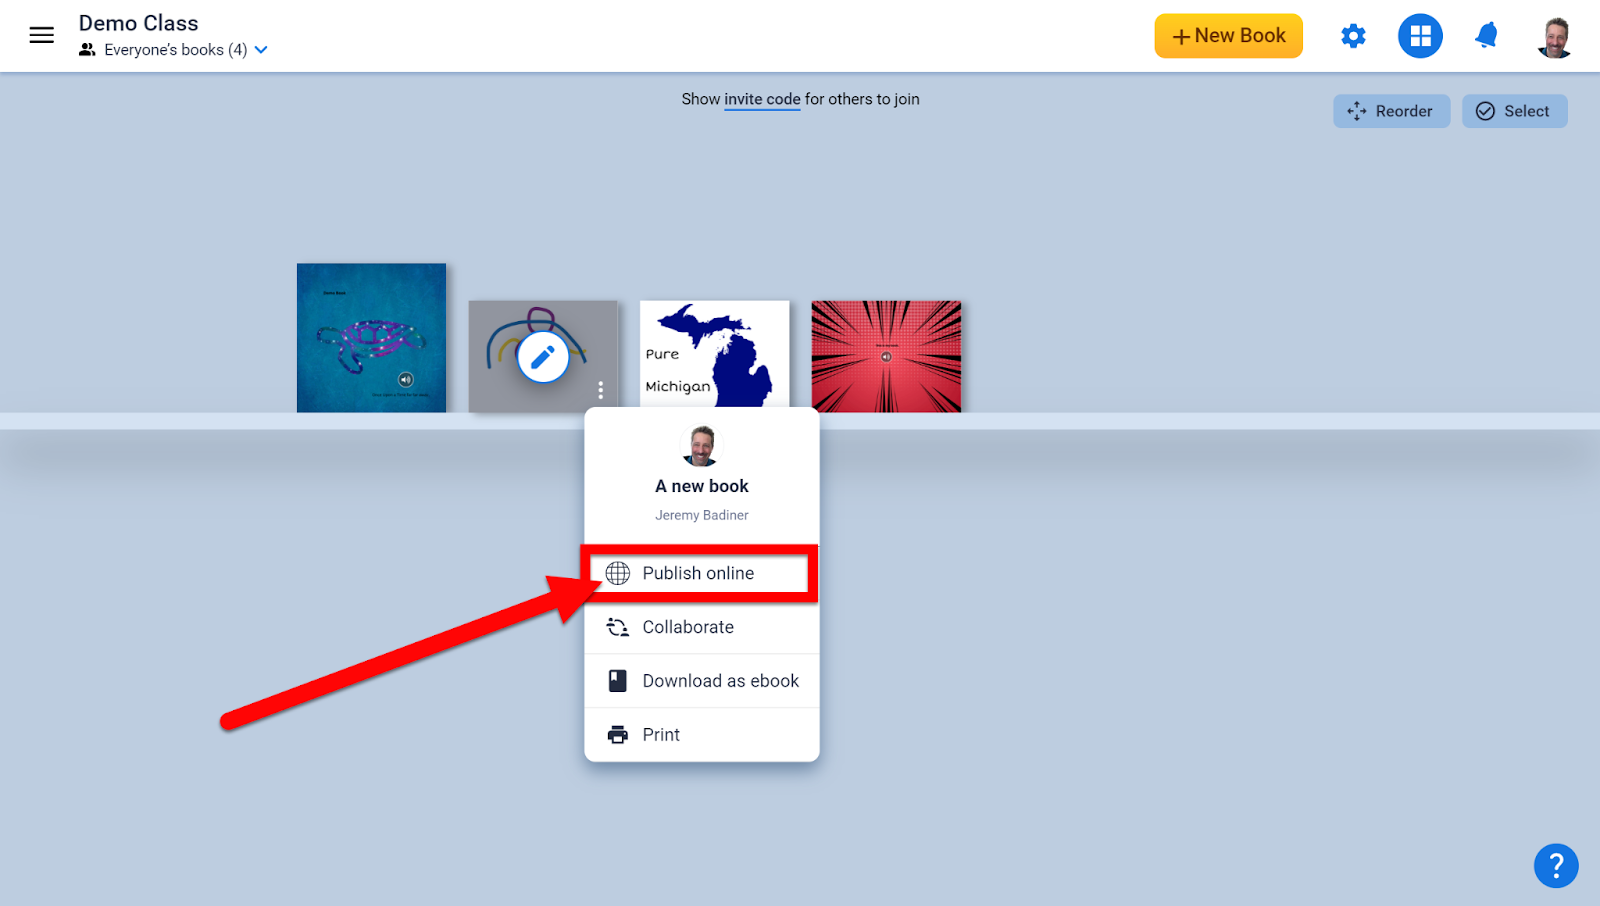
Revert a File to a Version History Moment:

  1. Open up your Document (Slide, Drawing, Sheet, or any Google file).

  2. Click on “Edit” in the top left. Choose “Version History” and choose “See Version History”.


  1. Choose the moment in time you want to go back to. The changes will be shown in colors (by change and the person who edited the document). You will see crossed-out (deleted) and color-coded (added) text/items.

    • Note that you may see drop-down arrows. These will expand even more moments to choose from. 

    • You will also see who made the changes you can go back to.


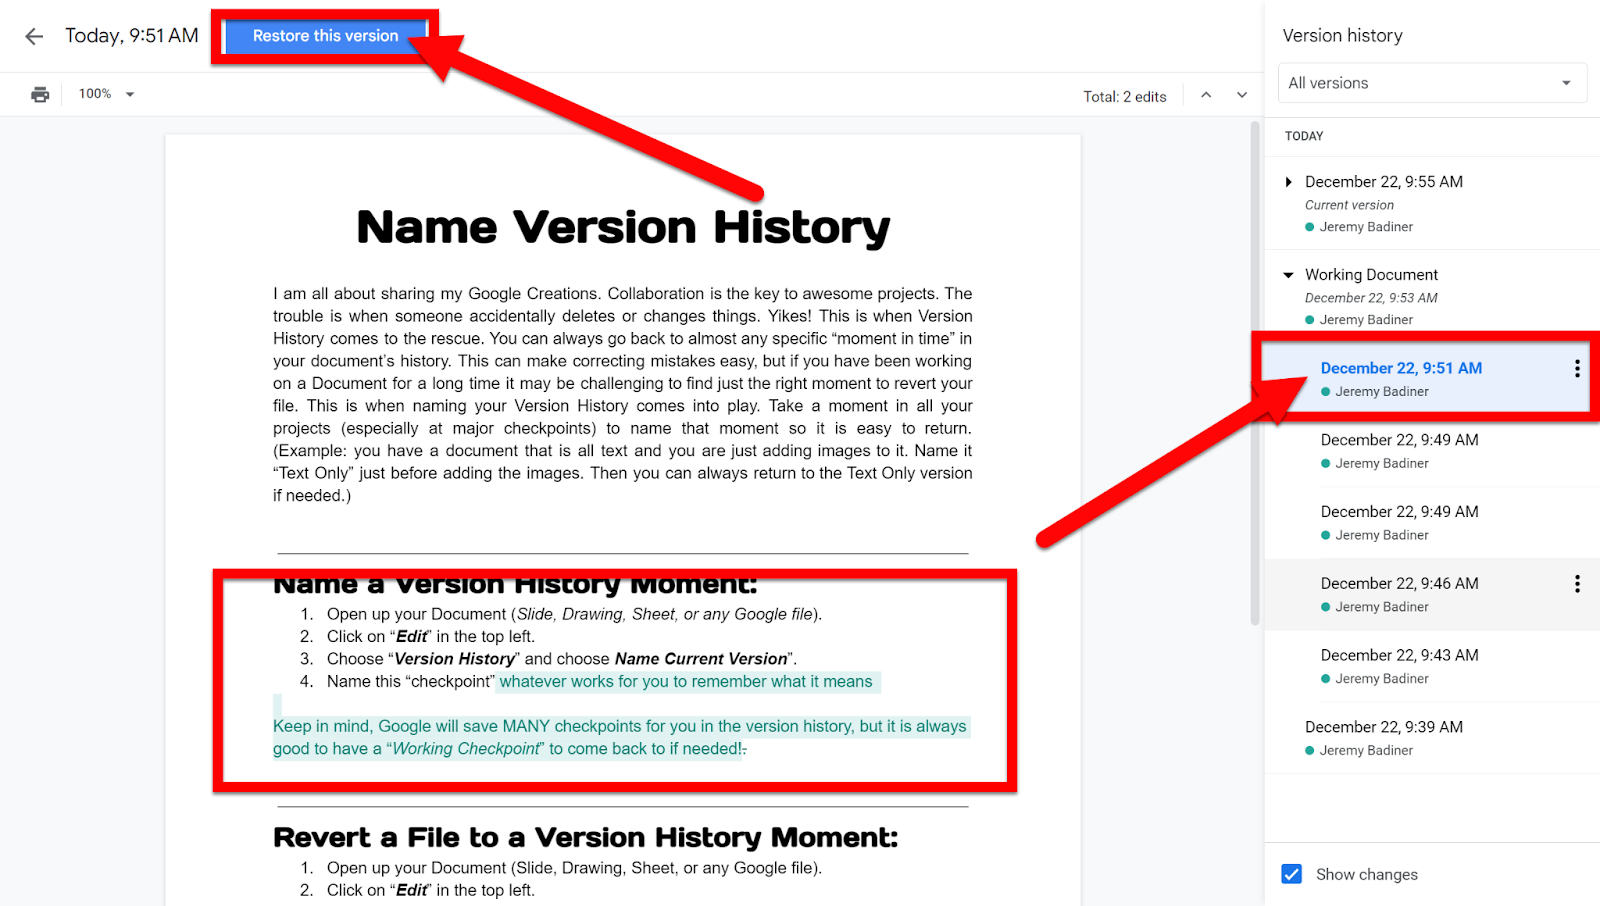
  1. Click “Restore this Version” in the top left.


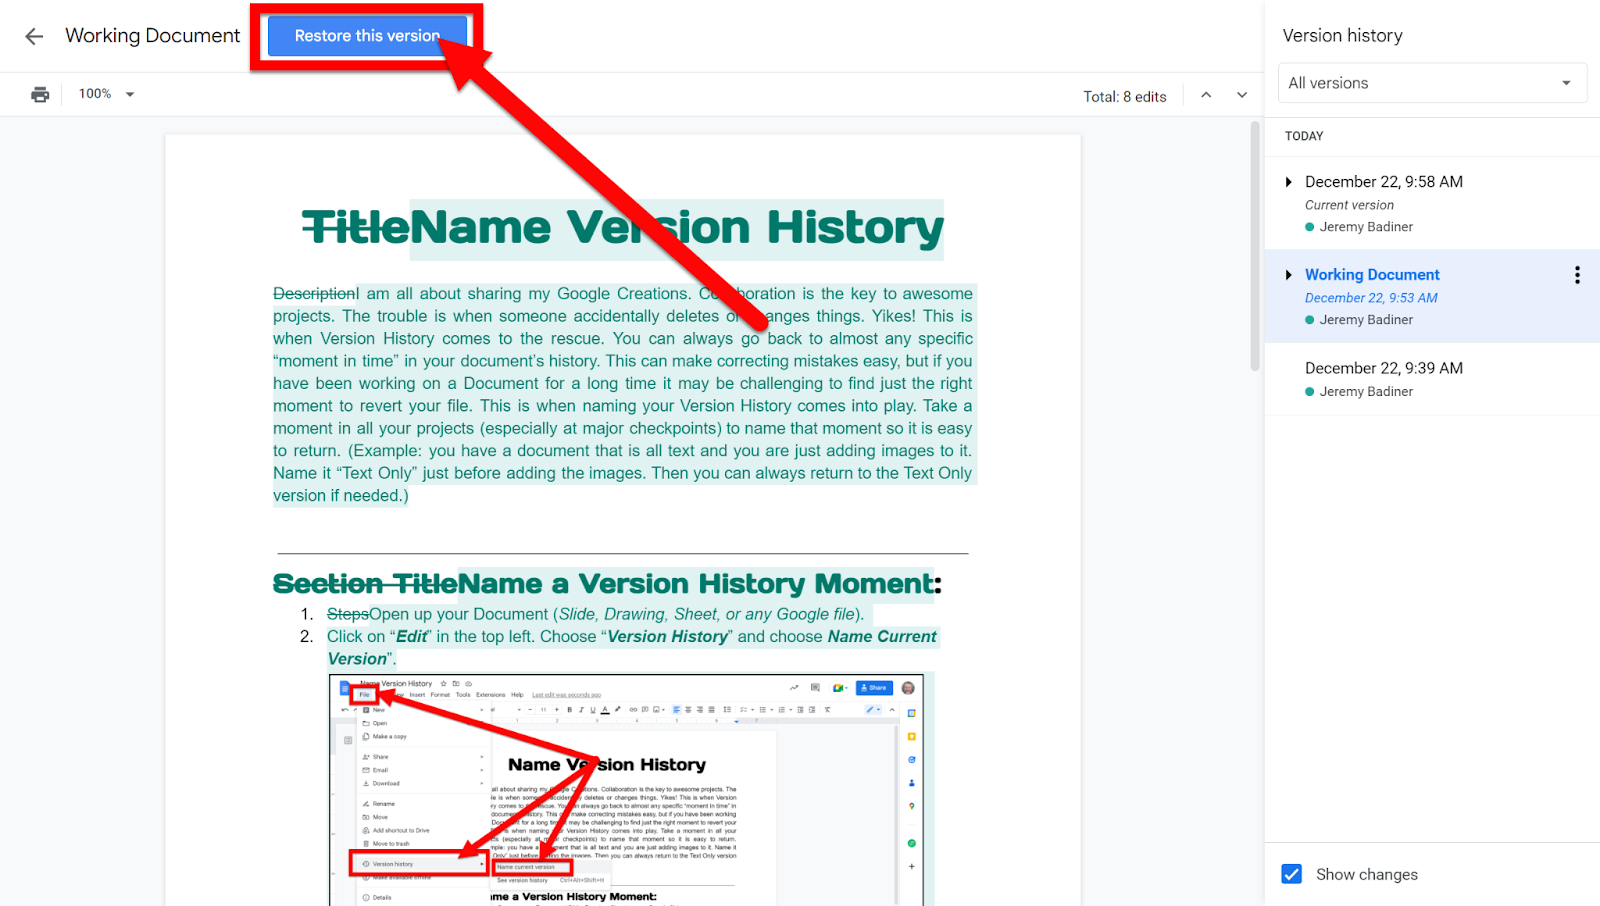
These can be undone and changed at any time. If you wish to return to the last or first change they are always available!


If you want these directions in a Document click HERE!


Tuesday, December 20, 2022

Publish with Book Creator

One of the benefits of living in a digital world is the availability of a worldwide audience. Students write differently for a larger audience than they do for the classroom. There are many tools out there that allow for digital publishing. One of them is
Book Creator. This is a tool that can be used on Chromebooks as well as tablets. There are different levels of paid access, but the free version can also be used in a classroom! With the free version, you get 1 library (collection of books) and 40 individual books. That works well for 1 book per student and leftover books for you or teams to create. At the end of the year, you can archive this library and start over with a new library and 40 new books. Check out the steps below to explore how Book Creator can help your students publish to a large audience!


Create an Account:

  1. Head over to bookcreator.com.

  2. Click “Sign In” at the top and then choose “Switch to Teacher”.


  1. Choose “Sign in with Google”.


  1. You will have to complete the steps to set up your library (the free version only allows 1 Library and 40 books).


Create a Book:

  1. Click on the “+ New Book” button.


  1. Choose your layout/shape.


  1. Choose your Background by clicking the “i” icon.


  1. Add content by clicking the “+” icon:

    • Media


  • Images: add images from the web or from your device.


  • Camera: Use your webcam to add a video/image


  • Pen: Draw anything you wish


  • The “Auto Draw” at the bottom uses AI to auto-create a picture so ANYONE can be an artist!


  • Text: Create a text box


  • Voice to Text: Add text by typing or DICTATION!


  • Record: record audio to add to your book


  • Shapes

    • Insert shapes and callout bubbles (can have text added)


  1. Add pages

    • Click the arrow to the right to add a page


  • Manage/reorder pages


  1. Play the book

    • Just click the arrow in the top right to play the book. You can even have it read to you by clicking “Read to me”.


Share with Students:

First, there are 2 ways to display your books. The grid icon in the top right controls this.


There are 2 ways to share your books. 

  1. Add to a Library: 

    • Click the 3 dots and choose “Move to Library” if in compact view. 


  • Go to the “Library” icon and click “Move to Library” if in the zoomed-in view.


  • Open the Library you added the book into by clicking the 3 horizontal lines in the top left, choosing the Library, and clicking on the “Invite Code” link at the top. This is what you will share with your students once they have signed into Book Creator.


  1. Share the Link:

    • After your books are finished you can share them with the world by clicking the “Share icon”. You can then choose to “Publish online”, “Download as ebook”, or “Print”. The ebook download will require an ebook reader, and printing can be paper or a shared PDF but will lose the video/audio features.


  1. Once published, your book can be read on bookcreator.com with a private link. You choose who to share this book with, and you can unpublish the book at any time.


Add Students to Library:

There are 2 ways to add students. The easiest is by using their Google Accounts. 


  1. Use your students’ Google Sign-in:

    • Have your class go to bookcreator.com.

    • They will click the “Student” option.

    • They will sign in with their Google Account.

    • Students will be asked for the teacher's code. This is found by opening the Library you added the book into by clicking the 3 horizontal lines in the top left, choosing the Library, and clicking on the “Invite Code” link at the top. This is what you will share with your students once they have signed into Book Creator.


  1. QR Code: (If not signing in with Google)

    • Create your class list by clicking on your profile pic and choosing “Student Logins”. 


  • Click “Add more students” and enter their names.


  • You will then be asked to add them to a Library. Choose the correct one.


  • You can now download badges or links for them to use to sign in.


  1. Students can now view any book in the library and add books of their own. Keep in mind...you are limited to 40 books with the free account. 


You now have Library and student access. Have them create and publish their work for the world to see!


If you want these directions in s Document click HERE!


Thursday, December 8, 2022

Free Cloze Generator


Cloze exercises are simple fill-in-the-blank exercises. Check out SPF.IO’s free Cloze Generator to create practice activities for your class. It is as easy as copying, pasting, selecting words to eliminate, and printing! Easy Peasy!


Steps:

  1. Head over to www.spf.io/free-cloze-fill-in-the-blank-generator.

  2. Paste the text you wish to use in the text box and click on “Generate exercises”.


  1. You will see each sentence as a separate line. The “X” to the left allows you to exclude this sentence from Numbering/Cloze words. Click on a word to make it one of the choice words eliminated that needs to be filled in. When ready, click on “Create worksheet” to make your activity.


  1. Title your activity and choose if you want the eliminated text in a word bank and if you want them numbered. Click “Print”.


  1. Print your activity and enjoy!


If you want these directions in a Document click HERE!