Thursday, December 8, 2016

Assigning Tasks in Google Comments


We all love the collaboration that all the G Suite tools allow. One of my favorite things to do is create comments in Apps to students or staff. This allows us to communicate within the document without editing the text. There is a new feature within Comments now. With the new update you can assign others a task. They will get an email and Drive notification and be directed to do what it is you assigned them. Give it a try with these easy to follow steps!


Assigning Tasks in Google Comments

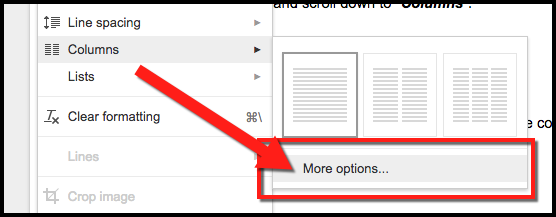
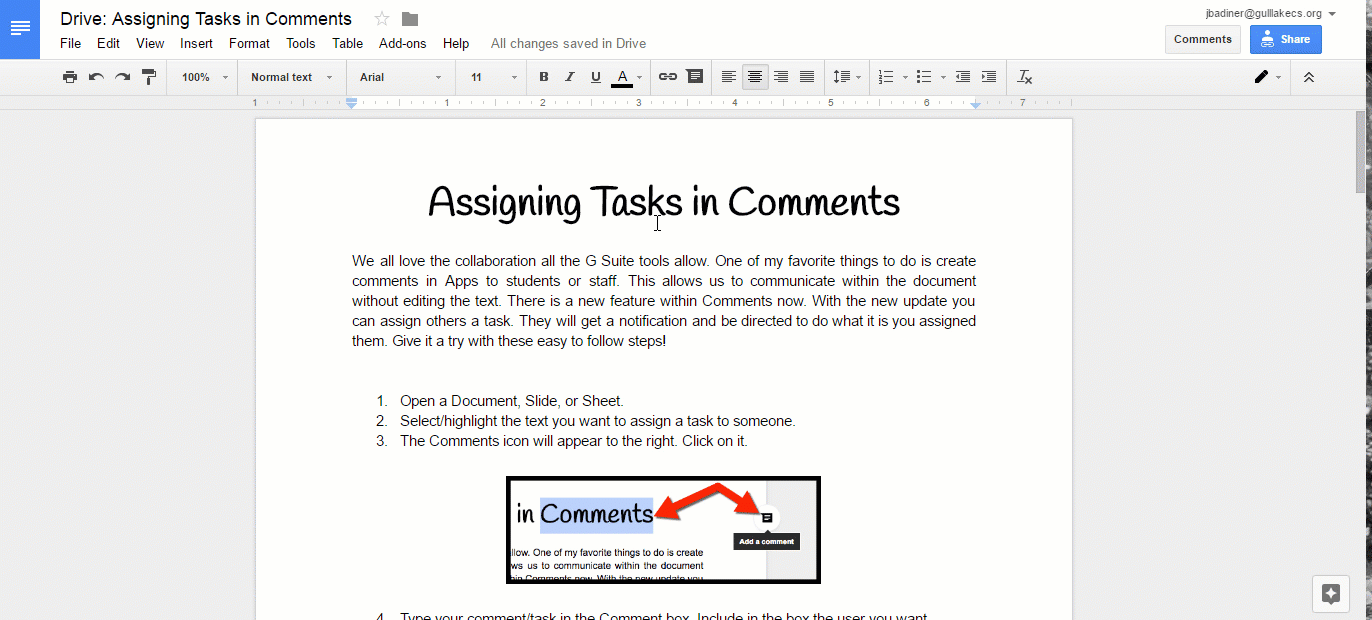
  1. Open a Document, Slide, or Sheet.
  2. Select/highlight the text you want to assign a task to someone.
  3. The “Comments” icon will appear to the right. Click on it.


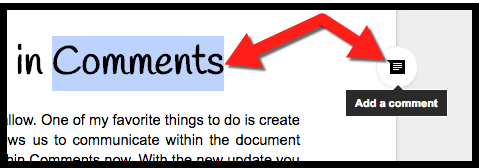
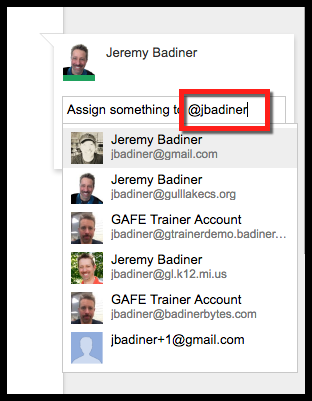
  1. Type your comment/task in the comment box. Include in the box the user you want notified by adding a “+” or “@” in front of their name or Google username.  


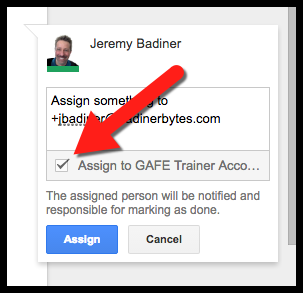
  1. Check the “Assign to...” box.


  1. You will get a notification to share this document with that person if it is not already shared with them.


  1. Finally you will see the comments/assigned task on the right side in the comment area.


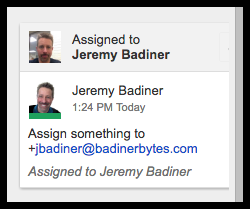
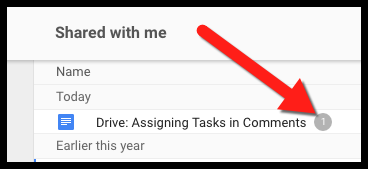
  1. The person assigned the task will get an email notification. Even cooler, any document shared with them that they are assigned a task in will have a badge within Drive!


Dive into a document and start assigning to give this a try!


If you want these steps in a document click Here!


Monday, November 21, 2016

The “New” Google Sites

After many years of using Google Sites, many of us have been waiting for a refresh/modern platform. It has arrived! With change always come some growing pains, and there are some with the New Google Sites. With the New Sites just being released, there are some things missing. Be aware that as of right now some things are limited: fonts are locked/non-changeable, arrangement of sections is basic, no HTML embedding, no ability to create copies for templates, and no gadgets are a few of the things I noticed right away. Knowing this going in helps, but there is good news! For starters, it is very easy to use...similar to other platforms like Weebly. There are drag and drop boxes/sections and object sizing is very easy. I feel it is more “student friendly” and more like all the other Google tools. Sites now lives within Drive (perfect!), allows easy sharing (great!), and makes nice looking sites with very little work (YES!). Dive in and take a look. Keep in mind that Google has already stated that they are working on adding features and will eventually allow your Old Sites to convert over. Follow the steps below and get creating!

The "New" Google Sites

There are 2 ways to get to Google’s New Sites:
  1. Go to https://sites.google.com/new and click the red “+” button in the bottom right.


  1. Go to your Drive>New>More>Sites.


Get Creating! Once you have started the sky's the limit!
  1. Inserting items:
    1. Click the Insert tab in the top right. You can also double click anywhere on the page to add these.


    1. Choose what type of item you want to insert.


    1. You can easily add Google Items as well!


  1. Creating Pages:
    1. Click the Tab for Pages and click the New Page icon.


    1. You can reorder these whenever you like.


  1. Changing Themes.
    1. Right now there are only a few to choose from. These themes set banner and font style/color.


  1. Publish/Share Site:
    1. When you are ready to publish or share, it is easy!
    2. Click the “Publish” button and your site will be live!
    3. You have the opportunity to set your web link, who can see the site, and if it is searchable on Google!


Now is the time to start playing and explore. Just a tip, while in the editing view, your site looks different than it will when published. I recommend always clicking the “Preview” icon (eye) before clicking “Publish” to verify your site looks like you intend. Alos, keep an eye out for updates. Hopefully more functionality is coming soon!

If you have a request for a missing feature submit Feedback!


For more information on the New Google Sites and help, head here:


If you want these steps in a document click Here!


Friday, November 11, 2016

Uploading Files with Google Forms

It is finally here! The long awaited “Upload File” in Google Forms has arrived! You can now have students upload files from their desktop or Drive directly to you through an easy process in Google Forms. Below are the steps to see how it works. One thing to keep in mind...This is only available for GAFE accounts and can only be used in the same domain.


Uploading Files with Google Forms

  1. Create a Form. Then choose the question option of “File Upload”.


  1. Forms will run you through a Step-by-Step setup for that question.


  1. You will title the question (this will name all submissions this name to easily find later).


  1. You can set the maximum file size.


  1. You can choose/limit the uploaded file type.


  1. Then you can send the Form to your students. When they submit they will be able to choose where the file is located to upload (on their device or in their Drive).


  1. If the file is on their device it will make a copy in their Drive (they will need to be signed in to their GAFE domain). If they are sharing a Google Drive file (or once the Form creates the uploaded file in their Drive) it will share to the Form creator. Form will then also make the Form creator the owner of this file.
  2. You now just need to go to “Responses” to see the submitted files. You can see them by individual or question here.


  1. The Form also makes a folder within your Drive with all the uploaded files.


  1. Forms also puts a folder for each question within this folder. You will notice that you (Form creator) is the owner of these files.


  1. If you prefer to work in the Spreadsheet, you can create a spreadsheet with all the submitted files.


  1. Links to each file will be listed under the question.


This is a great way for students to get files to you through Forms. Keep in mind, your students will need to be signed into their Google Accounts on the device they are using. Below is a video link to the process as well:


If you want these steps in a document click Here


Friday, September 30, 2016

Add Closed Captioning to YouTube Videos


YouTube Logo

With all the new laws on the books there are some considerations you need to keep in mind if you create or share YouTube videos. If you post links to YouTube clips on your website, share videos with parents, or make a YouTube link public in any way through your website you are required to have Closed Captioning enabled. You will need to do this to any video you share with the public that you make. The link below will help you enable Closed Captioning on any YouTube videos you have made so you are in compliance with this law.

Add Closed Captioning to YouTube Videos


  1. Go to YouTube.com.
  2. Click on your Profile picture in the top right and click “Creator Studio”.


Step Image


  1. Click on “Video Manager” and then “Videos”.


Step Image


  1. Click the drop arrow next to “Edit” on one of your videos. Click on “Subtitles & CC”.


Step Image


  1. It will ask for language. Choose which you want.
  2. Click on “Add New Subtitles or CC”.


Step Image


  1. The left side will now have the auto transcribed text. You can edit in here if needed then exit.


Step Image


You are all set!


(Video How-To Here: https://youtu.be/B_YYYo2t9ss)


If you want these directions in a Document click Here!


Tuesday, September 20, 2016

Create Columns in Google Documents


I have been a long time user of Google. It has been over 5 years since I have used MS Office for anything. I love everything about Drive and all the tools. Documents has replaced Word for me with only a few issues. One of them was columns. For years I have done a work around involving making a table, inserting text into cells, then making the table lines white to disappear. Those days are now GONE! Google Documents now allows the use of columns! Check out the simple steps below and start typing in one, two, or three column documents today!


Create Columns in Google Documents

  1. Create a document and click “Format” and scroll down to “Columns”.


  1. Choose one, two, or three columns.
  2. Tada! Start typing and you are Done!


  1. You can even choose to have a line drawn between the columns to separate them more by clicking “More Options”.


  1. Then choose “Line between columns” and click “Apply”.


Get Creative And Make Some Columns!


If you want these directions in a Document Click Here!