Thursday, October 22, 2015

Group Work in Google Classroom

With all that Google Classroom can do for you, there are some things it lacks. It is not a full LMS. There are some things missing. One of these items is a way to grade/submit Group Projects. We all know that collaborative work is a wonderful learning tool. Google Classroom does not have built-in method to do this; however, there are workarounds that are not difficult. Below are 2 options I use.


Group Work in Google Classroom


Option #1:
  1. Assign a project to the whole class as any regular assignment. Attach a Google Document/Slide or other file as you would usually do.


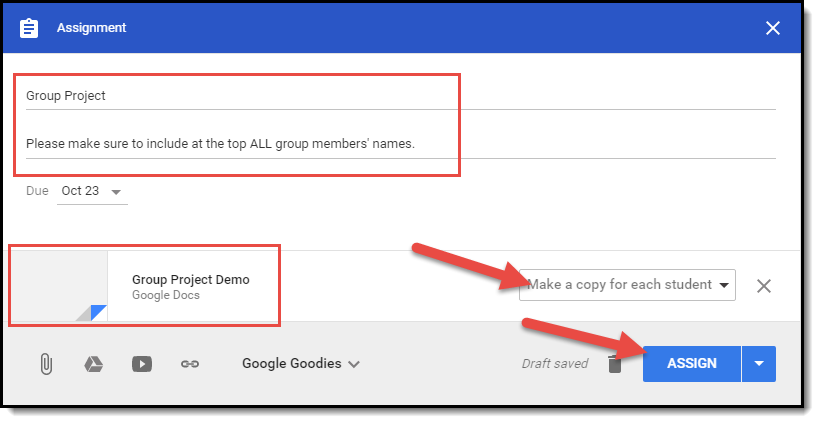
  1. Either create your own groups with students or have them choose who they will work with.

  1. Once you have groups, each group must choose a “Leader” or “Submitter”. This is important in order for this method to work.

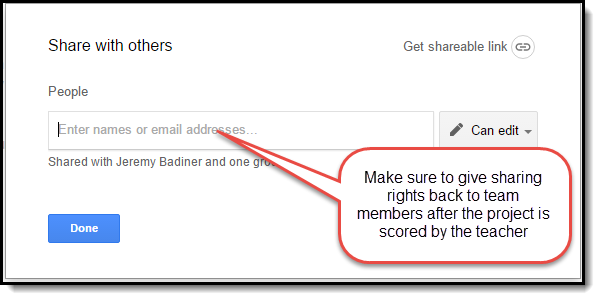
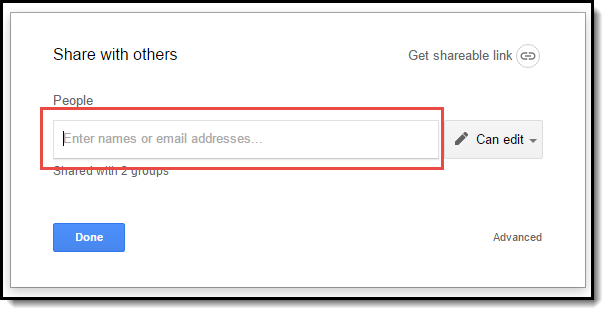
  1. The “Leader”/“Submitter” then must share his/her document from the Classroom and give all team members editing rights. The other team members will not edit their Classroom document.Make sure all team members are listed on the document.


  1. The group can now do this assignment as they would normally do a shared group assignment.

  1. When the project is completed teachers will have only the “Leader”/“Submitter” turn in the actual project the whole group worked on. Remember, on the top (or title slide) all team members must be listed for the teacher to assign grades to the correct students. Teachers will only need to read/review the one project and assign scores to all members of the group. Each group member still needs to submit their assignment (even though it is blank) like any other individual project.

  1. When the teacher goes to grade assignments, they will see all students’ submissions (the group one from the “Leader”/“Submitter” as well as the blank ones from the other members).


  1. Teachers only need to make comments on the “Leader”/“Submitter” document. Then assign the same score to each member of that group on their blank assignments.

  1. When the teacher “Returns” the assignment to the “Leader”/“Submitter” only that person will have editing rights to that document. This has to do with how Classroom changes ownership when “Turned In” and “Returned”. The “Leader”/“Submitter” then will re-share the document to the team members.


  1. In short, one person submits a project, but the teacher awards points to all members in the group. It is helpful to have the group members listed for the teacher to know who to award points to in each project.


Additional alteration: If the teacher wants all members to have a final project to own, the members who normally submit a blank project can copy and paste the group project directly into the Classroom assignment so they are all submitting the same project on their own. This is up to how the teacher wants to grade assignments.


Option #2:
If you don’t want the confusion of managing who is on what group, you can follow these steps.

  1. Create a template file in Drive.
  2. Share that file with pre-determined students in your Classroom.


  1. Attach this document as a LINK as an Assignment.


  1. Have only those students who are in that group click on the link (they will be the only one who can access the document as they are the only ones with rights.
  2. Have them click “Mark as Done” to turn in.
  3. The teacher will need to find that file in their Drive to assess the work.


For a document with these directions click Here!


Tuesday, October 20, 2015

Posting in Google Classroom

Google Classroom is a fantastic tool to help organize both teachers and students. It can act as your classroom hub for all things from posting reminders, to sharing links, to assigning work. Getting information to students is easy and can be done in different ways. There are Announcements, Assignments, and Questions. Each one is right for specific reasons. Check out the types of posts and what can be done with them. Get started posting with these simple steps!


Posting in Google Classroom

  1. Open your Google Classroom. If you do not already have one, follow these steps to Create a Google Classroom.
  2. Look in the bottom right corner and click the "+" symbol.
  3. Choose which type of post you want to use:


  • Announcement: This is a post that does not require the student to do anything. It is something you want them to see or read. It can be a text post, a video link, a document or any other file, or all of the above.


  • Assignment: This is something you want the student to do. It can be something non-digital, a video to watch, a document to turn in, or any file to upload. There are many options to use here, but they will all require the student to “Turn In” something or “Mark as Done” so the teacher can assess their work.


  • Question: This can be a post asking the students to discuss a topic or post a question. It creates a forum style dialogue that can be monitored by the teacher.


  • Re-use post: This allows teachers to reuse any post previously created in any course (Classroom) the teacher made.


Announcement:
  1. Type the announcement you want students to see in the top line.
  2. You can attach any type of file/link you want as well.


Assignment:
  1. Type the assignment name in the top line.
  2. Attach any file as well. This is where it is great to have a Google Document as a template for students to use. When they click on the Google Document it will make a copy in their Drive and when they submit it to you there will be a copy for you as well.
  3. Set the Due Date (if you want one).
  4. Click on “Assign” or drop arrow to “Save as Draft”.


Question:
  1. Post a question at allow students to have a forum style dialogue.


Re-Use Post:
  1. This is a great new feature. You can click “Re-Use Post” and use any port you have written in any other Classroom.
  2. Choose the Classroom the post is in.


  1. Choose the assignment.


All Post Types You Can:
  • Choose to have “Saved Draft”:
  • Note: You can not take a previously assigned/posted post as a Draft.


  • Posted to multiple Classrooms:
    • You can assign any post to multiple Classroom while making it.
    • Click the drop-down menu and choose which Classrooms you would like to assign it to. This is very helpful when you teach the same subject but want each block to have their own Classroom.


Start exploring what Google Classroom can do and get Posting!

If you want these directions in a document click Here!


Monday, October 19, 2015

Setting Up a New Google Classroom

Google Classroom is a great tool. It’s the perfect landing spot for most of your classroom links, activities, and assignments. It can be used for so much, as long as students are on the same domain as the teacher and the domain is a GAFE domain. Getting started is easy. Follow the steps below to create your first Google Classroom.


Setting Up a New Google Classroom


  1. Sign into your GAFE account.
  2. Choose “Teacher”.
    1. Very Important. If you choose “Student” your Google Admin will need to reset your account in order to create a class.


  1. Click the “+” symbol then “Create Class”.
  2. Name your class.
    1. Something to consider: you can change the class name at any time, but the Drive Folder associated with the class will not change.


  1. Walk through the tour to get a feel for the setup of Classroom.
  2. Set the Theme for your Classroom. Click “Select theme” or “Upload photo”.
    1. If you choose to upload a photo the theme will be set by the tone of the image.


  1. Click on the “Students” tab on the main page.
  2. There are 2 ways to have students join your Classroom.
    1. Manually Enroll:
      1. Then click on “Invite” button.
      2. Search and select students to enroll (works with Gmail contact list)


    1. Students Self-Enroll:
      1. Give students the class code. When they go to www.classroom.google.com they can join and enter in your code.


Log in to Google Classroom today and start posting!


To see these steps in a document click Here!


Saturday, October 3, 2015

Google Classroom Chrome Extension

Google Classroom is the Hot Tool right now. It is an awesome landing spot, sharing tool, and Drive organizer. The more I use it, the more I like it. The Chrome extension makes teachers’ lives even better. This extension does so much for both teachers and students. Check out what you can do with this simple little button that should be living next to your Chrome Omnibox!


Google Classroom Chrome Extension

First thing...Install the Chrome extension:
  • Search for “Google Classroom” in the Chrome Web Store and install in both teacher & student accounts. Click on the one that is called "Share to Google Classroom" made by Google.


Send websites directly to students:
  1. Go to a website you want your students to be at.
  2. Click on the Chrome extension.
  3. Choose the Classroom you wish to work with.


  1. Click on the top box and change it to “Push to students”.


  1. Click the blue “Push” button.


  1. Students will see a notification at the top and the site will load on their device!


Send website as an assignments directly to Classrooms:

  1. Go to a website you want your students to be assigned or get in an announcement.
  2. Click on the Chrome extension.
  3. Click on the top box and select either “Make announcement” or “Create assignment”.


  1. The extension then lets you add text to the assignment or announcement.
  2. Click the blue “Post” if it is an announcement or “Assign” if it is an assignment button.
  3. The link you were at is now an assignment or announcement within the Classroom you chose.


Students can send to the teacher as well:
  1. The student can go to a website they wish to share with the teacher.
  2. They click on the extension and see all Classrooms they are enrolled in.
  3. Choose the classroom and click on “Push to teacher”.


  1. The teacher will receive a notification in the top right side of their screen.


  1. They can then find the sent links in the “Received from students” section of the extension.


  1. If the teacher clicks they are directed to the sent link.


Experiment to see what you can do with the extension. You can do so much without ever actually opening the Classroom.


If you want these steps in a Document click Here!