Saturday, April 22, 2017

Remove a Drive File from One of Multiple Folders


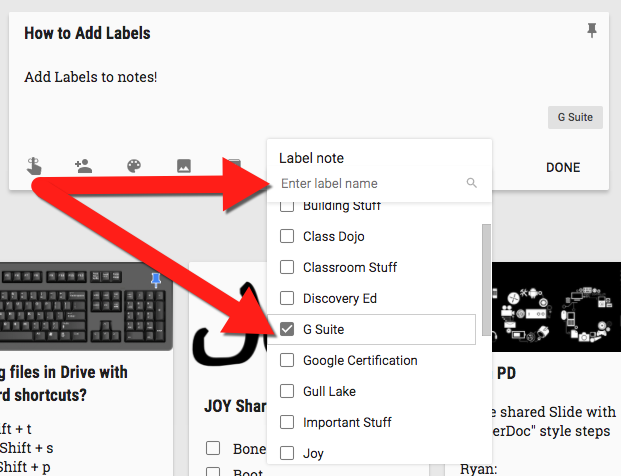
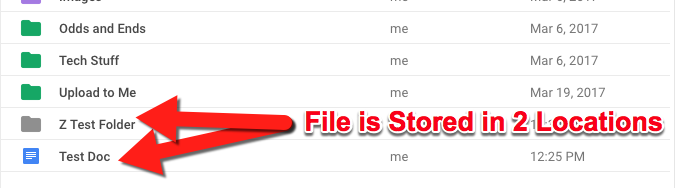
One of the awesome things Google Drive allows you to do is store files in multiple places. For a “How To” document on placing a Google Drive file into multiple locations click Here! Sometime a file needs to be in a “Tech” Folder as well as a specific “How To” Folder (or however your organization system works for you). I put files in multiple locations often as it makes organizing and finding these files easy for me. The trouble is if you ever want to remove a file from one of these folders you can accidently completely remove the file from your Drive. If you select the file and then click the trash car icon (Remove), you will not only remove it from the location you are removing it from, but it will also be removed from all the other locations you have it stored. Think of “Remove” as “I really want this file completely removed from my Drive no matter where it is organized”. But, fear not! There is a way to remove the file from selected locations easily! Follow the steps below to make sure you do not lose any of those files!


  1. Locate the file you want to remove from a location.


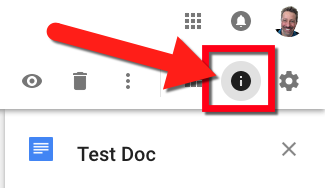
  1. Click on the file so it gets highlighted blue.


  1. Go to the top right of Drive and click on the “i” icon.
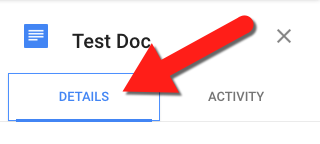


  1. Select “Details”.


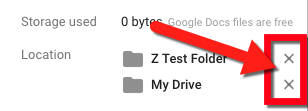
  1. The locations of the file will be listed below. Click the “X” next to any location you wish to remove.


Now you are all set and can remove files easily from unused locations without losing the file in the other folders! Give it a try and start organizing your Drive!


If you want these steps in a Document, click Here!


Friday, April 21, 2017

Hack to Change Site Font Color

Just a heads up...This does not seem to be working currently. The color does not seem to stick on other accounts or when you change pages. Not sure what happened, but hopefully this function will be working (or a true part of Sites) soon.

There was a worldwide celebration when the New Google Sites was announced. The old sites were archaic and difficult for younger students to manage. The New Sites promise easy, quick, and beautiful creations. I will admit that I really like the New Sites, but there are some things lacking. Some of the headliners missing that need adding are more style options. Embed codes, and font colors. Luckily, one of these is possible to do, although it is not a default Google setting but a “coding” process. Before you turn away because it sounds too difficult give it just a moment. This is pretty easy and quick, and even elementary school kiddos can do this. I know this because I learned how to do this from this 5th grader’s video. Kids rock, and so can you with font color changes in the New Google Sites.


  1. Open up a New Google Site.
  2. Highlight the text that you want to change the color and right click on the highlighted text.
  3. Click on “Inspect”.


  1. The page coding will appear on the bottom right side of your screen. In the bottom left dialogue box you will want to scroll down a little bit until you find the line that starts with the word “color”.


  1. Uncheck the box to the left of the word “color”.


  1. Now click the box after the word ‘color”. The color palette tool will open. Choose the color you want the text to be displayed.


  1. Close out of the coding box with the “X“ in the top right.


You are all done! You now have the ability to format text color with just a couple of click. If you change the site theme, this will be reset to the theme setting. This is an easy way to undo anything you didn’t like (just change the them and return to the one you had).


If you want these steps in a Document, click Here!

Tuesday, April 11, 2017

Get Creative with Google Auto Draw

Sometimes we just need to have some fun, and who is better at fun than Google? They have a whole list of yearly April Fools gags, create interactive and entertaining Doodles, and add themes to their tools (does anyone else desperately miss all the awesome Star Wars themes in Gmail & Maps?). Google also gives use some lesser known fun experiments. One of my new favorites is Auto Draw. I just stumbled on this and just had to share it. I will be honest, I am by no stretch of the word an artist. Please, my stick-people are even lop-sided. Google Auto Draw gives me the ability to create cool images by free drawing an object and choosing the “real artist” drawn image to replace it (all images are actually submitted by others...if you are talented you are able to submit your drawings for others to use!). Let me explain how all this magic happens below!


  1. Explore the tools on the left side:

Move images (using the select icon)
AutoDraw (Allows all the cool stuff this tool can do)
Free drawings (lines, squiggles, etc)
Text (add words to your image)
Fill (color in parts of your drawing)
Shapes (tool lets your not so perfect lines make symetrical shapes)
Change color (of lines or drawings)


Create a Cool and Amazing Drawing!
  1. I suggest using the “AutoDraw” icon to do a basic drawing of the object you want. Above the drawing Google will predict what you meant to draw and give you suggestions. Make sure to scroll over to see all the suggestions. When you click the image your sketch will change to the selected image.


  1. Choose the object that you want.
  2. Add more images to your pallette. Use the “Select” icon to move any drawing around or resize it.
  3. Change the color of the lines or fill in parts of the drawing with the “Fill” icon.
  4. When you are done with your creation you can click on the 3 lines in the top left and click “Download” the image as a PGN to use anywhere you like!


Head over to autodraw.com and start creating. The best part is that this works on the web as well as mobile! Go get creative and have some fun!

If you want these directions in a Document click Here!


Saturday, April 8, 2017

Organize Google Keep Notes with Images, Colors, and Labels


I have to admit it...I am a Google Keep addict! If you are not using Google Keep go here to get started. I use it for everything: notes, lists, saving text or web links, reminders (including location), or basically anything I just need to remember. Google Keep is easy to use, sharable, plays on all devices (web and mobile), and is connected to my Google account. I just love it. My only issue was that I had so many Notes they were often difficult to find when I needed them. I started with adding labels and then color coding my notes, and I now add images to the header of every note to find them quickly. Follow the steps below to start making your notes easier to find!


Add Labels:
  1. Log into your Google account and go to keep.google.com.
  2. Create a note or open one that you already have.
  3. Click the 3 dots icon on the bottom right of your note.
  4. Choose “Add Label” if it is a new Note or “Change Label” is it already has a label.


  1. Choose a label or create a new one (you can have multiple labels on any note).


  1. Click off the Note and a label has now been added. All created labels can be clicked to search quickly from on the left side of the screen.


  • Tip: I add any label that might apply to a Note to make finding it very easy.


Add Colors:
  1. Log into your Google account and go to keep.google.com.
  2. Create a note or open one that you already have.
  3. Hover on the palette icon on the bottom of your note and choose the color you want your Note to be.


  • Tip: I create a master Note for colors to remind me what the colors mean.


Add Images:
  1. Log into your Google account and go to keep.google.com.
  2. Create a note or open one that you already have.
  3. Click the image icon on the bottom of your note.


  1. Choose the image you want as your header from your device.
  2. Click “Done”.
  3. Now dig into your notes and you will see that image as a “quick identifier” for that note.


  • Tip: I suggest you use the same images for common notes. For example, anything that relates to my district specific notes (District lists, accounts, iPad info, etc..) I use the same image. Anything that is a G Suite note I use the same image for as well. In addition, I choose a color for the note to help be find them easily as well.


Now get organizing to find those important notes quickly! Once you get in the habit of adding labels, colors, and images finding the right Note is fast and easy!


For more Google Keep help check out the Help Site.

If you want these steps in a Document click Here!