Showing posts with label Audio. Show all posts

Wednesday, November 12, 2025

Sodaphonic: Record & Edit Audio


Sodaphonic
is a straightforward tool you can use to record and edit audio directly from your computer. It has all the basic editing features and some cool effects available…all for free! Check it out!


Record Audio:

  1. Head over to sodaphonic.com

  2. Click the “Get Started” button.


  1. Choose whether you want to edit an existing audio clip or record a new one.


  1. You will get a countdown. Create your audio clip, then click “Stop” to stop recording.


  1. You can download this file now if you want, or edit it if there are things you want to do to the file. To download, click “File” then “Export”.


  1. Name the file and click “Save” to choose where to save the audio clip.


Edit Audio:

  1. Once the audio is recorded, you will see the editing screen. 


  1. Options for Editing:

    • Cut: remove selected section

    • Copy: Copy the selected section

    • Delete: remove selected section

    • Paste: add in a copied section at the red line

    • Trim: use ONLY the chosen section, remove everything else 


  • Example: To cut a section, click and drag over the piece to highlight it in red. Then click “Edit” and choose “Cut”.


  1. Options for Effects:

    • Fade-in: have the audio get louder as it starts

    • Fade-out: have the audio get quieter as it ends

    • Chorus: change how the audio echoes and sounds to make it fuller

    • Compressor: reduce the difference between loud and quiet sounds

    • Louder: increase volume

    • Quieter: decrease volume

    • Silence: remove sounds from the section

    • Normalize: make the audio as loud as it can without distortion

    • Bleep it: add an audio beep over audio

    • Reverse: reverse the playback of this section

    • Faster: speed up the audio section (changes pitch=Alvin and the Chipmunks)

    • Slower: slow down the audio section (slow motion sound)

    • Time-stretch: change the time length without changing the pitch (no Alvin and the Chipmunks)


  • Example: To add an effect, highlight the section of audio, click “Effects” and choose the effect you want added.


Start recording and editing audio and add these to your resources, or have students create audio to add to their projects!


If you want these directions in a Document, click HERE!


Tuesday, November 30, 2021

Mote: Advanced Features

We all know that Mote is an awesome tool. If you are new to Mote, check out the “Mote Basics” document to get started. Below are some of the awesome additional features that Mote offers (some may require a subscription). 


Mote QR Codes

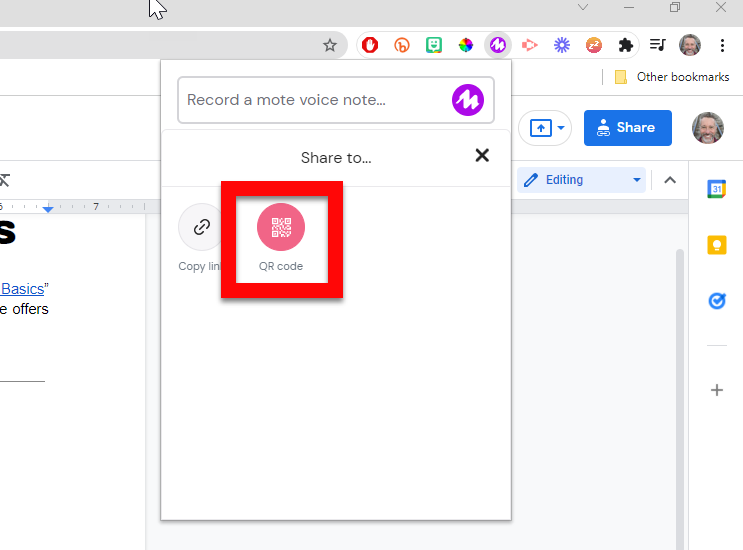
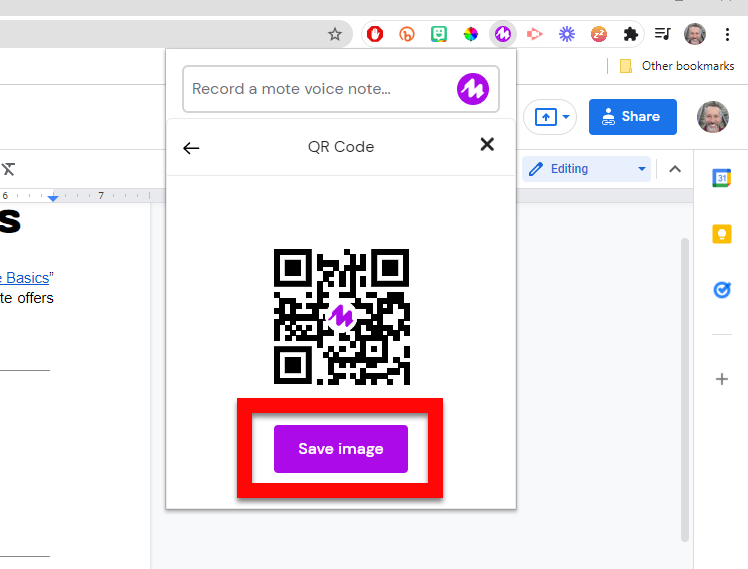
Create audio QR codes to Mote audio.

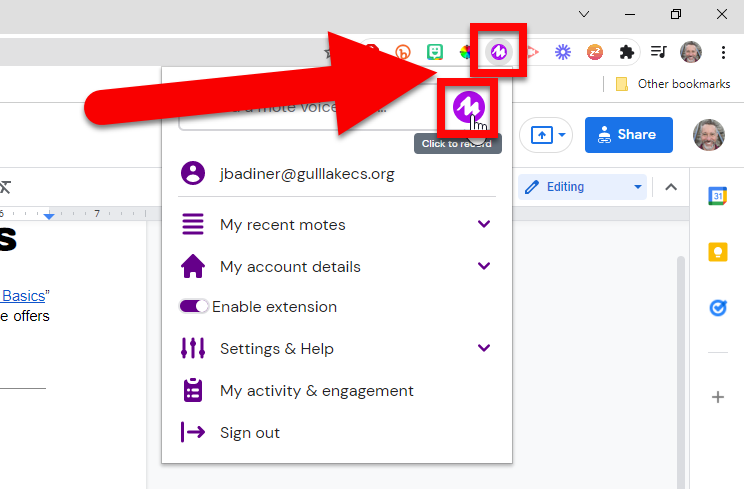
  1. Click on the Mote extension and click the Mote icon to record your audio.


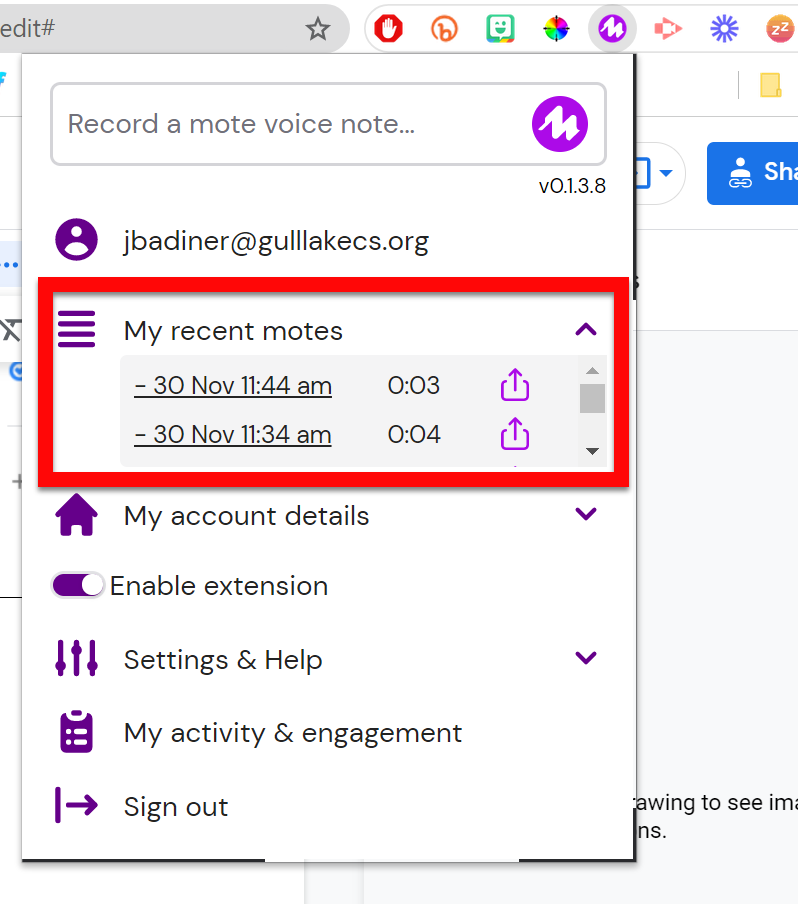
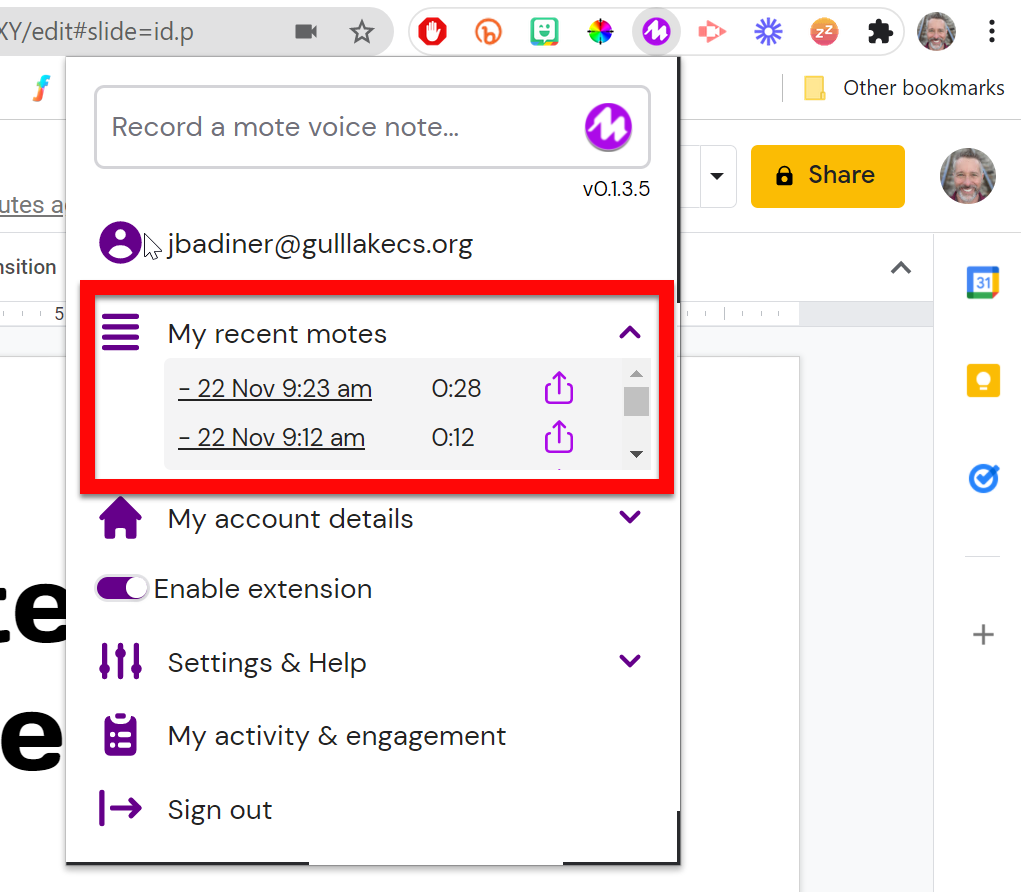
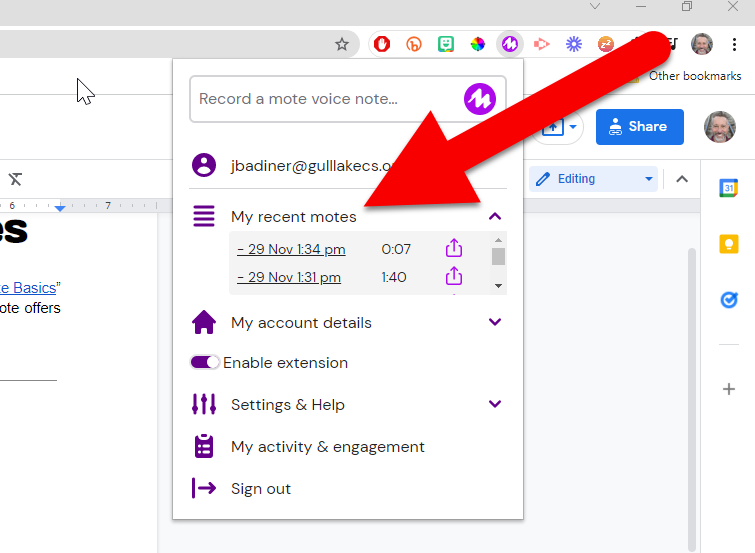
  1. Click on “My Recent Motes”.


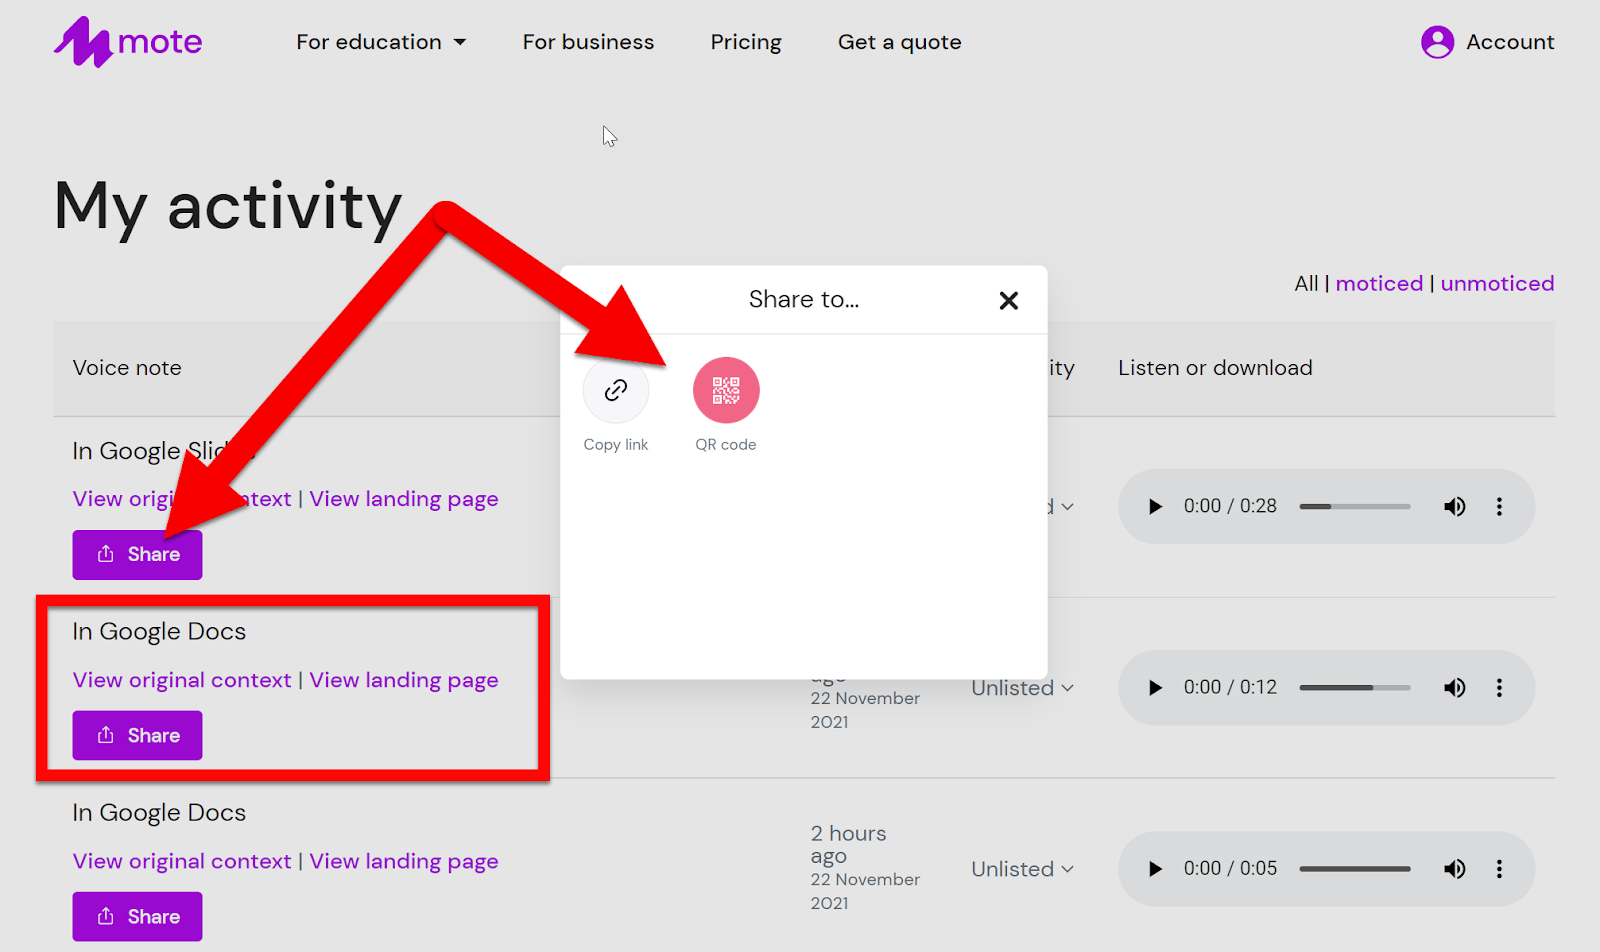
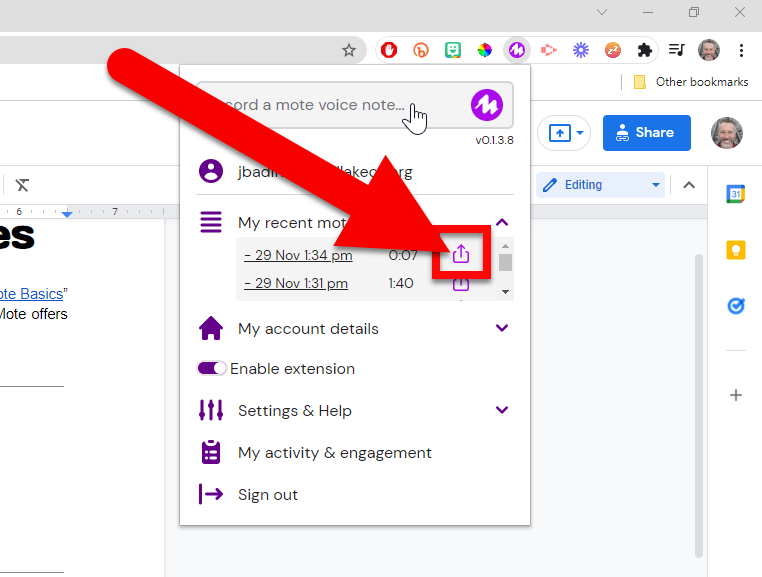
  1. Click the “Share” icon.


  1. Click “QR code”.


  1. Click “Save image”.


Check out this video to see this in action.


Mote in Gmail

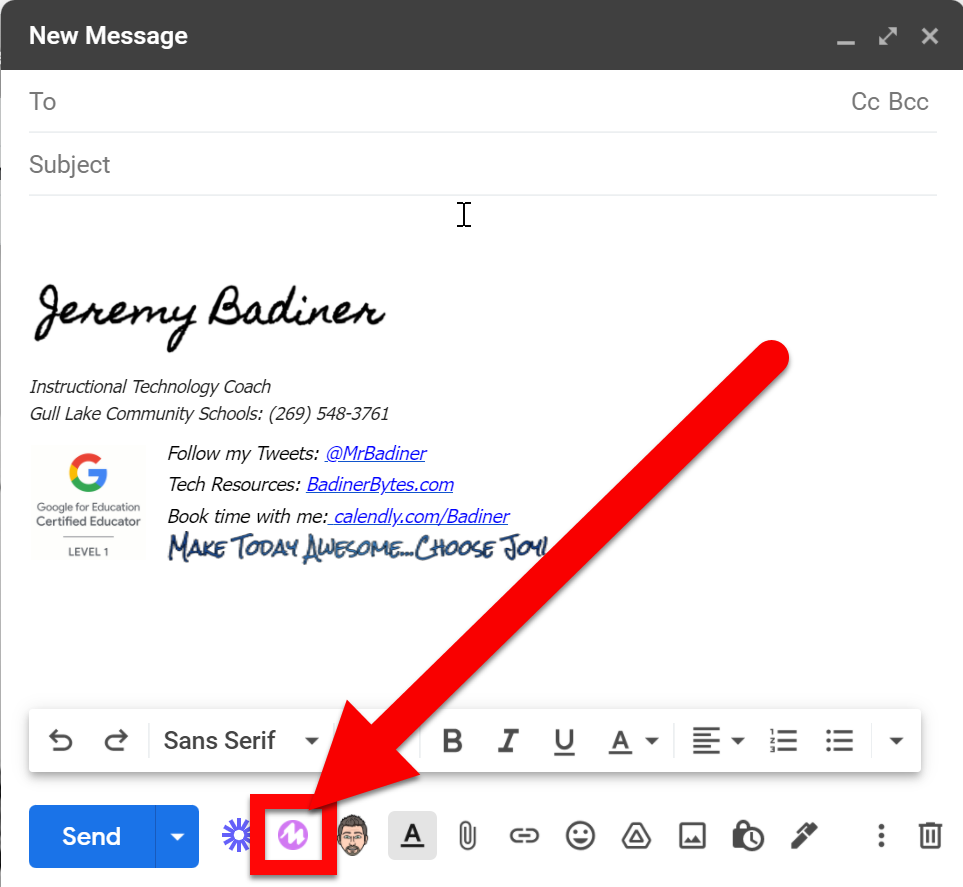
Want to send a quick Mote audio clip through Gmail? Here you go! 

  1. Open your Gmail and click Compose.

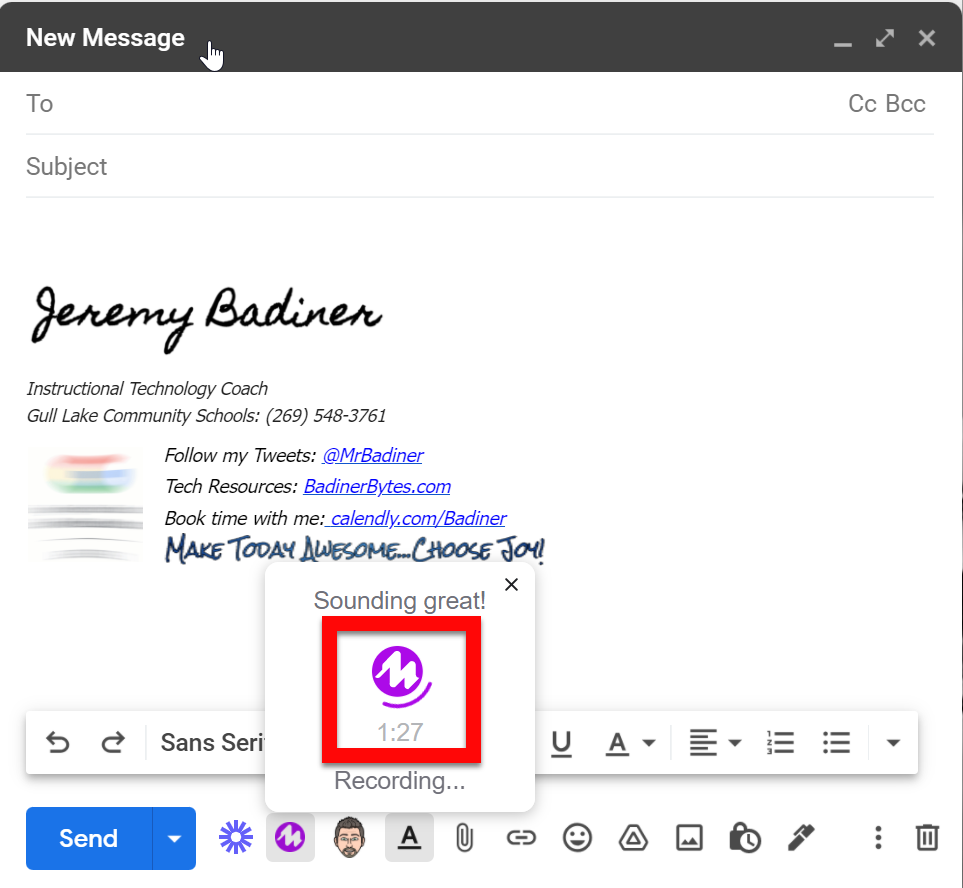
  2. Click the Mote icon at the bottom. It will start recording your audio.


  1. Click the center icon to stop.


  1. Your Mote will be embedded in your email for the recipient to hear.


Check out this video to see this in action.


Mote in Forms

Want to add your voice to your Google Forms? Check this out!

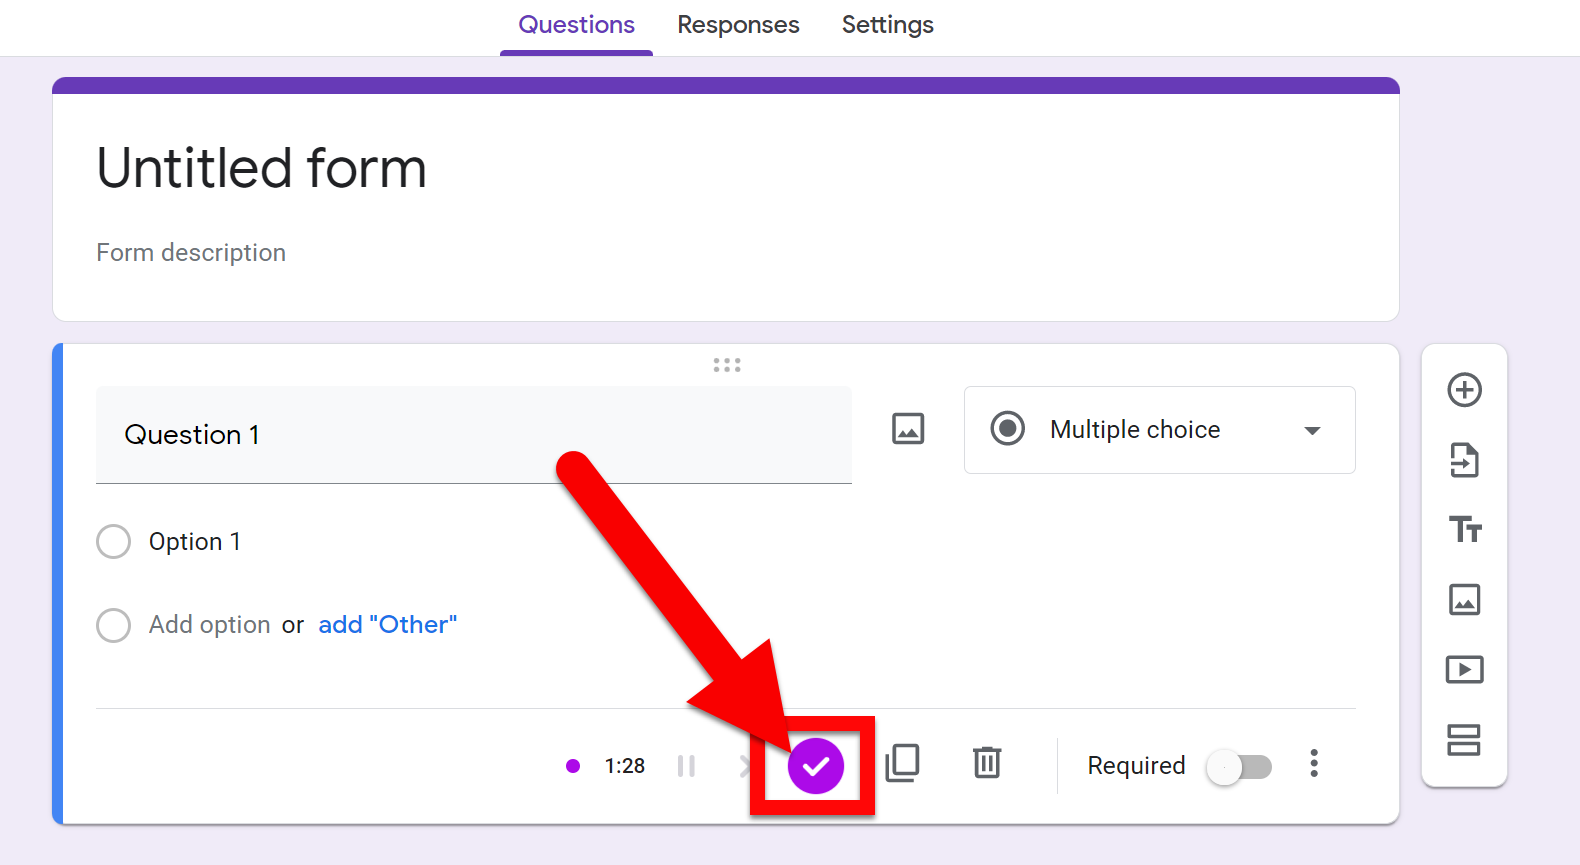
  1. Create a form. When you are in the question field click the Mote icon at the bottom of the editing box.


  1. Record your audio. Click the check icon to stop recording.


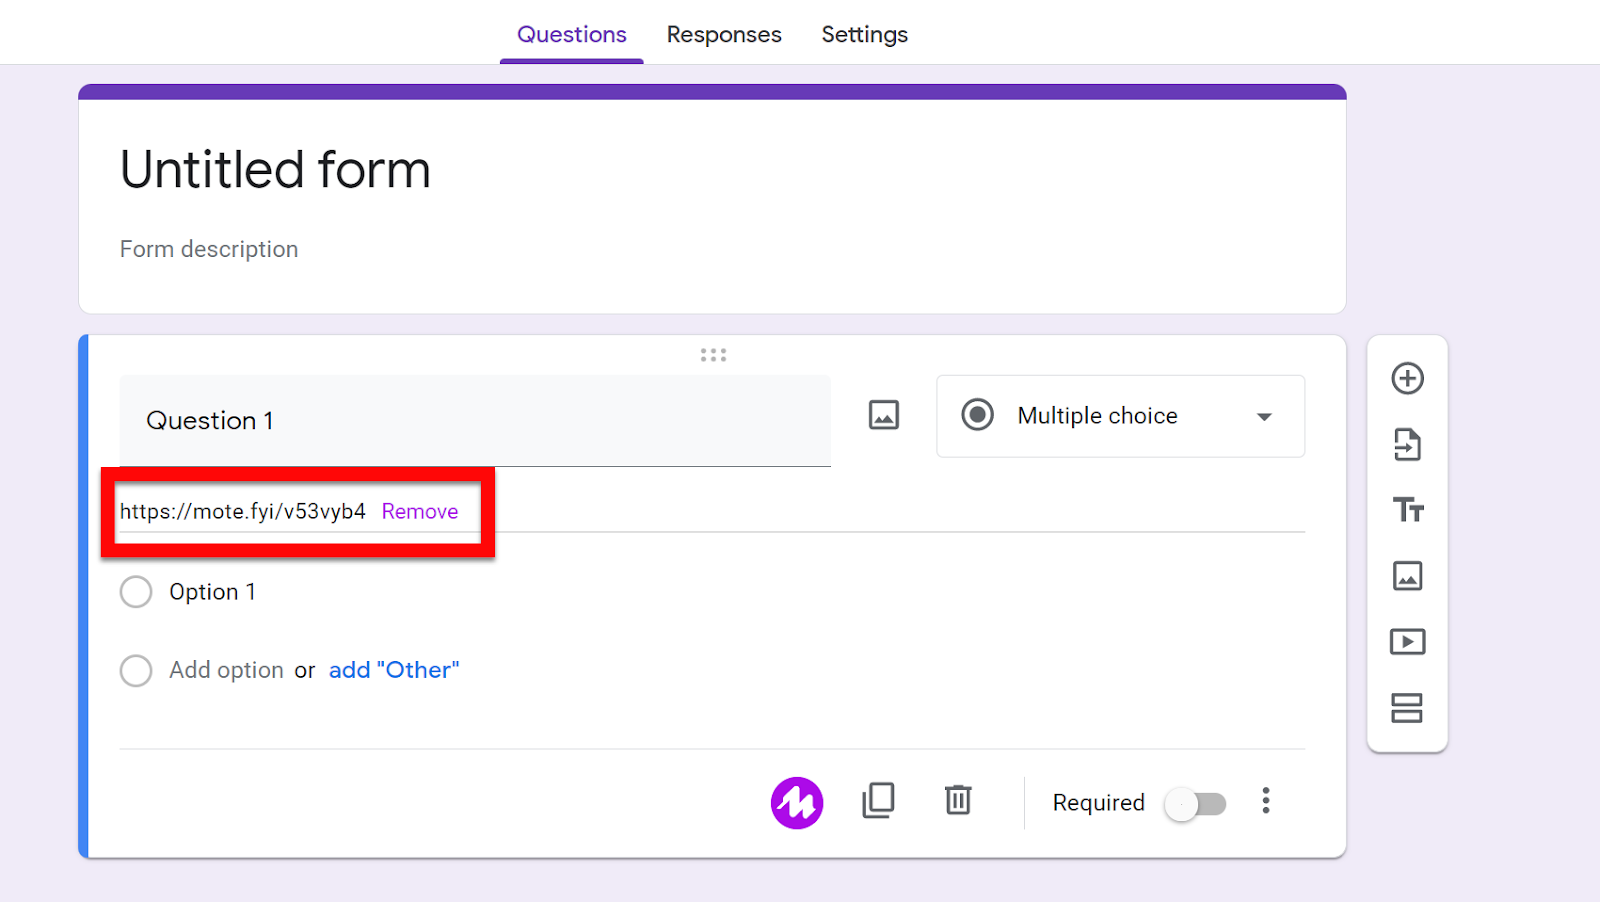
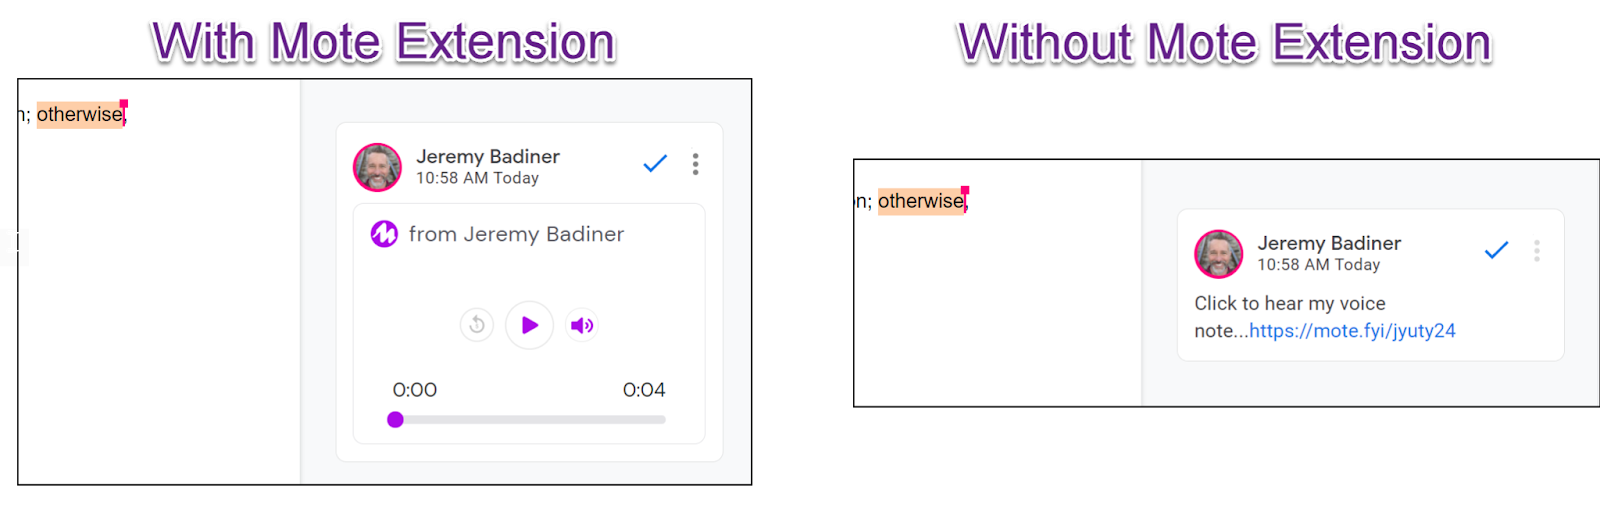
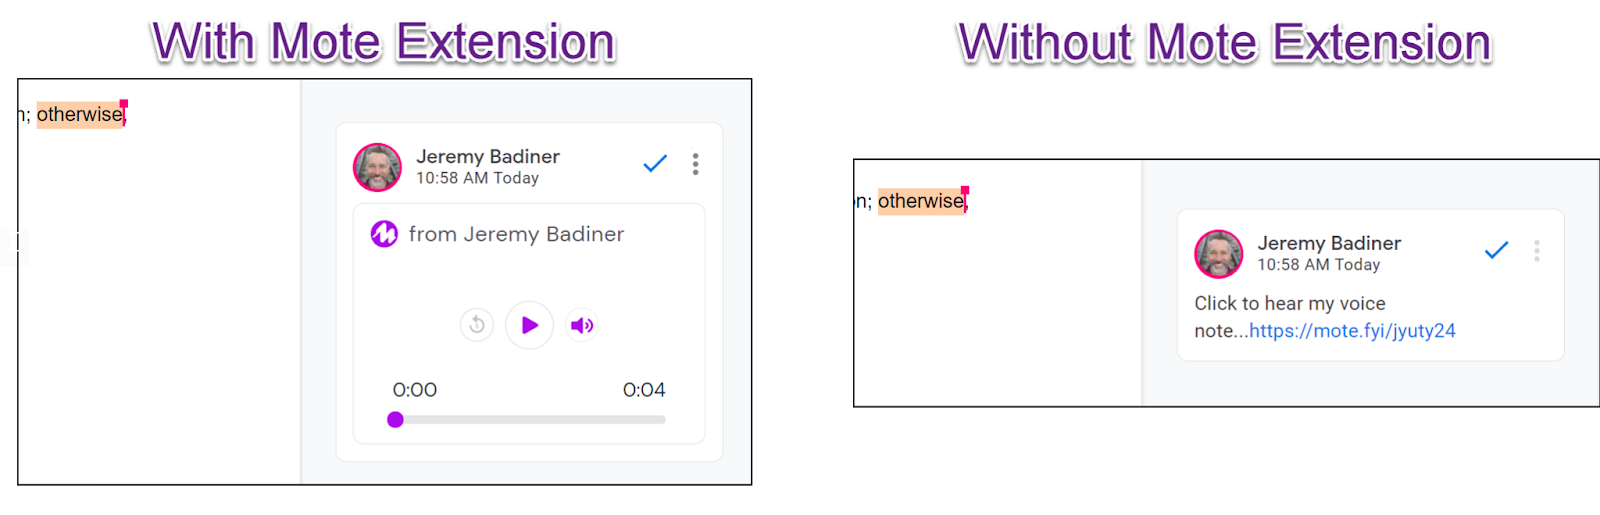
  1. The Mote audio is placed in the text box. (It will be viewable as an audio player if the recipient has the Mote extension installed, but only as a link if the reader does not have the extension installed.)


If you want to add audio to the choices (multiple choice type questions) you will need to follow these steps:

  1. Enter the choices into the form.

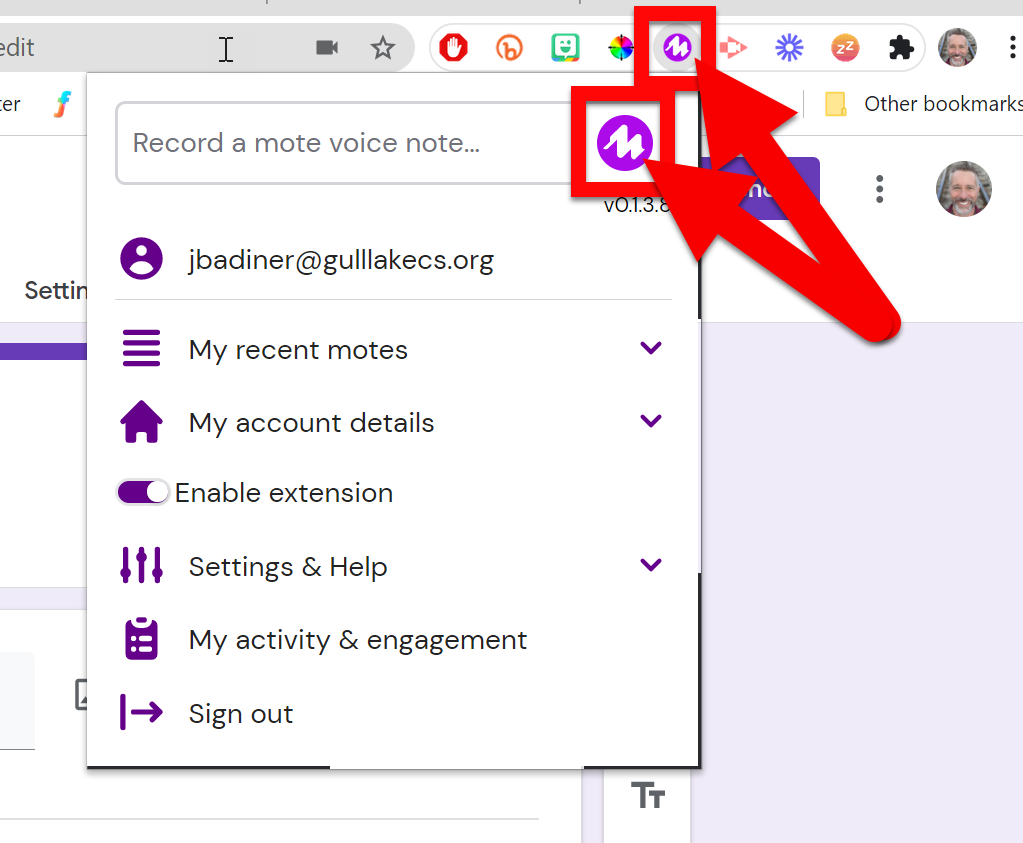
  2. Click the Mote extension icon in the top right of Chrome. Record a Mote. 


  1. Stop the recording by clicking the check and the link is auto-copied to your clipboard.


  1. Paste this next to the choice you want it added. 


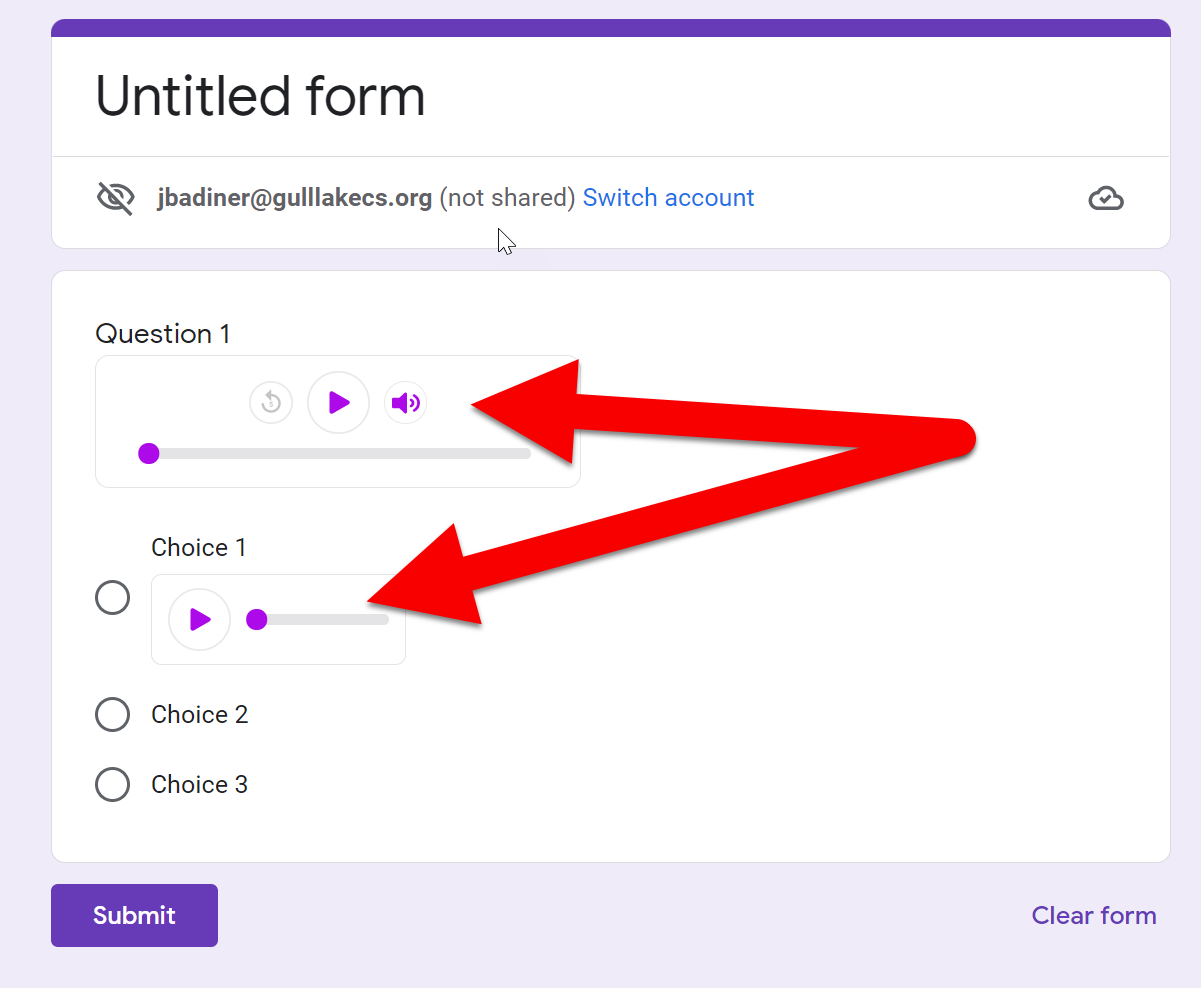
This is what the recipient sees (if they have the Mote extension installed):


Check out this video to see this in action (Mote Playlist).

Check out this video to see this in action (My Video).


Motes Saved in Motebook

If you plan to use the same audio clip multiple times it is helpful to set up a Motebook to have access to your often-used clips. You will need to create a new recording using the Mote extension.

  1. Click on the Mote extension and record an audio clip.


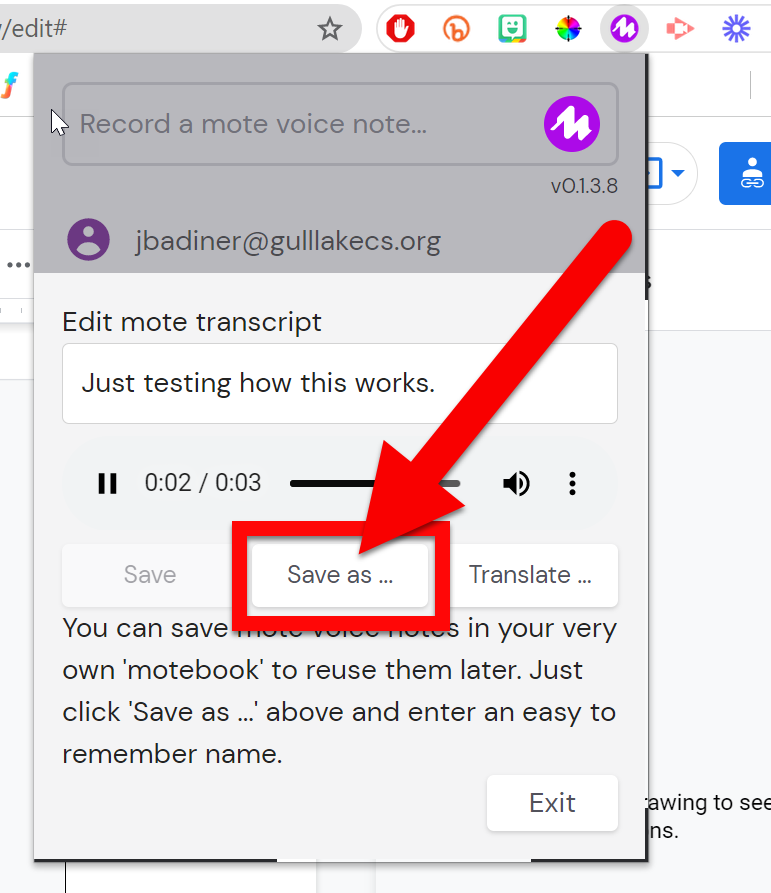
  1. After recording open the clip back up by clicking on it in “My recent motes”.


  1. Click “Save as…”.


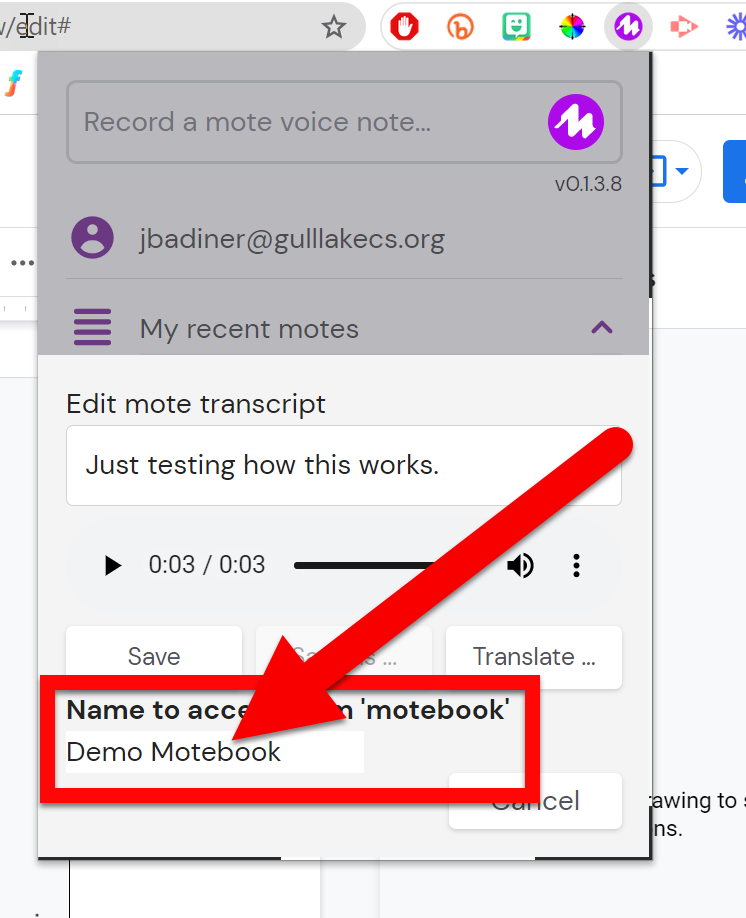
  1. Create a Motebook title (this is the tile for this audio clip). Hit “Enter” on your keyboard to save.


  1. When you go back to the Mote extension or icon in a comment long-press the record button and you will see a list of all your Motebooks. Click the one you want to use. 


Check out this video to see this in action.


Access All Your Recordings

Want to see (or hear) all your past recordings?  

  1. Go to mote.com and click Account>My Activity


  1. Click the Mote extension, then “My activity & engagement”.


  1. From here you will see all your recordings. You can share them, mark them unlisted/hidden/or delete them, view them on a landing page, and listen to them on this screen.


For more “how-Tos” and advanced features check out Mote’s YouTube Playlist Here!


*REMINDER: for the best experience, make sure students also have the Mote extension; otherwise, they will need to click a link and listen to the comment audio (in comments only) in a new tab. Google Slide’s audio will still play normally (no extension needed to hear it). 


If you want these directions in a Document click HERE!


Monday, November 22, 2021

Add Audio with Mote

The sound of your voice has power, especially with students. Being able to give feedback with our own voice carries more impact than just text. With tools like
Mote, you can add your voice to comments, Slides, Docs, Forms, and many other tools. Check out what Mote can do for you and your students!


Using Mote in Comments:

  1. Install the Mote Chrome Extension.

  2. Head to the tool you want to add an audio clip.

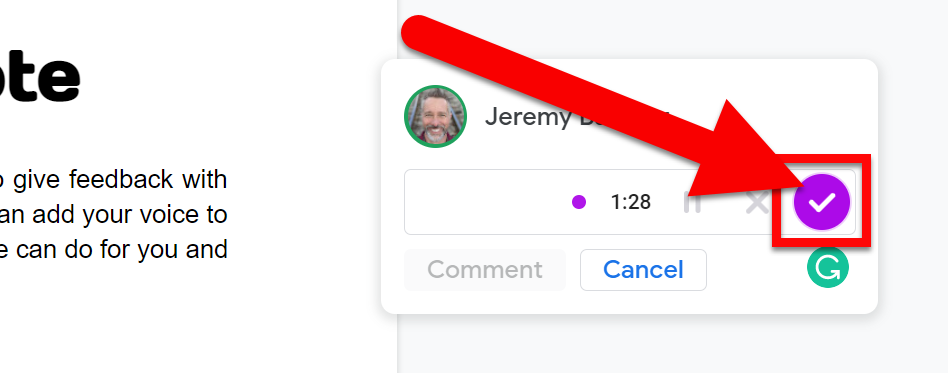
  3. Look for the Mote icon in a comment box and click that icon to record your comment.


  1. Click the purple check to stop recording.


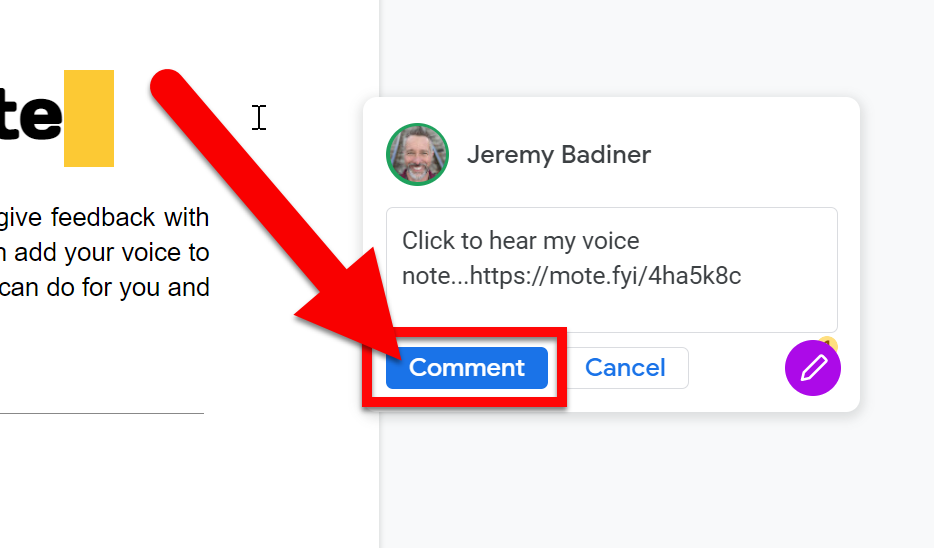
  1. Click “Comment” to complete.


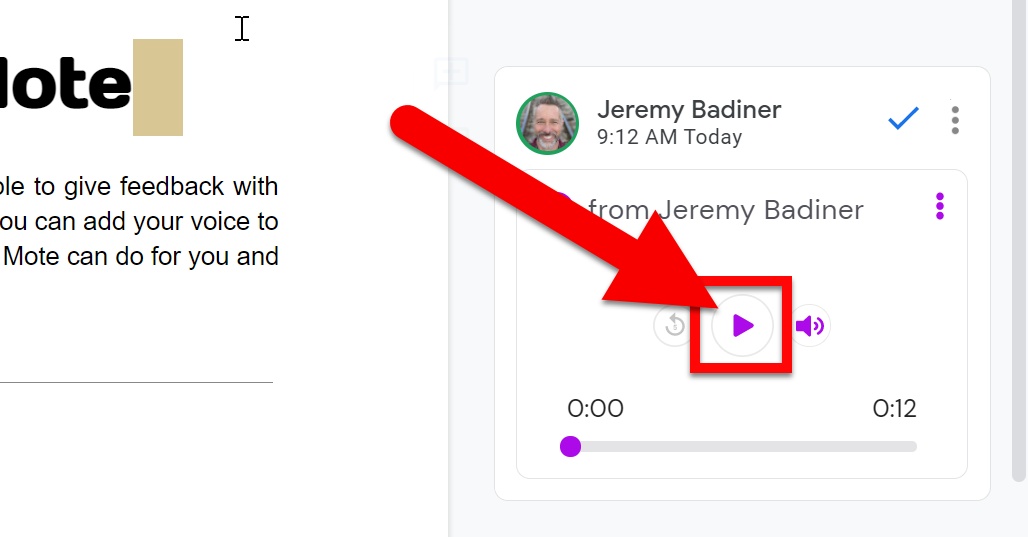
  1. Click the purple “Play” button to hear your audio.


Adding Audio to Google Slides:

  1. Open a Slide Deck. (Make sure to have the Mote Extension installed first.)

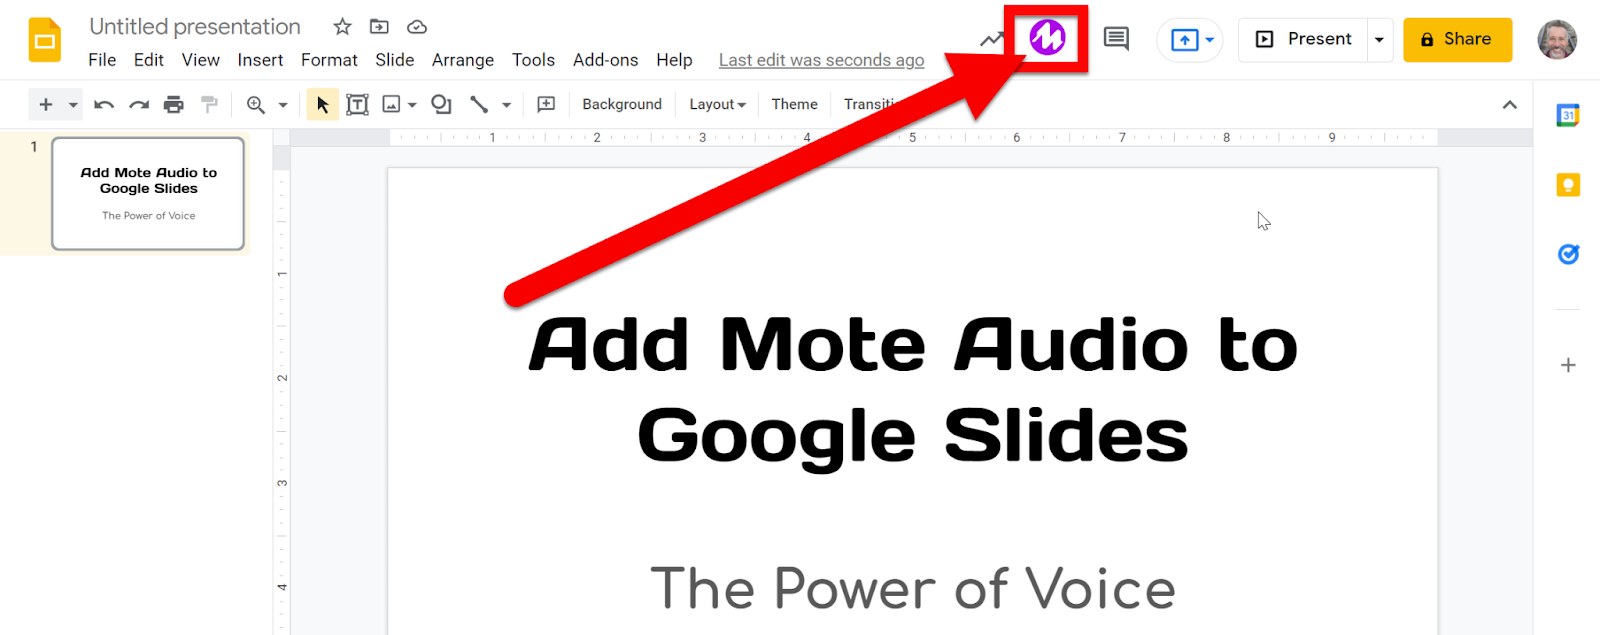
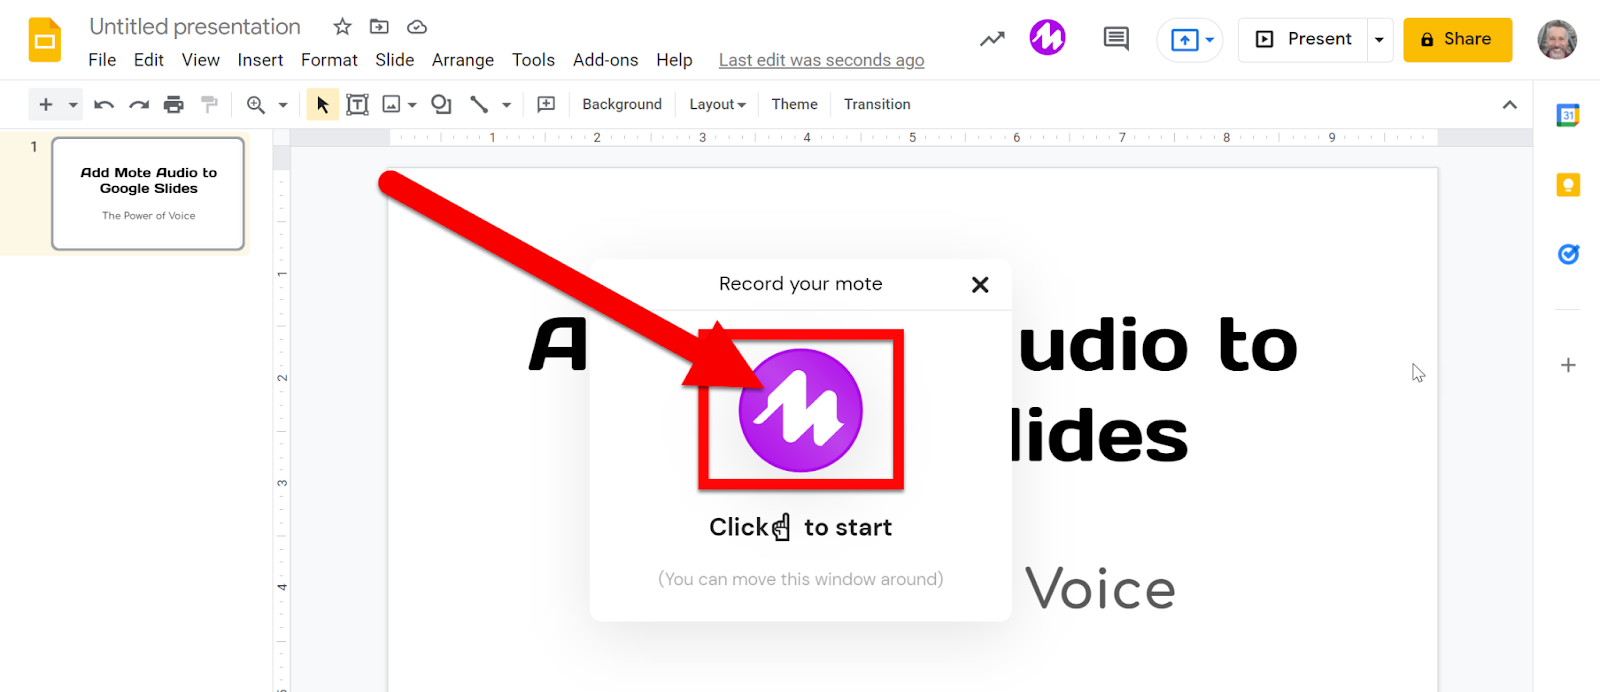
  2. You will see the Mote icon in the top right. Click on the icon.


  1. Click the “Click to Start” icon.


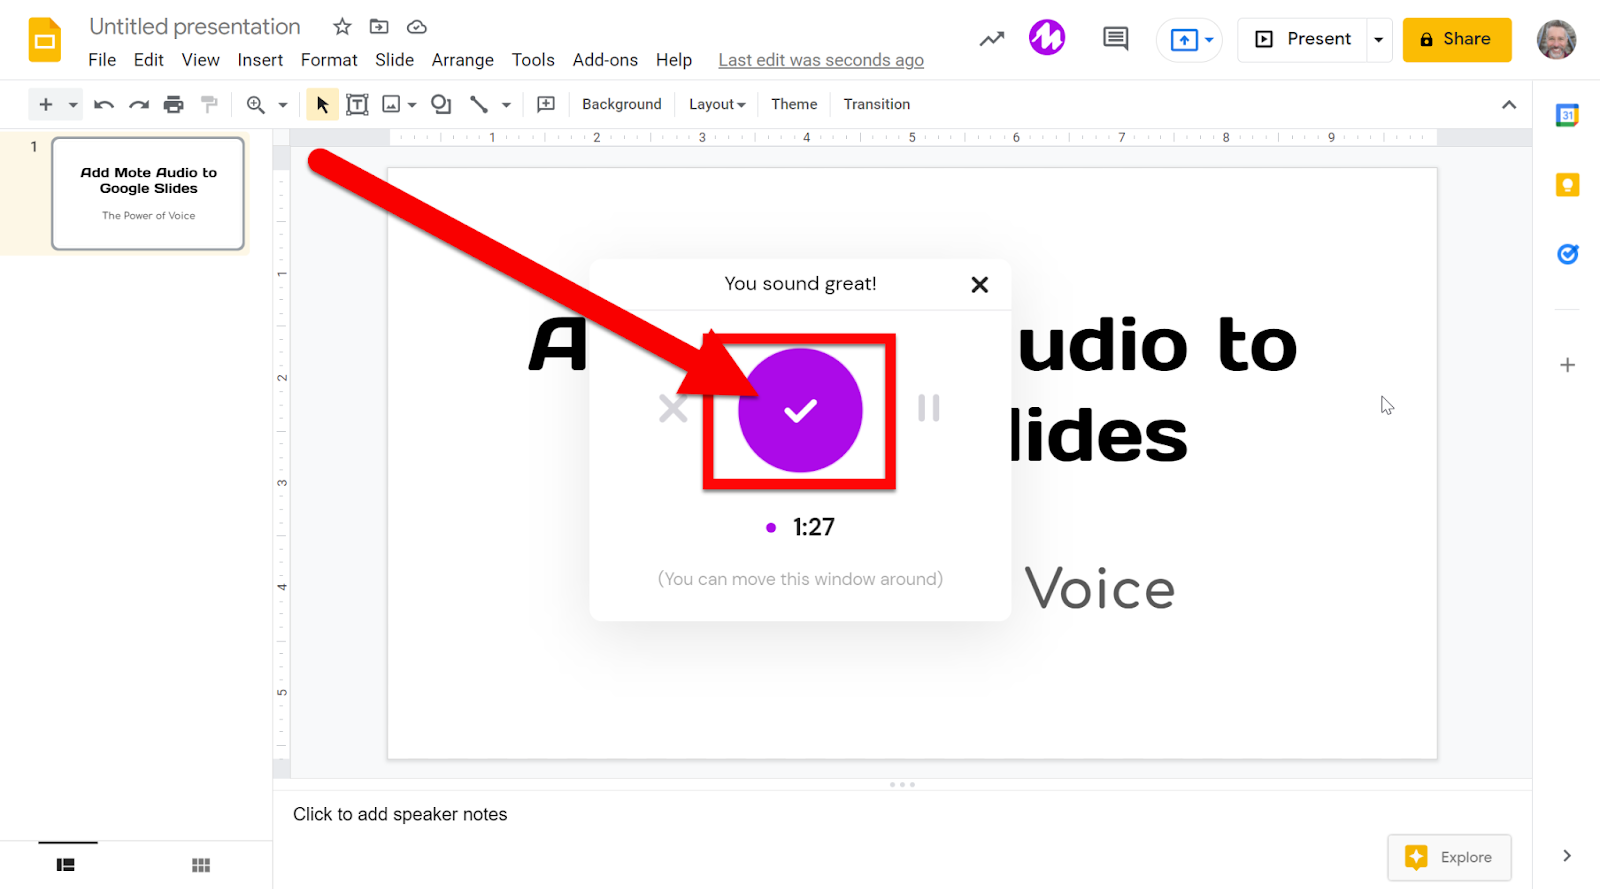
  1. Your audio is recording. Click the purple check to stop recording.


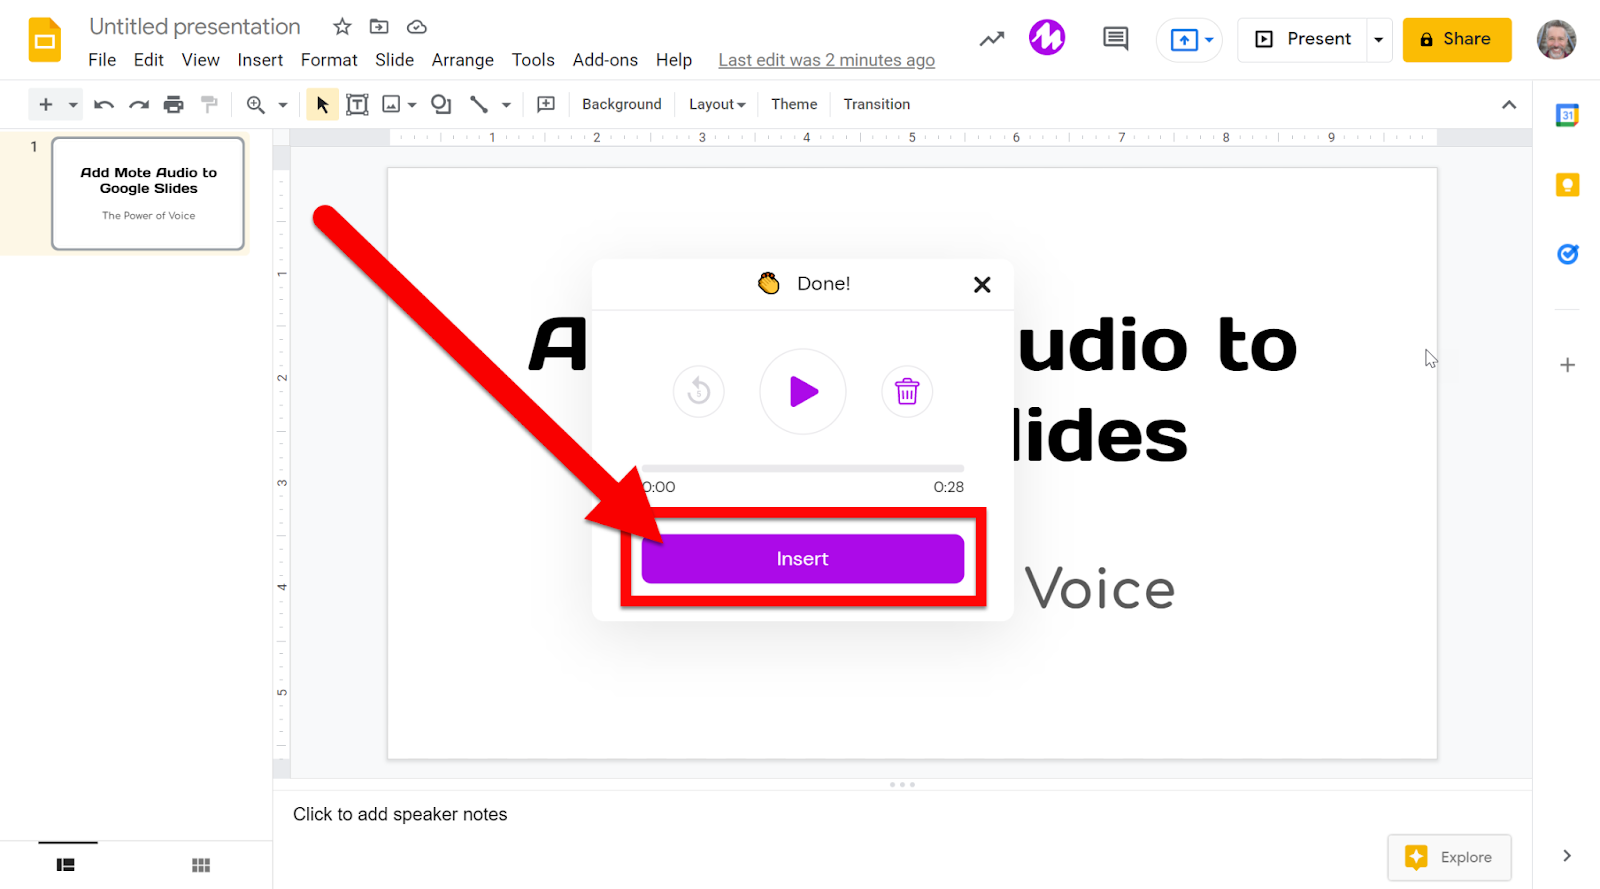
  1. Click the “Insert” button to add this audio to your slide.


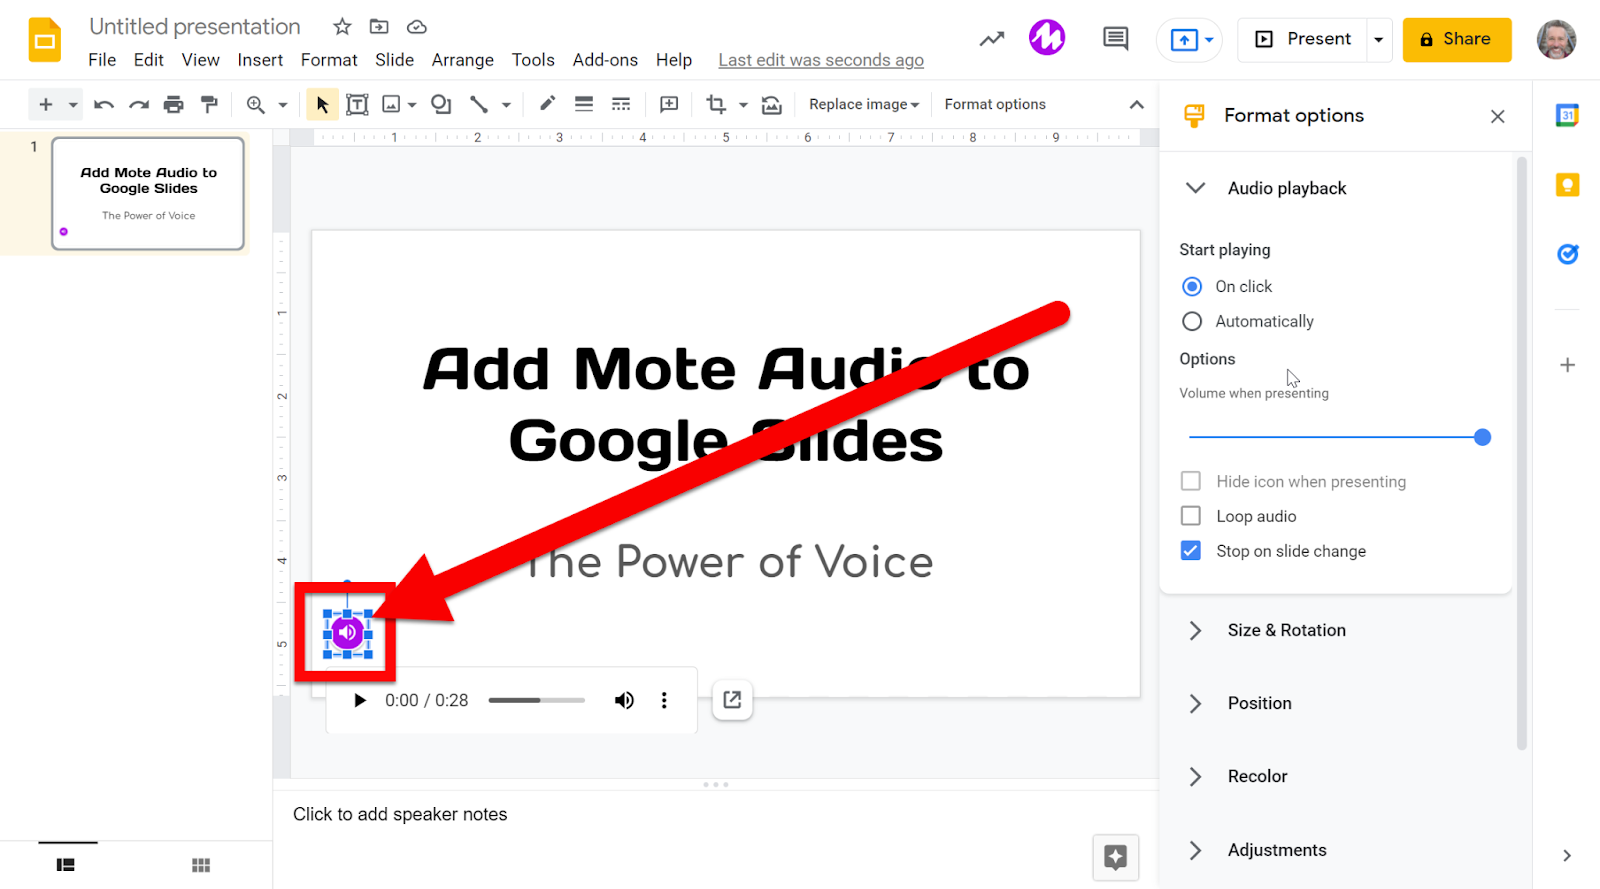
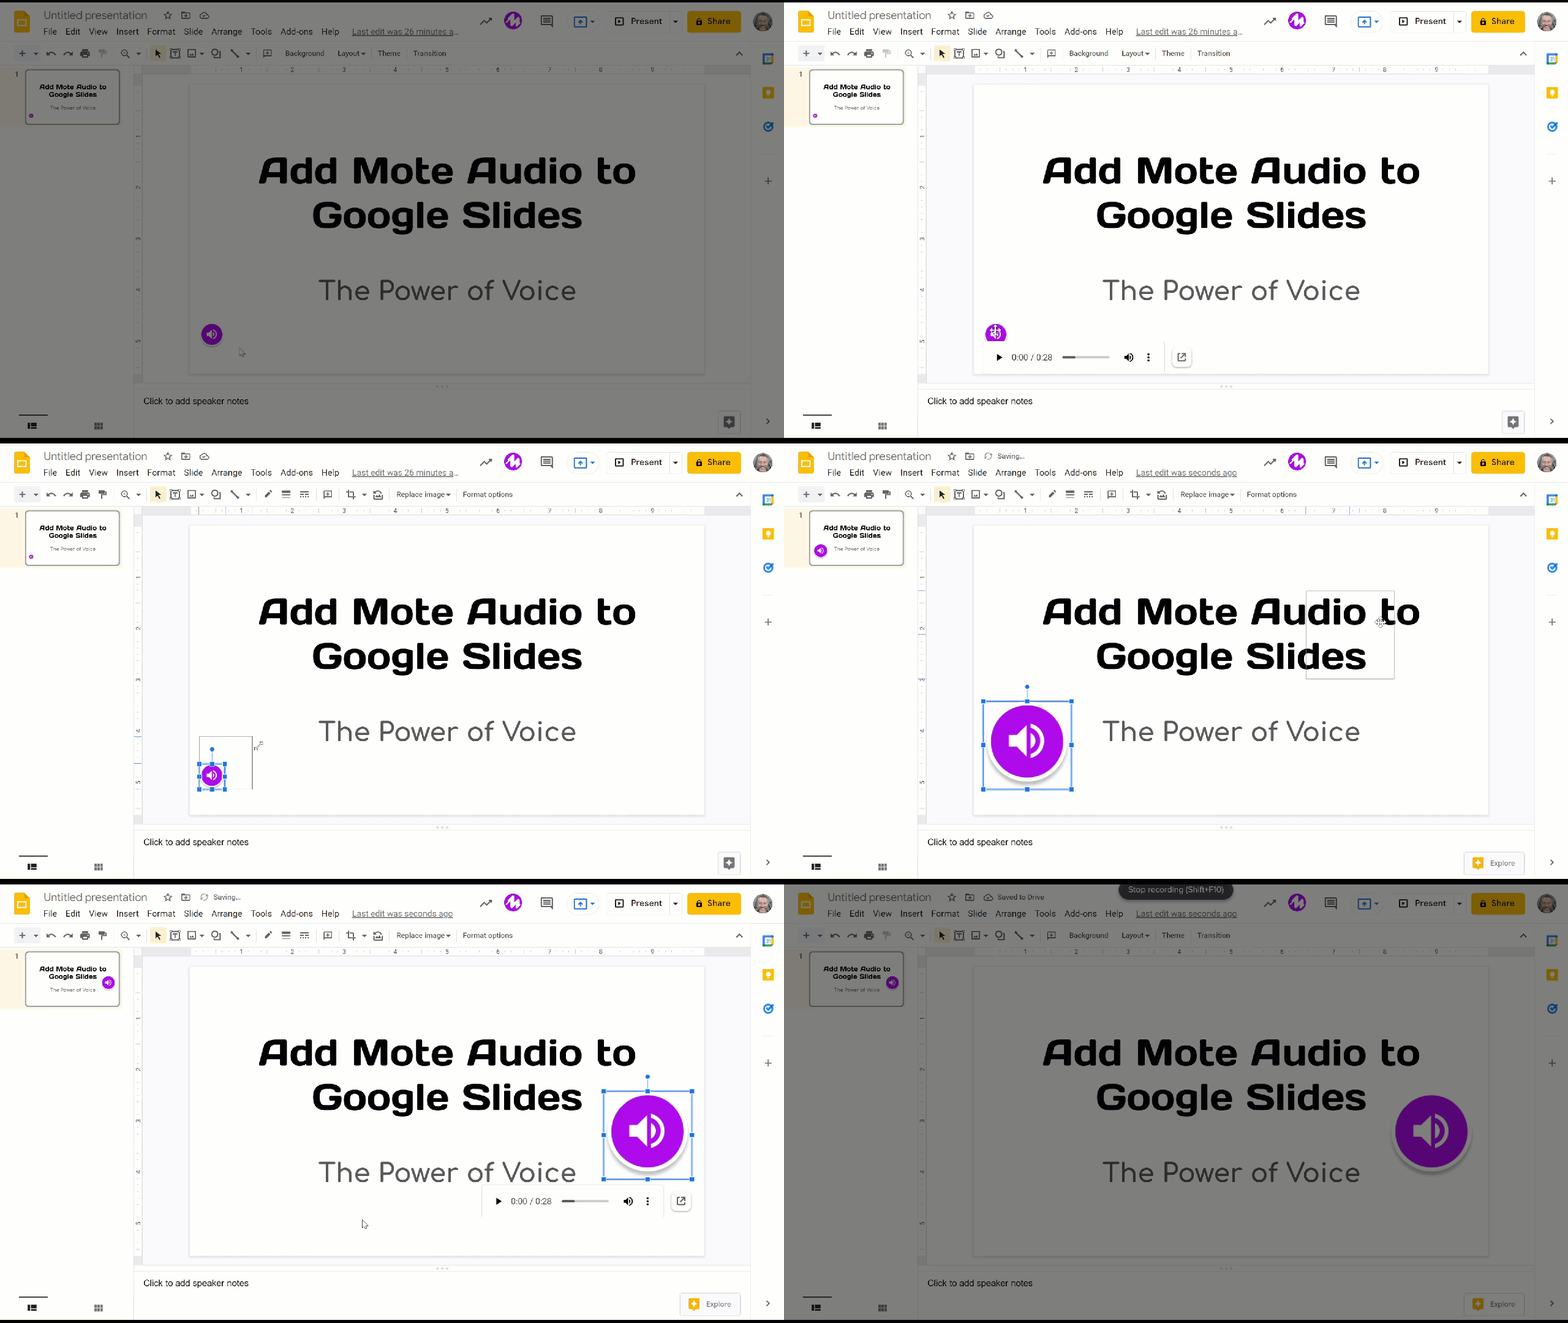
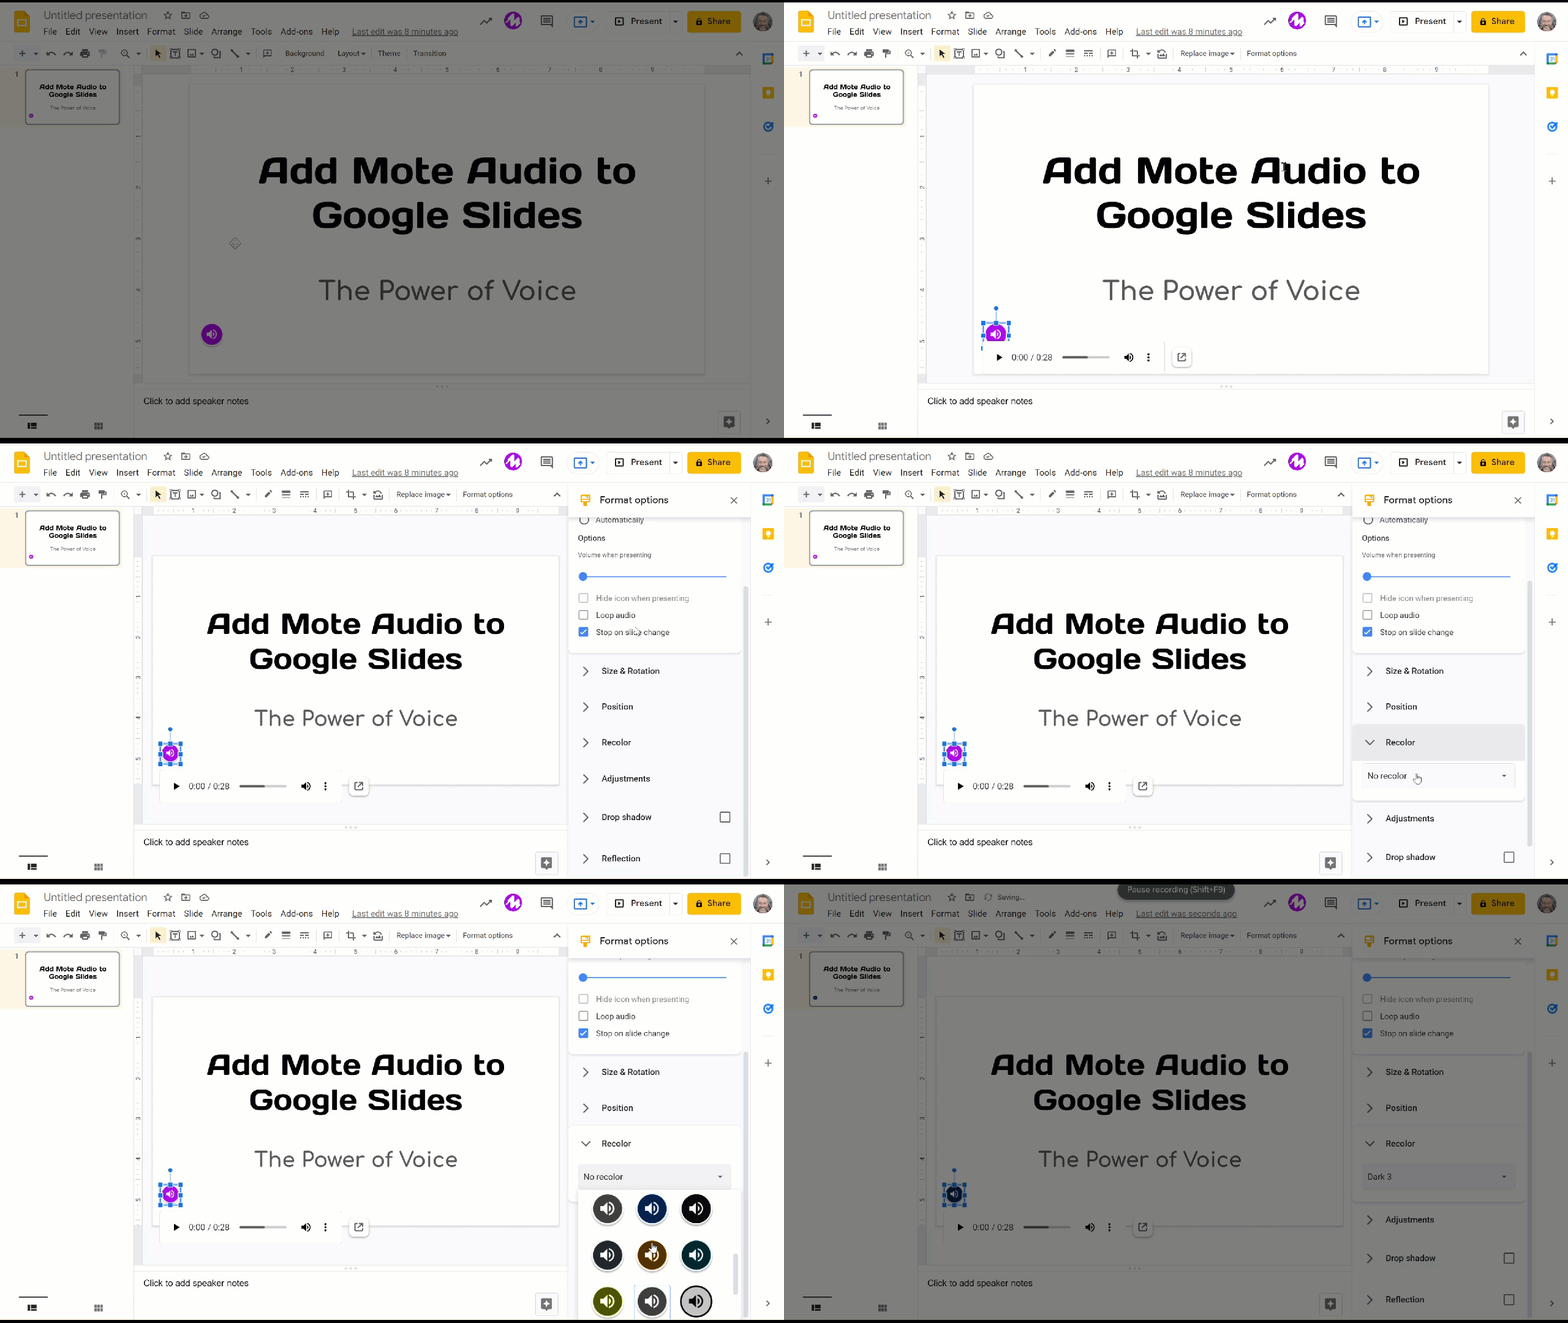
  1. You will see the Mote icon appear on your screen (you can drag this anywhere you want it) as well as the Slide’s audio option on the right. Set them to whatever you need.


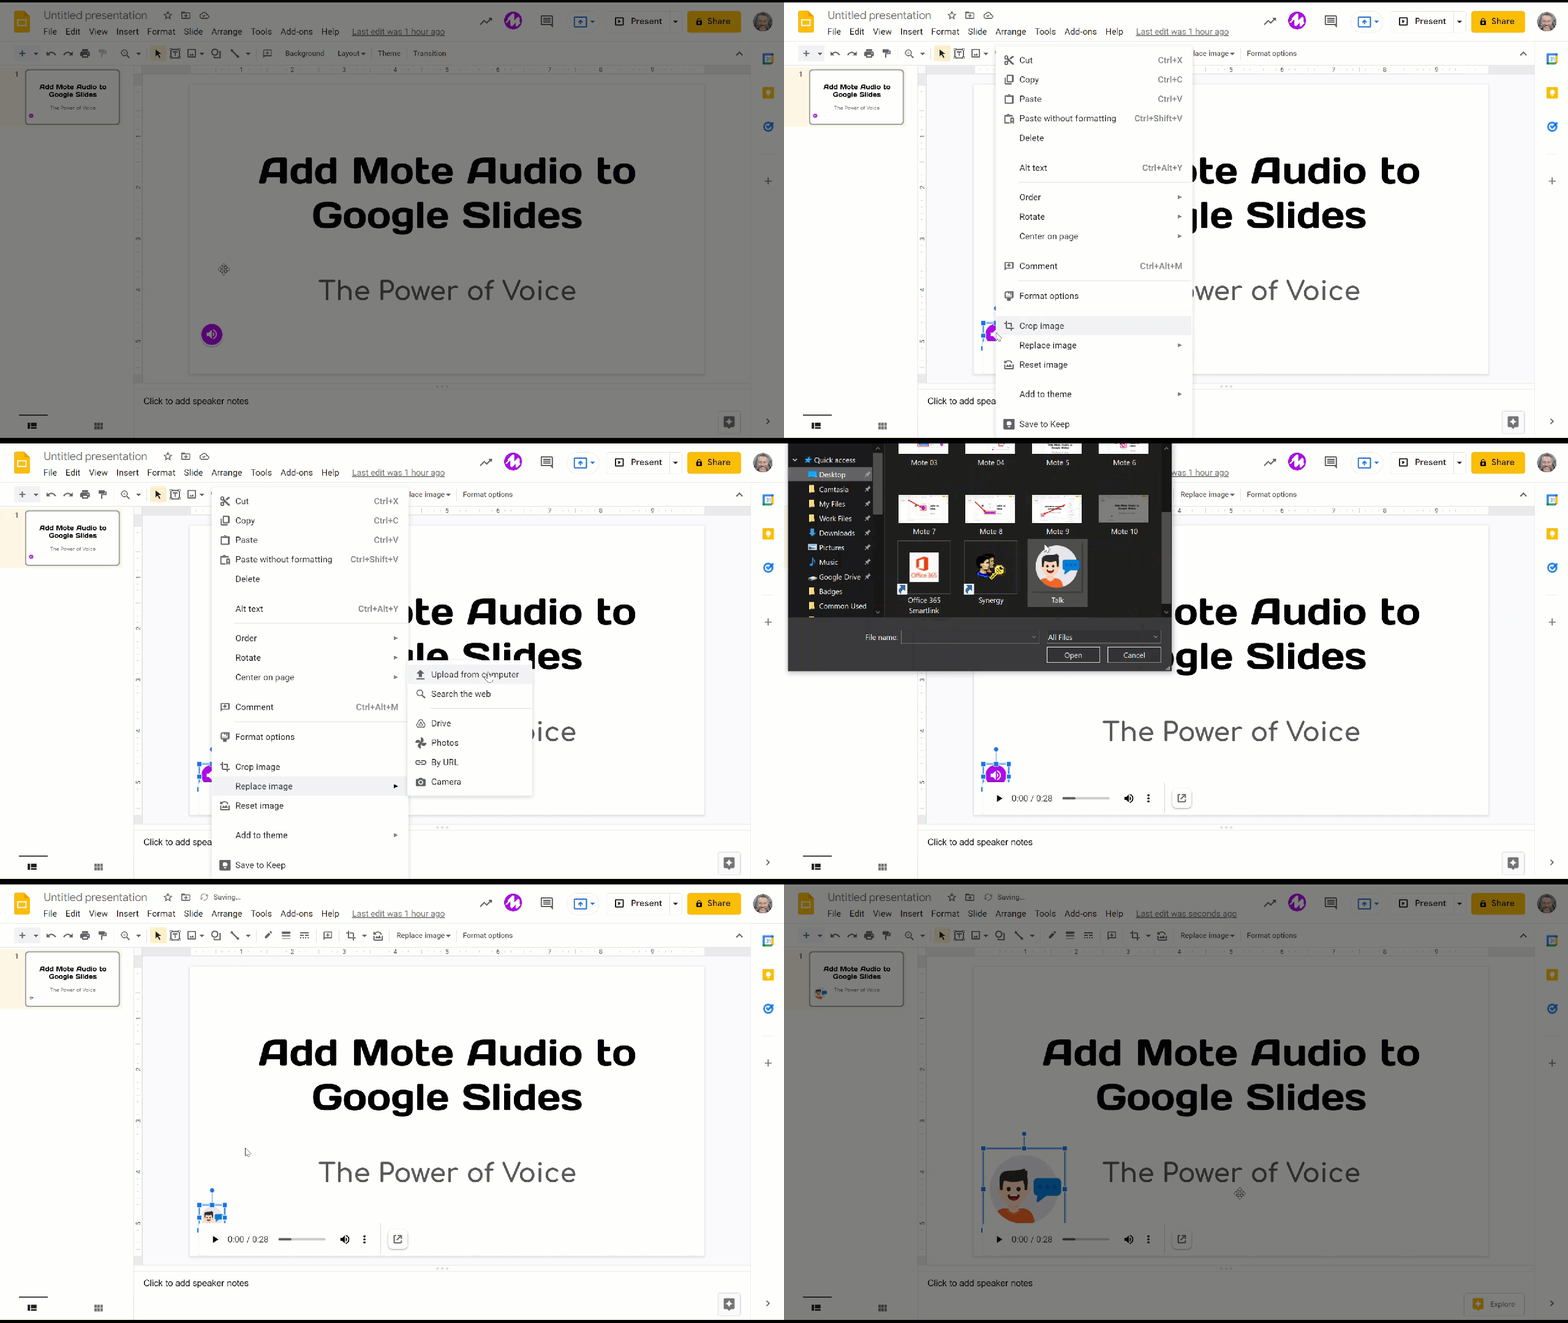
  1. You can resize, recolor, or replace the Mote icon with anything.

    • Resize Icon: Click and drag the corner of the icon


  • Recolor Icon: Click the Icon>Format Options>Recolor  


  • Replace Icon: Right-Click the icon>Replace Image>Choose File from Location


Accessing All Created Motes:

Want to see (or hear) all your created Mote audio clips? 

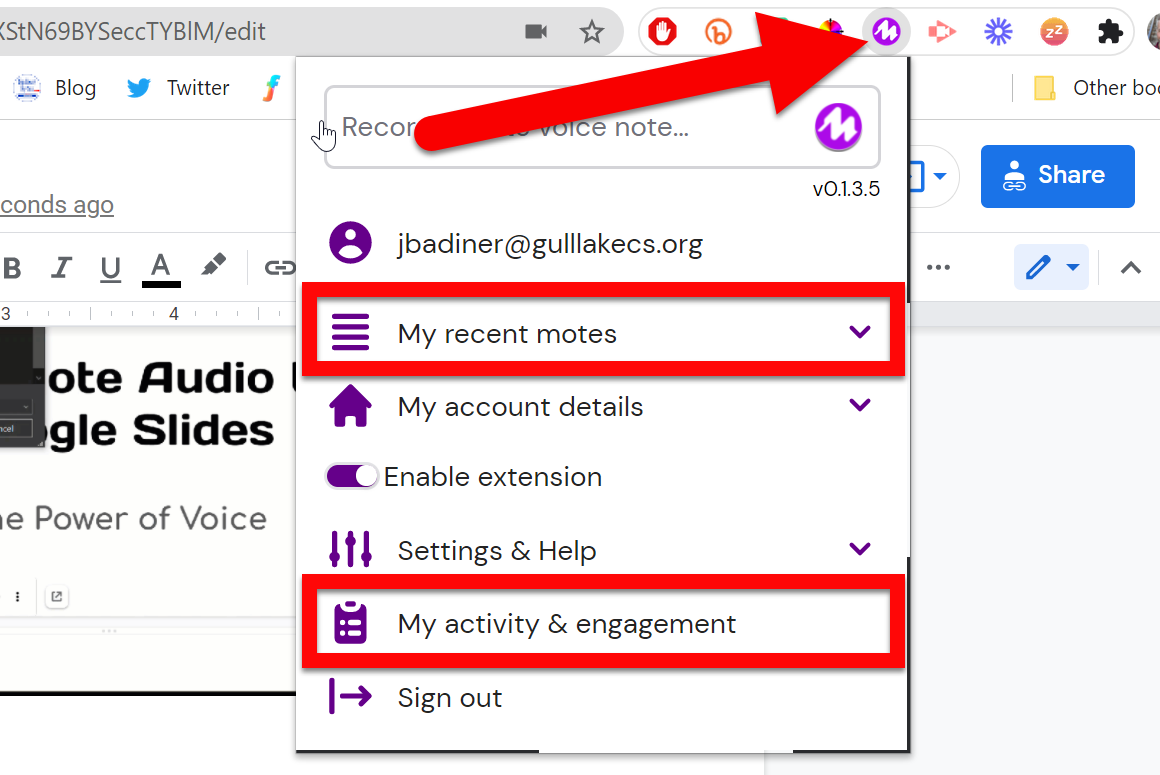
  1. Click on the Mote Extension and click:


  • My Recent”: to see recent Mote recordings


  • My Activity & Engagement”: to see all and details of each recording.


Experience the power of your voice! Give Mote a try!


*Note: for the best experience, make sure students also have the Mote extension; otherwise, they will need to click a link and listen to the comment audio (in comments only) in a new tab. Google Slide’s audio will still play normally (no extension needed to hear it). 


If you want these directions in a document click HERE!